
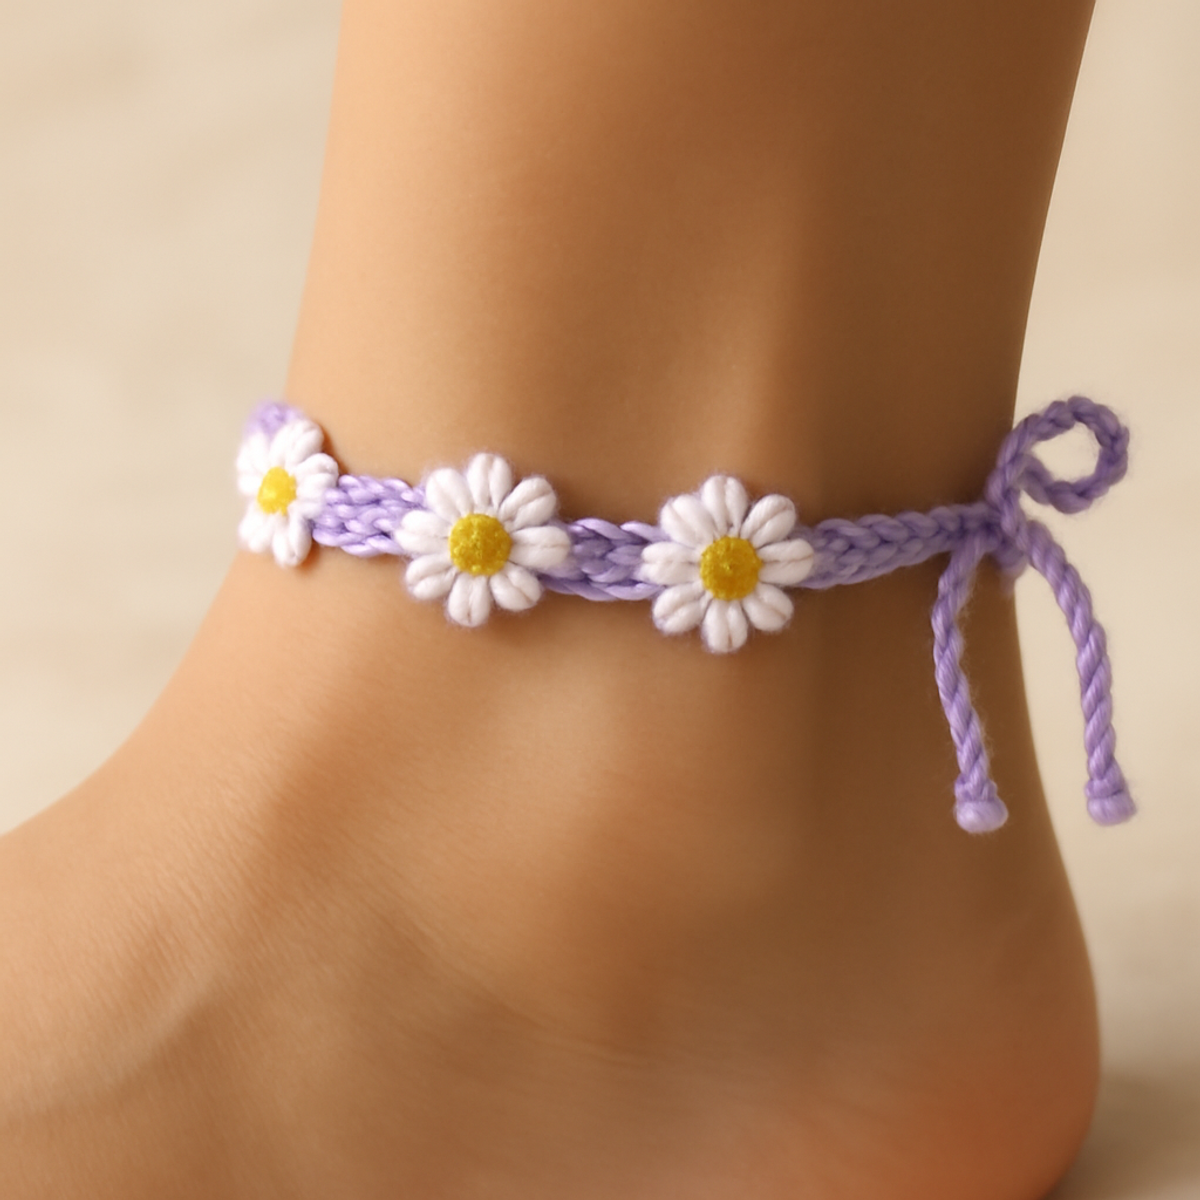
As I sat in my sunny corner, hook in hand, envisioning the perfect summer accessory, the idea of a crochet anklet danced into my mind. This "Daisy Dream Crochet Anklet" is not only a fun project, but it’s also delightfully easy, making it ideal for beginners eager to fill their summer with handmade charm. What’s even better? You have the freedom to customize this anklet with your favorite colors and embellishments, turning a basic design into a personal statement piece. Plus, there's a satisfying joy in crafting something that feels light and breezy—perfect for those sun-soaked days. So, let’s dive into this charming pattern and bring a touch of floral whimsy to your summer wardrobe!
Daisy Dream Crochet Anklet Materials & Tools
- Light Worsted Weight Yarn – Approximately 50 yards in pastel purple, perfect for a summery vibe.
- 2.0 to 2.5 mm (B/C) Crochet Hook – Use this size for a tight yet flexible fabric, suitable for your crochet anklet.
- Scissors – Keep handy for snipping yarn ends as you complete your project.
- Tapestry Needle – Essential for weaving in ends neatly, ensuring a polished finish.
- Decorative Beads (Optional) – Add some flair to your anklet, allowing for customization in design and aesthetic.
Why Make a Crochet Anklet?
Beginner-Friendly: This crochet anklet is designed with novices in mind, allowing for an enjoyable and simple crafting experience. Quick Satisfaction: Whip up this project in no time, making it the perfect last-minute accessory for summer outings. Whimsical Aesthetic: Adorned with charming daisies, this anklet brings a touch of playfulness to any outfit. Customizable Fun: Choose from a variety of colors and embellishments to create a unique piece that reflects your style. Comfortable Fit: The lightweight and breathable fabric ensures this anklet won’t weigh you down, making it a delightful wear all season long.
Gauge & Sizing Notes
Don't skip the gauge swatch! Checking your tension is essential for creating the perfect "Daisy Dream Crochet Anklet." Ensuring your crochet gauge is accurate can make a significant difference in the fit and overall appearance of your anklet. A common guideline to follow is aiming for approximately 4×4 inches (10×10 cm) with 14 single crochets by 8 rows. To adjust the size for your anklet, simply modify your foundation chain in multiples of 4, plus 1, depending on how snug or loose you want the anklet to fit. If you find that your swatch is too small, don't worry—just go up a hook size, and you'll be on your way to a delightful fit!
Step-by-Step Pattern for Daisy Dream Crochet Anklet
Row 1: Foundation Chain
Start with a slip knot and chain 45 to 60 stitches, depending on your ankle size. This initial chain will form the base of your crochet anklet. Make sure your chain is comfortably loose, as it should fit easily around your ankle without constricting, preparing you for the next row.
Row 2: Single Crochet Row
Turn your work and insert the hook into the second chain from the hook. Yarn over and pull through, making a single crochet (sc) stitch. Continue this process across your foundation chain to create a row of single crochets. By the end, you should have a solid row adding texture and stability (44–59 sc).
Row 3: Daisy Flower Base
To begin the daisy flowers, chain 3. Next, slip stitch (sl st) into the same stitch to form the center of the flower. Repeat this process five times in the same stitch to create the daisy petals. Your work should begin to resemble a small flower in the center of your anklet design.
Row 4: First Daisy Complete
Now, skip a stitch in the single crochet row and repeat the daisy flower process by chaining 3 and forming a flower with 5 petals through slip stitches. This creates a playful floral element on your anklet. Aim for an even spacing between your daisies, giving the anklet a lovely, scattered design.
Row 5: Continue Daisies
Continue adding daisies throughout the anklet. Be sure to skip one stitch before starting the next flower. Repeat the prior steps until you reach the end of the row or your desired number of daisies. Each flower should add a cheerful touch to your crochet anklet, resulting in a charming pattern.
Row 6: Finishing Loops
Once all your daisies are completed, it's time to create the tie loops. Chain an additional length of yarn (about 15–20 chains) to make your adjustable loops. This will ensure that your crochet anklet fits comfortably on your ankle, allowing for a modified size if necessary.
Row 7: Completing the Piece
To finish your Daisy Dream Crochet Anklet, weave in all loose ends with a tapestry needle. This step is crucial for achieving a neat and polished look. Make sure all ends are secured firmly, and feel free to add decorative beads if desired for extra flair, showcasing your beautiful craftsmanship perfectly.
Crochet Anklet Customization Ideas
Creating your crochet anklet allows for endless possibilities, inspiring you to infuse your own creative spirit into this delightful project.
- Yarn Weight Substitution: Opt for DK weight yarn for a slightly thicker anklet; it adds warmth and visual interest without overwhelming the design.
- Color Variations: Explore bold emeralds or cheerful oranges for a vibrant summertime expression that truly stands out against your skin.
- Fiber Alternatives: Swap cotton for bamboo yarn; its soft, smooth texture provides a luxurious feel against your skin while maintaining breathability.
- Bead Embellishments: Add sparkling glass beads between the daisies for a stunning touch that catches the sunlight beautifully, perfect for beach days.
- Stitch Pattern Changes: Replace the daisy flowers with star-shaped motifs to bring a fresh perspective to your anklet while keeping the summer vibe alive.
- Length Adjustments: Modify the foundation chain for a looser fit; this is great for those who prefer a more relaxed anklet style during those hot months.
- Textural Additions: Incorporate a delicate fringe at the edges for a trendy, bohemian twist that elevates your anklet beyond the ordinary.
- Contrast Color-Blocking: Create a striking two-tone effect by alternating rows of different colors; this adds a playful dynamic that’s sure to catch eyes.
Expert Tips for Your Crochet Anklet
-
Keep Tension Consistent: Maintain an even tension throughout your work; this aids in preventing buckles and ensures a smooth finish on your crochet anklet.
-
Count Your Stitches: Regularly check your stitch count as you progress; losing track can lead to uneven spacing, especially when adding daisies.
-
Practice First: Before starting on the anklet, practice the daisy stitch separately; it will increase your confidence and enhance the beauty of your final piece.
-
Secure Finishing: When weaving in ends, make sure to go through multiple stitches; this reinforces durability and helps your crochet anklet withstand wear.
-
Adjust Chain Lengths: If you find the anklet too loose or tight, don’t hesitate to adjust the foundation chain; this customization accommodates your unique fit perfectly.
How to Wash and Care for Your Crochet Anklet
-
Machine Washing: Use a gentle cycle in cold water to keep your crochet anklet looking fresh. Avoid high agitation to prevent any pilling or felting.
-
Hand Washing: For best results, hand wash your anklet in cool water with a mild detergent. Gently agitate the water, avoiding any twisting or scrubbing.
-
Drying/Blocking: Lay your crochet anklet flat on a clean towel to dry naturally. Do not wring or hang it, as this could distort its shape or stretch the fabric.
-
Storage: Store your anklet in a cool, dry place, away from direct sunlight. This will help maintain its vibrant colors and whimsical charm, keeping your crochet anklet ready for every sunny outing!
What to Pair with the Daisy Dream Crochet Anklet?
Creating a whimsical, matching crochet set can elevate your crafting experience, letting your creativity bloom in harmony.
- Daisy Decorative Hairpins: Adorn your hair with matching daisies using leftover yarn for a lovely hair accessory that ties your look together.
- Playful Flower Coasters: Crochet cute coasters that mimic the anklet’s daisy motifs. They’ll brighten your table settings and provide a cohesive aesthetic.
- Pastel Flower Bracelet: Transform your crochet skills into a beautiful bracelet adorned with the same floral accents for a coordinated set.
- Charming Tote Bag: Craft a light, summery bag using the same yarn to carry your crochet projects—perfect for sunny days at the park.
- Cheerful Flower Garland: Create a lovely garland out of daisies to hang in your crafting corner, invoking the same cheerful spirit as your anklet.
Daisy Dream Crochet Anklet FAQs
Can I substitute the yarn type for this crochet anklet?
Absolutely! While cotton is ideal for its lightweight and breathable nature, you can substitute it with acrylic yarn if you're looking for durability. Just remember to check the yarn weight, ensuring it remains in the light worsted weight category to maintain the desired drape.
How do I make my crochet anklet larger or smaller?
To customize the size of your anklet, simply adjust the number of foundation chains you create. For a larger fit, chain 60 or more stitches, and for a smaller fit, aim for 45 or fewer chains. You can also tighten the tension of your stitches for a snugger feel!
Why is my crochet work curling at the edges?
Don't panic! Curling edges are often caused by too tight a tension in your stitches or an imbalanced stitch count. I recommend checking your tension and adjusting your hook size if needed. You might also want to practice a loose foundation chain to help flatten the piece.
What size crochet hook should I use?
For this Daisy Dream Crochet Anklet, a 2.0 to 2.5 mm crochet hook (US size B or C) is recommended. This size helps create the right fabric density for a light and comfortable anklet. If your stitches are too tight, consider moving to a larger hook for a better fit.
I dropped a stitch while crocheting; how do I fix it?
It’s an easy fix! Simply locate the dropped stitch and gently unravel until you reach it. Use your hook to bring the yarn back up to the current row, making sure to secure it in place. Plus, practicing this will boost your confidence with crochet!
Can I add additional decorations to my crochet anklet?
Absolutely! You can embellish your anklet by adding larger decorative beads or charms and experimenting with different flower stitch patterns. This customization allows you to express your personal style even further, making your crochet anklet uniquely yours!

Leave a Reply