
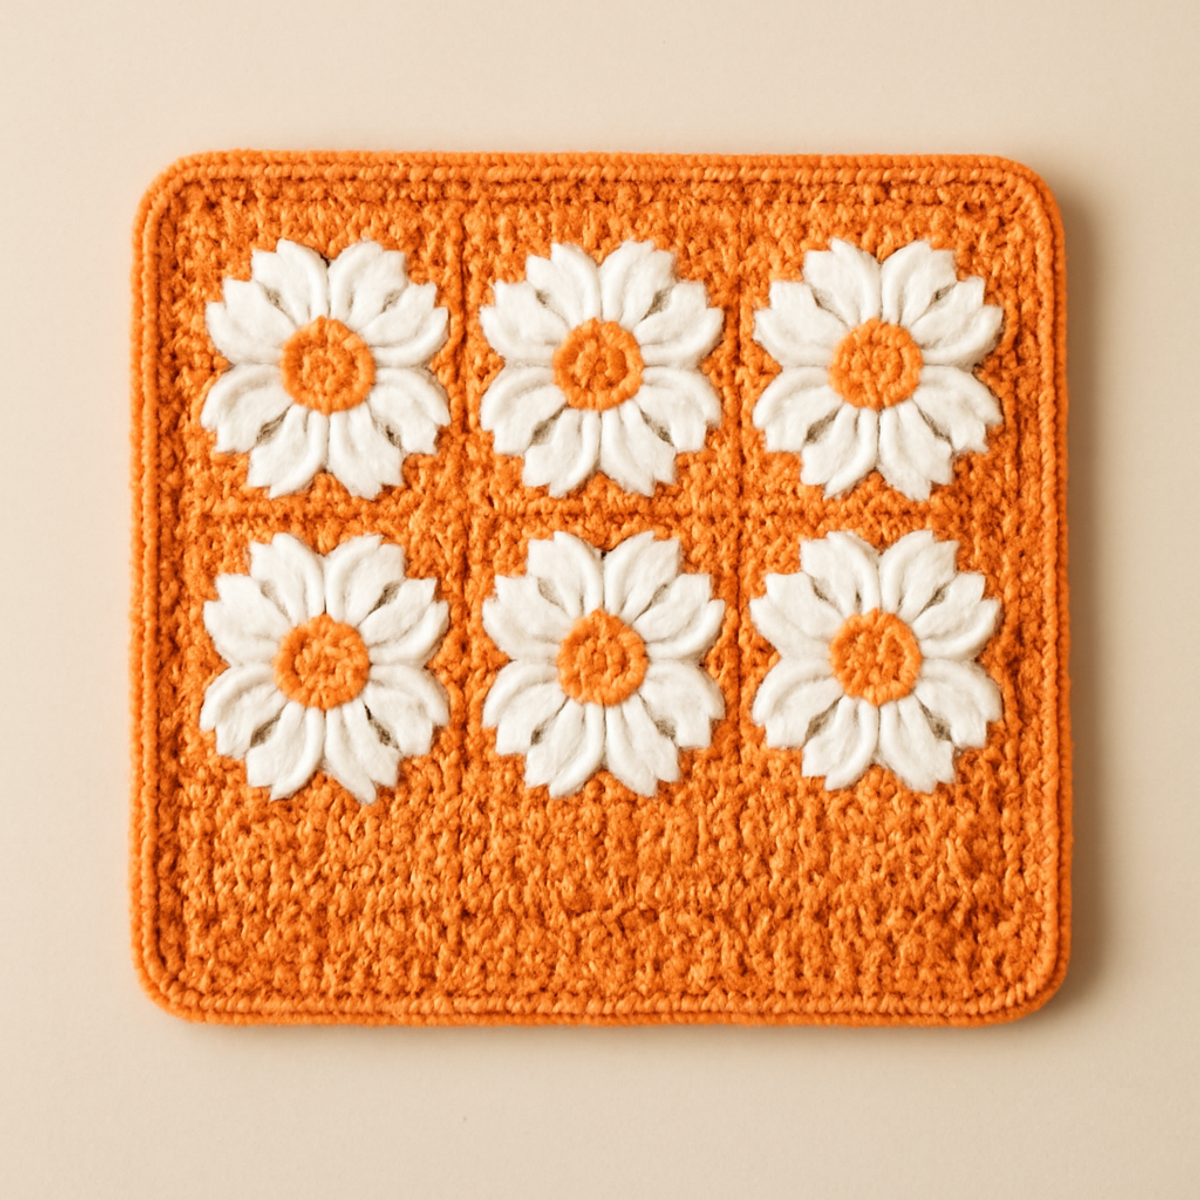
As I sit in my cozy corner surrounded by skeins of vibrant yarn, I can't help but get excited about the joyful creation of a floral granny square! The Floral Granny Square Delight is the perfect project for anyone looking to brighten up their crochet repertoire. This enchanting piece not only allows you to express your creativity with blossoming floral motifs but also serves as a wonderful means to enhance your skills in colorwork and techniques. Imagine transforming your yarn stash into stunning decorative elements for your home—whether it's a cheerful blanket, a vibrant pillow, or even a unique wall hanging! With its intermediate-level stitches, this project strikes a delightful balance between challenge and fun. So grab your favorite medium-weight yarn and let's make some magic with these cheerful granny squares that evoke the beauty of nature!
Floral Granny Square Materials & Tools
- Medium Weight Yarn (Category 4) – Use vibrant colors like bright orange and white, made from 100% acrylic or a cotton blend for durability.
- 4.0mm (G-6) or 5.0mm (H-8) Hook – Choose based on your personal tension; both sizes work well for creating the floral granny square.
- Approx. 100-150 yards of each color – Plan for this yardage to ensure you have enough for each floral motif.
- Yarn Needle – Essential for weaving in ends and finishing your project neatly.
- Stitch Markers – Useful for keeping track of rounds and ensuring accurate assembly of the motifs.
Why Choose the Floral Granny Square?
Versatile Application: This charming floral granny square can be adapted for various uses—from vibrant blankets to eye-catching pillow covers, making it a staple in any home décor lover’s collection.
Skill Enhancement: As you create, you’ll perfect your crochet skills by mastering advanced motifs while practicing your colorwork techniques, perfect for the intermediate crafter.
Cheerful Aesthetics: Its bright and playful design radiates joy, instantly elevating the ambiance of any space it's added to.
Creative Freedom: Experiment with colors and yarn types to match your personal style; the possibilities are endless with this customizable piece!
Tactile Appeal: Enjoy the delightful texture created by a combination of stitches that adds depth while remaining beautifully soft and cozy.
Gauge & Sizing Notes
Don't skip the gauge swatch! Checking your tension is essential for ensuring that your floral granny square turns out perfectly. A general guideline is to aim for a gauge of approximately 4×4 inches (10×10 cm) to have a similar consistency and fit as detailed in the pattern. If you'd like to adjust the size of your square, remember to increase your starting chain in multiples of 6 + 2 or modify the number of flower motifs used. If you find that your swatch is too small, simply try going up a hook size to achieve that cozy, comfortable fit you desire for your floral granny squares. Happy crafting!
Step-by-Step Pattern for Floral Granny Square Delight
Row 1: Flower Center
Start by making a magic circle. Ch 3 (counts as 1 dc), then crochet 11 more dc into the circle. Pull the magic circle tight to form a tight center. Join with a sl st to the top of the initial ch-3. You should have 12 dc total. Your flower center will be a vibrant, round shape.
Row 2: First Petal Round
Ch 3, then in the same stitch, work 2 dc (inc). Ch 1, skip the next st, then in the following stitch, work 3 dc, ch 1. Repeat from * to * until you have 6 petals created, then join with a sl st into the top of the initial ch-3. Your work should now have a beautiful floral outline with petals.
Row 3: Petal Detailing
For each petal, ch 3, then work a hdc into the same petal base, followed by 2 dc in the same stitch. Ch 1, then sl st to the next petal's base. Repeat this process for all petals around the flower. Your floral granny square should now have defined, three-dimensional petals, showcasing your skillful design.
Row 4: Second Flower
Repeat Rows 1-3 to create additional flowers, each in different colors. Ensure you have a total of squares ready for assembly, making sure that your tension remains consistent for each floral motif. Each motif should now perfectly complement the others, adding a delightful vibrancy to your project.
Step 5: Assembling the Squares
Lay out your finished flower motifs in the desired arrangement. With a new yarn color, use the sc stitch to join the motifs together by working through the ch-1 spaces between petals. Ensure to place sc in every space to maintain even structure. After this step, your floral granny square will start taking shape as a solid, unified piece.
Step 6: Final Border
To add a border, switch to a contrasting yarn. Ch 1 and work 1 sc in the corners and throughout the square in each side stitch. This will create a neat finish around your floral granny square. Sl st to join and enjoy the crisp outline that frames your beautiful work, perfect for any home décor piece!
Expert Tips for Floral Granny Square
-
Maintain Your Tension: Consistent tension is crucial for even squares. Practice on a small swatch before starting to ensure a snug but flexible gauge that retains the floral motifs' beauty.
-
Count Your Stitches: Keep track of your stitches with a stitch marker or a tally system. Losing count can lead to uneven motifs or unexpected holes, so stay vigilant!
-
Block for Perfection: After completing your floral granny square, blocking helps to enhance its shape and gives it a polished finish—making those blooms stand out beautifully.
-
Join with Care: When assembling squares, be mindful to place single crochet stitches evenly through the ch-1 spaces to ensure a stable and coherent structure for your floral granny square.
-
Finish Neatly: Weave in any ends securely with your yarn needle. This final step not only tidies up your project but also showcases the quality of your craftsmanship.
Floral Granny Square Variations
As you embark on your colorful crochet journey, let your creativity shine with delightful customizations for your floral granny square!
-
Color Flourish: Dive into pastels or bold contrasting colors to match your décor or mood, bringing a personal touch to each square. Picture how the different shades play off each other, brightening your space with each stitch!
-
Size Adjustment: Modify the number of motifs to create larger throws or smaller coasters. The beauty of this design lies in its adaptability—think about cozying up with a generous blanket or crafting lovely tiny gifts.
-
Fiber Play: Swap your acrylic for cotton blends in warmer months or cozy wool blends for winter warmth. Each fiber will give a distinct feel—envision the soft drape of cotton against your fingers in summer!
-
Embellished Blooms: Stitch beads or embroidery in flower centers to create unique textures and mementos. Imagine the sparkle of beads drawing eyes to your handiwork, adding a layer of charm.
-
Fringed Edges: Introduce playful fringe around the border for a boho twist. The movement of the fringe can evoke a carefree vibe, harmonizing beautifully with the floral motifs' softness.
-
Textured Borders: Experiment with different stitches for the border, like shell stitches or picots, to make the edges pop. Think of how intricate borders can elegantly frame your floral design, emphasizing the joyful shapes within.
-
Layered Motifs: Add a second layer of petals for depth, making your flowers stand proud and vibrant. Visualize how these multi-dimensional blooms might stand out even further, captivating anyone who sees them!
-
Patchwork Style: Combine various granny square designs to create a playful patchwork blanket. Mixing your floral granny squares with other shapes gives a lively and eclectic feel, reflecting your unique style and love for crochet!
What to Pair with Floral Granny Square Delight?
As you embrace the joy of crafting your floral granny square, consider all the delightful companion pieces that can complete your set!
- Colorful Pillow Covers: Create matching pillow covers to bring your colorful creations into living spaces, adding a cozy vibe to any room.
- Charming Table Runner: Transform your granny squares into a stunning table runner; a perfect way to brighten your dining experience.
- Delightful Bag: Craft a bag that showcases your floral motifs, making a stylish and bold statement wherever you go.
- Bright Wall Hangings: Use your squares to design an eclectic wall hanging that brings a touch of nature and warmth to your home.
- Cheerful Blanket: Join multiple floral squares together to create a vibrant blanket—a comforting piece perfect for snuggling under.
- Whimsical Coasters: Turn your floral motifs into fun coasters, protecting surfaces while adding a cheerful touch to your home décor.
Care Instructions for Floral Granny Square
Machine Washing: Use cold water and a gentle cycle to wash your floral granny square; this helps maintain its vibrant colors and shape without causing felting.
Hand Washing: For extra care, gently hand wash your square in cold water with mild detergent, avoiding agitation to prevent pilling or distortion.
Drying/Blocking: Lay your floral granny square flat to dry, shaping it as desired. This not only preserves its structure but also enhances the floral design beautifully.
Storage: Store your finished piece in a cool, dry place away from direct sunlight to prevent fading and damage, keeping your floral granny square looking its best for years to come.
Floral Granny Square Delight FAQs
Can I substitute cotton yarn for acrylic in this floral granny square?
Absolutely! You can use cotton yarn for a breathable feel, especially if you plan to use the granny square in warmer months. Just be mindful of the yarn's weight and gauge, as cotton can change the overall texture and drape.
How do I make my floral granny square larger or smaller?
To adjust the size, simply modify the number of motifs you create. For a larger square, add more flowers; for a smaller one, reduce the motifs. Keep in mind that the finished dimensions will also depend on your tension and the yarn weight you choose!
Why is my floral granny square curling at the edges?
Don’t panic! Curling often occurs due to tight tension or not enough stitches along the edges. If you find this happening, try loosening your tension or adding a few extra stitches in the corners when working the border.
What hook size should I use for my floral granny square?
I recommend starting with a 4.0 mm (G-6) hook for a compact feel, especially if you're using medium-weight yarn. However, feel free to try a 5.0 mm (H-8) hook if you prefer a looser, drapier finish. Just remember to check your gauge!
How can I fix dropped stitches in my floral granny square?
It's an easy fix! Gently pull the working yarn until the dropped stitch pops back up. Use a yarn needle to weave the top of the dropped stitch back into place, securing it to its neighbors. It’s a small bump in the road that won't affect your overall design!
What if my flower motifs don’t look perfectly round?
No worries! Sometimes a little blocking can work wonders. After completing your square, wet and block your motifs to help them regain their intended shape. This simple step can bring out the full beauty of your floral designs!

Leave a Reply