
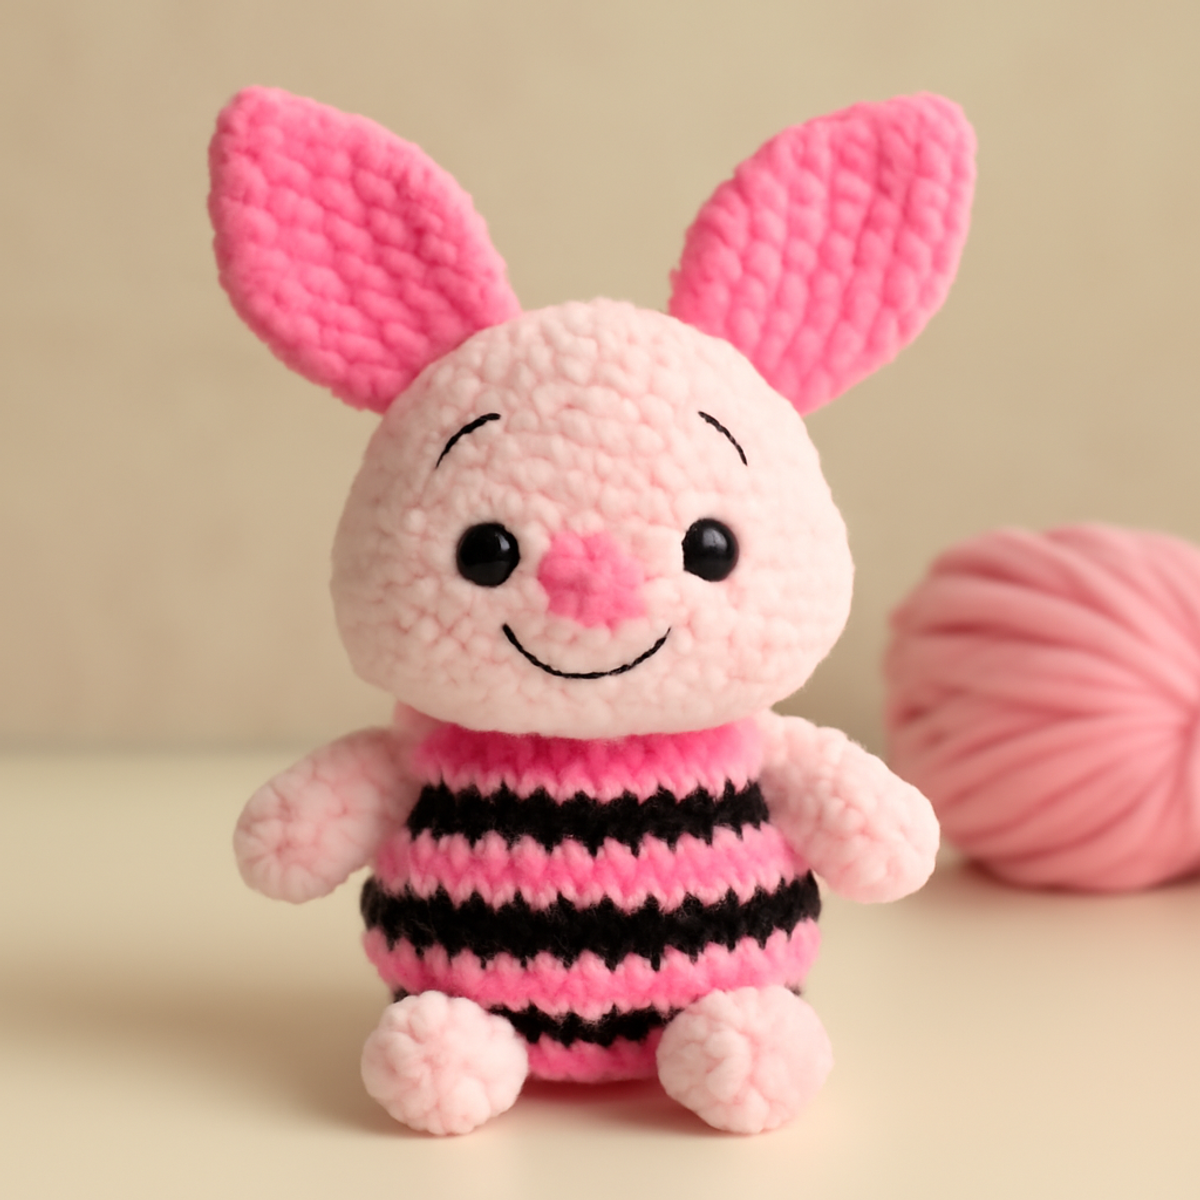
Wrapped in softness and bursting with charm, my latest crochet adventure has brought to life an adorable crochet pig plushie that’s bound to steal hearts! With its delightful round shape and oversized ears, this cuddly companion is perfect for quick assembly—ideal for those moments when you crave instant creative gratification. Not only will this plushie make a whimsical addition to any room, but it also serves as a thoughtful gift for children and the young-at-heart. Using super bulky yarn means every stitch is satisfying, and you'll see this little pig come together in no time. Ready to dive into this cozy, yarn-filled journey? Let’s get stitching!
Crochet Pig Plushie Materials & Tools
- Super Bulky Yarn – You'll need approximately 150-200 yards in pink and black for this adorable crochet pig plushie.
- 6.5mm (K) Hook – This size is perfect for accommodating the plush thickness of your yarn.
- Safety Eyes (12-15mm) – To give your pig personality, these eyes are both safe and charming for a plush toy.
- Stitch Marker – A helpful tool for easy round counting, especially with the plush texture that can obscure stitches.
Why Crochet the Pig Plushie?
Instant Gratification: This crochet pig plushie is designed for quick assembly, meaning you’ll enjoy the satisfaction of finishing your project in no time.
Soft & Cuddly: Utilizing super bulky yarn creates a wonderfully cozy texture, making this plushie delightful to snuggle.
Perfect for All Skill Levels: Whether you're a beginner or an intermediate crocheter, this pattern guides you seamlessly through the fun of amigurumi.
Charming Gift: Its whimsical design makes it a fantastic gift for children or as a charming décor piece in any room.
Versatile Customization: Feel free to experiment with colors and stitches to make your pig uniquely yours—adding special touches that truly reflect your style!
How to Check Your Gauge for Crochet Pig Plushie
Don't skip the gauge swatch! Checking your tension is crucial in creating a delightful crochet pig plushie that looks just right. For this project, aim for a standard gauge of 4×4 inches (10×10 cm) = approximately 8 single crochets by 8 rows using a 6.5mm (K) hook. If your gauge differs, adjust accordingly—want your pig to be larger? Increase your starting chain in multiples of 6 to maintain the shape. If your swatch seems too small, try going up a hook size for a roomier finish. Remember, achieving the right crochet gauge ensures your new cuddly companion is as perfectly plump as you envision!
Step-by-Step Pattern for crochet pig plushie
Round 1: Start the Head
Begin by creating a magic ring. Work 6 single crochets (sc) into the ring and pull the tail to tighten. This will form the basis of your crochet pig plushie’s head. Make sure your stitches are snug so that there are no gaps. Your work should look compact, with a small circle formed (6 sts).
Round 2: Increase the Head
In this round, make 2 single crochets (sc) in each stitch around. This will help increase the size of the head for your plushie. Keep your tension even to ensure a smooth finish. You should notice the head beginning to puff out nicely (12 sts).
Round 3: Continue Increasing
Next, work 1 sc in the next stitch, then 2 sc in the following stitch around. Repeat this pattern, which will create a pleasing, rounded shape for your crochet pig plushie. As you progress, your work should begin to resemble a slightly larger circle, fuller at the bottom (18 sts).
Round 4: More Increases
For this round, do 1 sc in the next 2 stitches, then 2 sc in the following stitch around. The head should continue to grow, becoming rounder. You should see a lovely increase in size, which is essential for the pig's charismatic appearance (24 sts).
Round 5: Stabilize the Shape
Work 1 sc in each stitch around for this round to create a solid base for the head. This simple round allows for maintaining the shape you've constructed thus far while giving it a sturdy foundation. Your work should be rounding out nicely and feel more robust (24 sts).
Rounds 6-10: Build the Head
Continue working 1 sc in each stitch around for 5 rounds. This will create the height for the head, ensuring your crochet pig plushie has a plump silhouette. Your work should look consistent, with tight stitches that feel secure (24 sts each round).
Round 11: Begin Shaping the Snout
In this round, work 1 sc in the next 3 stitches, then 2 sc in the following stitch around. This increase will shape the snout area of your plush pig, giving it a charming face. You can already feel the character of the pig starting to emerge (30 sts).
Round 12: Form the Snout
Now, do 1 sc in the next 4 stitches, then 2 sc in the next stitch around. Continue building the shape of the snout, as this is a crucial feature of your crochet pig plushie. Your work should be noticeably longer in front, suggesting a cute snout forming (36 sts).
Round 13: Finishing the Head
Work 1 sc in each stitch around for one last time before moving on. This will secure the snout and ensure a clean finish at the top. The head will now have a full and rounded appearance, laying the groundwork for the next stages of assembly (36 sts).
Step 1: Begin the Body
Transitioning to the body, work a slip stitch to join and start the body with 1 sc in each stitch around. This body section will be worked seamlessly from the head, maintaining your crochet pig plushie's whimsical charm. Your work will continue to grow, resembling a soft, rounded shape (36 sts).
Steps 2-5: Building the Body
Continue with 5 more rows of 1 sc in each stitch around. This will add the necessary height to your plushie, creating a soft and huggable form. Your textile should feel plush and ample, ready to be shaped further into the beloved pig plushie (36 sts each round).
Step 6: Add Limbs
Now, we will make the limbs separately. Start with a magic ring and crochet 6 sc in the ring, then increase in the next round to give each limb a slight stature. These will be small cylindrical forms that will allow your crochet pig plushie to stand adorably (6 sts).
Step 7: Completing the Ears
For the ears, work in rows of dc and ch stitches to create a wavy texture, joining with a slip stitch. This adds the charming floppy look characteristic of your plush pig. The ears will begin to take shape, adding personality to your work (varying stitch counts).
Step 8: Assembly
Sew all the finished pieces together—head, limbs, and ears—using a tapestry needle and matching yarn. Securely attach each piece to create a seamless look for your finished crochet pig plushie. Ensure you place the nose and eyes to give it that cute, enchanting finish.
Final Touches: Add Details
To complete, you may surface slip stitch black stripes onto the body for added character. These stripes will give your plushie a pop of charm! Your completed crochet pig plushie should be soft, cuddly, and full of delightful personality, ready to be adored.
Care Instructions for Crochet Pig Plushie
-
Washing: Always wash your crochet pig plushie by hand in cold water to preserve its softness and structure. Avoid twisting or agitating while cleaning to prevent any felting.
-
Drying: After washing, gently reshape your plushie and lay it flat to dry. This method ensures it retains its adorable shape without compromising the plush texture.
-
Storage: When not in use, keep your crochet pig plushie in a cool, dry place. This care will help prevent any dust buildup and maintain its lovely appearance.
-
Blocking (If Needed): If you wish to enhance the shape or definition of your plushie, lightly steam or reshape the ears, but blocking is typically unnecessary due to the plush material's forgiving nature.
What to Pair with Adorable Crochet Pig Plushie?
Imagine not just a single plush companion, but a cozy collection that brings warmth and whimsy to any space.
-
Charming Crochet Blanket: Create a matching blanket to keep your pig plushie company. The soft texture will complement your plushie’s cuddly nature beautifully.
-
Snug Crochet Pillow: A pillow can add comfort to the setting your pig calls home, making it the perfect duo for snuggling on the couch.
-
Fun Crochet Barn: Craft a little barn for your pig plushie to live in! It adds an imaginative play element that’s delightful for both children and adults.
-
Colorful Crochet Farm Friends: Make a few more amigurumi animals, like a sheep or a cow, that enhance the playful theme of your crochet pig plushie.
-
Cute Crochet Hat: Whip up a matching hat for your pig to wear. It's a fun detail that can turn this plushie into a whimsical décor piece perfect for any season.
Expert Tips for Crochet Pig Plushie
-
Even Tension: Keep your tension consistent while crocheting with plush yarn to prevent unraveling and secures every stitch beautifully.
-
Count Carefully: Regularly check your stitch count, paying close attention, as the plush fibers can obscure visibility, making it easy to miscount.
-
Secure Assembly: When sewing pieces together, ensure they are tightly stitched; this will provide neat edges and a professional finish for your crochet pig plushie.
-
Shape Ears Thoughtfully: Lightly shape and adjust the ears after finishing to enhance their definition—this little detail adds to the overall charm.
-
Finish with Detail: Use surface slip stitching to create fun patterns or stripes on your plushie, adding character and uniqueness to your crochet creation.
Crochet Pig Plushie Variations
Feel free to embark on your own creative journey with this crochet pattern, customizing it to reflect your unique style and flair!
-
Yarn Swaps: Experiment with cotton or bamboo blends for a different texture—these fibers provide a unique crispness and sheen.
-
Color Block: Consider adding pastel blues or greens for a whimsical charm. Chunky stripes could make your pig even more playful!
-
Size Adjustments: Use a larger hook for a bigger plushie or a smaller one to create a miniature version perfect for tiny hands.
-
Texture Twist: Incorporate popcorn stitches or bobble stitches for a tactile experience that adds depth—your pig will love the character!
-
Limb Variations: Try making different limb shapes, such as stubby arms or long, floppy legs, to give your plushie a new personality.
-
Detail Enhancements: Add a cute bow or scarf made from contrasting yarn to amplify your pig's charm and give it a stylish accessory.
-
Ears Reimagined: Instead of the standard shape, consider making pointy or rounded ears for a fresh twist, adding to its overall cuteness.
-
Button Eyes: Swap out safety eyes for buttons for a vintage look. Just ensure they are securely attached for playtime safety!
Crochet Pig Plushie FAQs
Can I substitute different yarn types for my crochet pig plushie?
Absolutely! While I recommend using super bulky yarn for its softness, you can substitute with a similar weight yarn like bulky or heavy worsted—just keep in mind this might affect the overall size and drape.
How can I adjust the size of my crochet pig plushie?
To scale up or down, you can use a different hook size and yarn weight as needed. If you want a larger plushie, try a bigger hook with the same yarn or a thicker yarn altogether. For a smaller version, opt for a finer yarn and a smaller hook to maintain the plushie's adorable proportions!
Why is my crochet pig plushie curling?
Don’t panic! Curling can often happen when working with plush yarn. It usually settles once you assemble the pieces. If it's still persistent, check your tension and make sure you're not pulling your stitches too tight.
What hook size should I use for my crochet pig plushie?
You'll want to stick with a 6.5mm (K) hook for the best results with super bulky yarn. This size creates a lovely plush texture that's key to the soft, cuddly finish of your pig plushie.
How do I fix dropped stitches on my crochet pig plushie?
It's an easy fix! Gently pull the working yarn as you locate the dropped stitch, and use your hook to reinsert it. If it’s a bit tricky, don’t hesitate to use a tapestry needle to weave it back into place neatly.
What should I do if I can’t see my stitches clearly?
This is common with plush yarn, but don’t worry! Check your gauge regularly and use a stitch marker to keep track of rounds. If you still struggle, consider using a non-plush yarn initially to practice the pattern, then switch to plush for the final project!

Leave a Reply