
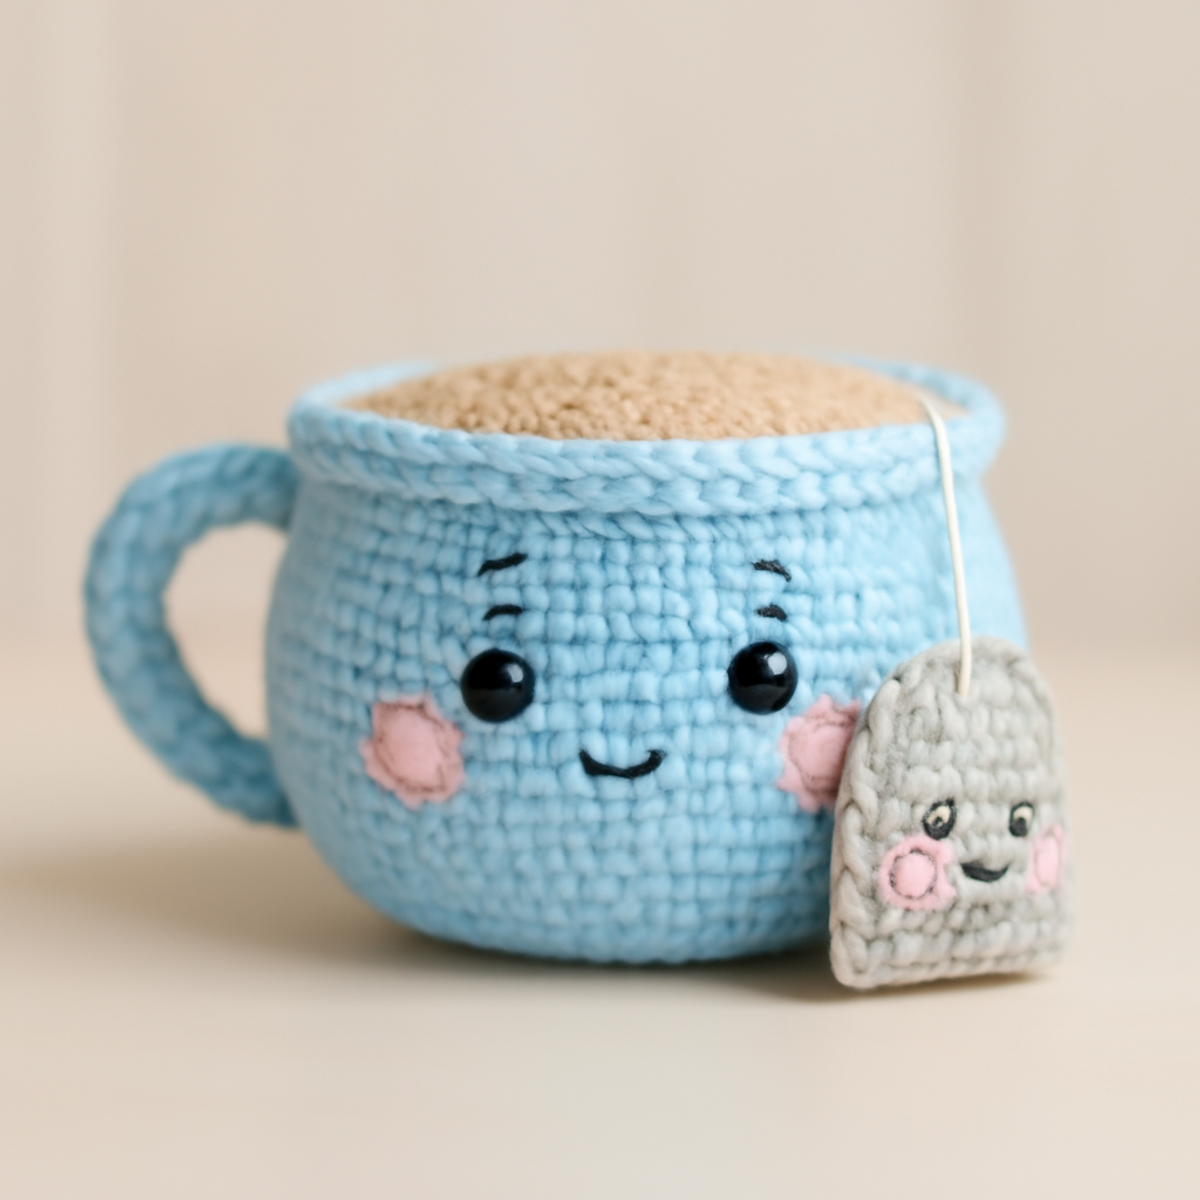
As I sifted through my yarn stash, a whimsical idea brewed—what if I could create a cheerful crochet tea cup that captures the playful spirit of my favorite beverage? This crochet tea cup is not only adorable but also a delightful project perfect for intermediate crafters looking to add a touch of charm to their home decor. With the option to personalize colors and features, it becomes an instant favorite gift for tea lovers, ensuring that each stitch reflects your unique flair. Plus, its quick assembly makes it an ideal stash-buster! If you're ready to fill your space with warmth and character or surprise a friend with a handmade treasure, let’s dive into crafting this kawaii crochet tea cup together.
Crochet Tea Cup Materials & Tools
- Medium Weight Yarn – Approximately 200 yards of an acrylic or cotton blend will provide durability and softness for your cute creation.
- 3.5 mm (E) Crochet Hook – Ideal for crafting the body of the crochet tea cup for a neat finish.
- 2.5 mm (B) Crochet Hook – Perfect for those delicate details and the smaller parts of your tea cup.
- 8 mm Safety Eyes (optional) – Add playful character to your tea cup with these adorable eyes for a whimsical touch.
- Yarn Needle – A handy tool for sewing all your pieces together with ease.
- Contrasting Yarn – Consider using a different shade for the tea bag to add visual interest.
- Small White String – Use for the tea bag tag to enhance your crochet tea cup's charm.
Why Make a Crochet Tea Cup?
Irresistibly Cute: This crochet tea cup boasts a playful amigurumi style, making it an adorable addition to your decor or gift collection.
Quick Assembly: The straightforward construction allows for a speedy creation process, perfect for those who want to whip up a project in no time.
Customizable Colors: Experiment with vibrant yarns to personalize your tea cup’s appearance, letting your creativity shine through.
Perfect Gift: Ideal for tea lovers, this charming piece serves as a thoughtful present that shows you care.
Warm Texture: The soft, squishy feel of medium weight yarn enhances its inviting look, making it an appealing decorative touch in any cozy space.
Gauge & Sizing Notes
Don't skip the gauge swatch! It's crucial for your crochet tea cup project to ensure the final piece comes out just right. A typical crochet gauge for amigurumi is about 4×4 inches (10×10 cm), which roughly translates to 18 single crochets by 20 rows. If your tension doesn’t align, consider adjusting your hook size; if your swatch is too small, simply go up a hook size. To change the size of your crochet tea cup, you can modify the starting chain or increase your stitch count in multiples of 6 to make it larger or decrease as needed for a mini version. Happy crocheting!
Step-by-Step Pattern for Kawaii Crochet Tea Cup
Row 1: Start the Cup Body
Begin with a magic circle and work 6 sc into the ring. Pull the tail to tighten the circle, making sure your stitches are snug. This forms the foundation of your crochet tea cup. Your work should be a small circle with 6 stitches (6 sts).
Row 2: Increase Round
Next, work 2 sc in each stitch around to increase the size of the cup. You will have 12 stitches total after this round. Your tea cup should now be slightly larger, with 12 visible sc stitches forming a neat ring (12 sts).
Row 3: Double Increase Round
Continue by working 1 sc in the first stitch, then 2 sc in the next. Repeat this sequence around, which will create even more volume in your cup. You’ll have 18 stitches at the end of this round, and your work should begin to take shape (18 sts).
Row 4: Additional Increase Round
In this round, work 1 sc in each of the first 2 stitches, then increase by adding 2 sc in the following stitch. Continue this pattern until the end, bringing your stitch count to 24. At this point, the cup body should be curving upward (24 sts).
Row 5-8: Build the Body
For the next four rounds, simply work 1 sc in each stitch around without increasing. These rounds will allow the body of your crochet tea cup to gain height, creating a solid structure. Your piece should maintain a cylindrical shape over these four rounds (24 sts each round).
Row 9: Start the Cup Handle
To create the handle, switch to a new section of your yarn. Chain 6, then work 1 sc in the second chain from the hook. Continue with 4 more sc down the chain, totaling 5 sc. When finished, your handle should be a small row of 5 saturated stitches (5 sts).
Row 10: Attach the Handle
Align the handle to the side of the cup and attach it using sl st through both the handle and cup body. Make sure it’s secure and shaped nicely. Your crochet tea cup should now have its charming handle attached, adding to its whimsical appeal.
Row 11: Create the Tea Surface
To form the tea surface, make a flat circle using tan yarn. Start with a magic circle and work 6 sc in the circle, then increase each round until you reach 24 stitches, mirroring the cup's shape. This will ensure a snug fit on top of the cup (24 sts).
Row 12: Finish the Cup Decoration
Stitch the tea surface onto the top of the cup body with sl st to secure it firmly. This layer adds character while presenting a delightful ‘tea’ look. Your cup should now have its top layer, creating an appealing finish that stands out.
Step 1: Create the Tea Bag
For the tea bag, chain 15 and turn. Work 1 sc in each chain back to form a small rectangle. Fold this piece in half and secure the sides with sc, leaving the top open for stuffing. It should resemble a small tea bag pouch ready for embellishing.
Step 2: Embellish & Attach the Tea Bag
Embroider a small face or design on the front of your tea bag, then thread through a long piece of yarn for the tag. Attach the bag securely by looping its string over the cup rim and fastening it with sl st to ensure it hangs correctly.
How to Wash and Care for Your Crochet Tea Cup
Machine Washing: Use cold water on a gentle cycle to protect your crochet tea cup. Avoid agitation to prevent felting or pilling.
Hand Washing: For extra care, hand wash in lukewarm water using mild detergent. Gently press out excess water without wringing.
Drying/Blocking: Lay your crochet tea cup flat on a clean towel to dry, reshaping it as necessary. Avoid hanging as this may distort its charming shape.
Storage: Store your finished crochet tea cup in a cool, dry place. Keep it away from direct sunlight to maintain its vibrant colors and softness.
Crochet Tea Cup Variations & Substitutions
Unleash your creativity and make this crochet tea cup truly your own with these fun ideas and swaps!
-
Yarn Weight Swaps: Use a lighter or heavier yarn to create a larger or smaller cup, adjusting the hook size accordingly for a delightful new dimension.
-
Color Blocking: Combine complementary colors in sections for a playful vibe, making your tea cup even more eye-catching and whimsical—think a bright pink body and a sunny yellow handle!
-
Mix Fiber Types: Try substituting cotton for acrylic for a softer touch, or opt for a fuzzy yarn like chenille to give your cup a huggable, plush feel.
-
Textured Finishes: Add fun embellishments such as a fluffy pom-pom on top, or introduce fringe at the rim for a boho flair that gives your tea cup a unique personality.
-
Personalized Embellishments: Integrate small decorative elements like beads or charms on the tea bag or handle, making your tea cup not just cute, but also a delightful surprise.
-
Size Adjustments: Scale your project for larger gatherings! Use a bulkier yarn and size up your hooks to create a family-sized tea cup that's perfect for group crafting sessions or decor.
-
Playful Patterns: Experiment with variegated yarn to add a dash of randomness, bringing unexpected color twists to your crochet creation that will keep each cup unique!
-
Alternative Teas: For the tea surface, consider using a deeper color for a "strong tea" vibe or even a sparkly yarn if you're in a festive mood, transforming your cup into a dazzling centerpiece.
What to Pair with Kawaii Crochet Tea Cup?
Embrace the joy of crafting by creating delightful companions to your adorable tea cup, enhancing your home decor and gifting options.
-
Crochet Coaster Set: Craft matching coasters to protect your surfaces while adding a pop of color beneath your tea cup.
-
Amigurumi Tea Bag: Create a whimsical tea bag to accompany your cup, making it a complete set that brings a smile.
-
Cute Crochet Spoon: Design a tiny decorative spoon to rest next to your tea cup, completing a charming tea time scene.
-
Whimsical Sugar Bowl: Pair your tea cup with a mini sugar bowl, perfect for a functional yet playful twist on your decor.
-
Charming Teapot: If you're feeling ambitious, crochet a delightful teapot to create an entire amigurumi tea party for display.
Expert Tips for Your Crochet Tea Cup
-
Mind Your Tension: Maintaining even tension is crucial for a neat finish. Keep your stitches consistent, especially for facial details on your crochet tea cup.
-
Count Carefully: As you work through the cup body rows, count your stitches diligently. Losing count can lead to uneven sizing, so keep a marker or note handy.
-
Secure the Handle: When attaching the cup handle with slip stitches, ensure it’s firmly secured. A loose handle may unravel or detach later, ruining your adorable creation.
-
Flatten the Tea Surface: Before stitching the tea surface onto the cup, check its fit. A snug placement not only enhances the look but also keeps everything in place.
-
Don’t Rush the Assembly: Take your time when attaching the tea bag. A carefully secured bag will prevent any future mishaps, ensuring your crochet tea cup stays charming and intact.
Kawaii Crochet Tea Cup FAQs
Can I substitute yarn types for this crochet tea cup?
Absolutely! You can swap acrylic for cotton if you prefer a softer texture. Just make sure to choose a medium weight yarn to maintain the overall appearance and structure of your cute tea cup.
How can I adjust the size of my crochet tea cup?
If you want a larger or smaller cup, you can alter the stitch count when starting the magic circle or adjust your hook size. Just remember that changing the hook size may also affect your tension, so keep an eye on your gauge as you go.
What should I do if my work is curling?
Don't panic! Curling often happens when your stitches are too tight or there's uneven tension. Try relaxing your grip and ensuring your stitches are even. If it persists, consider working with a larger hook for a looser gauge.
How do I fix a dropped stitch?
It's an easy fix! If you notice a dropped stitch, simply use your yarn needle to weave the yarn back through the original stitch spot, making sure to secure it tightly. This will help keep your crochet tea cup's shape intact.
What size hook should I use for the details on my tea cup?
For details, such as the tea bag and face features, use a smaller 2.5 mm (B) hook. This will allow you to achieve the precision needed for those charming accents without compromising the overall look.
How do I ensure my stitches stay uniform throughout my project?
Counting your rounds and maintaining consistent tension is key! Take your time and occasionally check your work to ensure you’re on track. If your stitches start feeling too loose or tight, adjust as needed.

Leave a Reply