
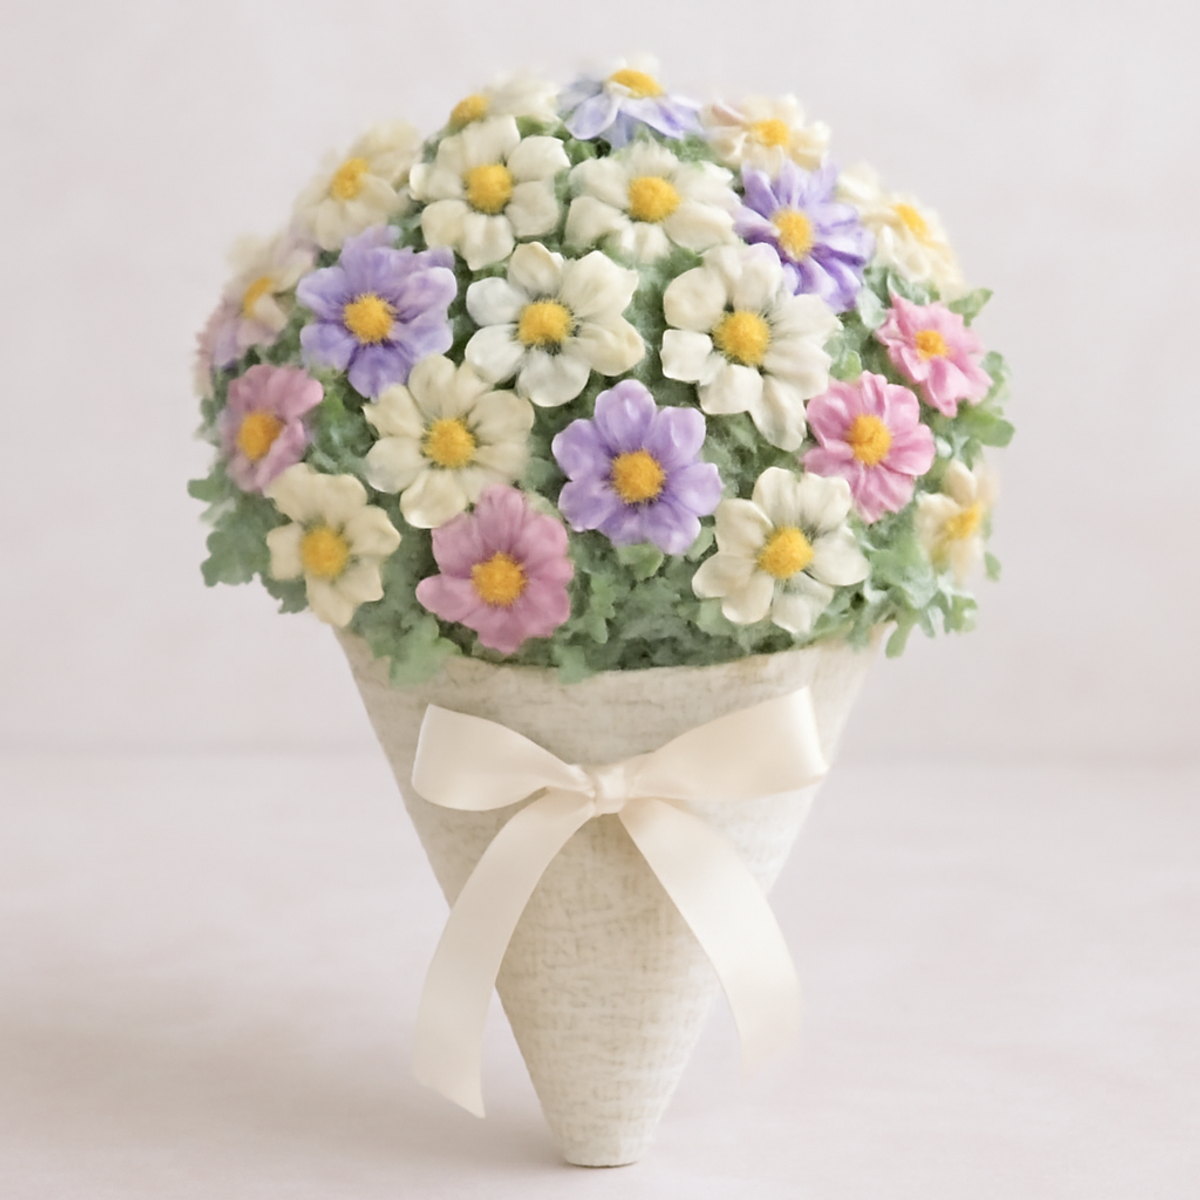
As I sat on my cozy couch, the gentle light filtering through the window, I couldn’t help but be captivated by the vibrant colors of the yarn I'm about to transform into a stunning daisy bouquet crochet piece. The Charming Daisy Bouquet Blanket is more than just a decorative item; it’s a delightful project that beautifully merges intricate floral details with functional design. Perfect for those with a bit of crochet experience, this pattern not only enhances your skills but also offers a fantastic way to create a warm atmosphere in your home. With its lively textures and cheerful blooms, it makes for a thoughtful gift that’s sure to brighten anyone’s day. So grab your 5.0 mm hook and let’s dive into this joyful crafting adventure together!
Daisy Bouquet Crochet Materials & Tools
- Worsted Weight Yarn – Use a soft acrylic or cotton blend for durability and to achieve a cozy feel; approximately 500-700 yards needed for your daisy bouquet crochet project.
- 5.0mm (H-8) Hook – This hook size allows for clean and tight stitch formation, perfect for the intricate details of the bouquet.
- Stitch Markers – Helpful to keep track of your rounds, especially when transitioning between the base and floral components.
- Tapestry Needle – Essential for weaving in ends and finishing your project with a professional touch.
- Safety Eyes (optional) – If you desire a toy-like effect for your bouquet, these can add fun charm to your creation.
Why is the daisy bouquet crochet special?
Unique Design: This pattern features an enchanting floral motif, combining the beauty of daisies with functional decor. Skill Enhancement: A perfect project for intermediate crocheters, it helps refine techniques while creating something stunning. Vibrant Colors: The lively palette evokes warmth and joy, making it a standout centerpiece. Versatile Decor: Adapt it for any season by switching up colors or flower types. Thoughtful Gift: Create a heartfelt present that's both practical and delightful, sure to bring smiles.
Gauge & Sizing Notes
Don't skip the gauge swatch! Checking your tension is crucial for the Charming Daisy Bouquet crochet project, as it ensures your creation has the right dimensions and structure to showcase those beautiful floral details. A general guideline is to aim for a crochet gauge of 14 stitches and 8 rows in a 4×4 inch (10×10 cm) swatch, but doing a test swatch with your yarn is always best. If your swatch isn't matching this size, adjust by going up or down a hook size accordingly. To make your bouquet larger, simply increase your starting chain or initial rounds in multiples of 4 to accommodate your sizing adjustments for this delightful daisy bouquet crochet pattern. Happy crafting!
Step-by-Step Pattern for daisy bouquet crochet
Row 1: Base Construction
Ch 4 and join to form a ring. Work 8 sc into the ring to create the base of your daisy bouquet crochet. Pull the tail to tighten the ring, ensuring a neat start. Your work should lay flat, and you’ll have 8 stitches (8 sts).
Row 2: Increase Round
Ch 1, then work 2 sc in each stitch around (16 sts). This will give your base a wider opening. Keep an eye on your piece; it should start to curve slightly upwards, forming the cone shape of the bouquet.
Row 3: Cone Shaping
Ch 1, sc in next stitch, inc in next stitch, repeat from * to * around (24 sts). This round will continue to widen your base while maintaining a structured shape. Your work should resemble a cup at this stage, easily holding its form.
Row 4: Taller Cone
Ch 1, sc in next 2 stitches, inc in next stitch, repeat from * to * around (32 sts). As you proceed, ensure the structure is stable and your stitches are tidy. The base should be achieving a good height for your daisy bouquet crochet piece.
Row 5: Final Cone Round
Ch 1, sc in next 3 stitches, inc in next stitch, repeat from * to * around (40 sts). The base should now feel quite sturdy, providing a solid foundation to support the blooms of the bouquet.
Row 6: Joining the Top
Ch 3 (counts as dc), dc in the next stitch and each stitch around (40 sts). This round reinforces the opening while creating a neat edge. You should see a lovely transition into the floral section, where your work is flattening at the top.
Row 7: Flower Petals – First Flower
Join a new color for the first flower. Ch 4, then in the same space, work 2 dc, ch 2, 2 dc. This creates the first petal. Skip the next 2 stitches and slip stitch to the next stitch to secure your flower petal (1 flower made).
Row 8: Additional Petals
Repeat Row 7 for each petal, creating a total of 5 petals for the first flower. After finishing the petals, the flower should appear full, blooming beautifully from the top of your daisy bouquet crochet.
Row 9: Flower Assembly
Finish off the flower and weave in ends. Attach a new yarn color to start the next flower in the same manner. Ensure each flower is distinct, enhancing the vibrant look of your bouquet.
Step 10: Adding Foliage
Using green yarn, create 3 sc in the same stitch where a flower is attached, then add 2 hdc in the next stitch (for leaves). This adds depth and richness to the overall daisy bouquet crochet project.
Step 11: Final Assembly
Once all flowers and foliage are complete, arrange them on the bouquet base and sew securely with a tapestry needle. The arrangement should feel balanced with vibrant colors popping against the green.
Step 12: Finishing Touches
Make a bow using your ribbon and attach it to the base of the bouquet to secure everything in place. The completed daisy bouquet crochet now stands as a charming decorative piece, ready to brighten any room!
Daisy Bouquet Crochet Variations
Feel free to unleash your creativity as you personalize your daisy bouquet crochet project!
-
Color Changes: Choose seasonal colors, like warm oranges for autumn or icy blues for winter, to match the vibe.
-
Flower Types: Introduce different flower shapes by experimenting with various stitches, like scalloped edges for a fresh look. Your bouquet will become a vibrant medley with delightful diversity.
-
Size Adjustments: Opt for thicker yarn and a larger hook for a bold statement or use finer yarn with a smaller hook for a charming, compact display.
-
Textured Touches: Add fun elements like soft pom-poms or fringes for a lively twist. These details elevate the visual interest and texture of your bouquet.
-
Contrasting Ribbon: Play with ribbon colors that complement your flowers for added flair. A bold ribbon can create a stunning contrast, making your piece stand out beautifully.
-
Mixed Yarn Blends: Combine different fibers within the same color palette, such as cotton and acrylic, to achieve a unique texture and sheen. This thoughtful pairing enhances the overall aesthetic.
-
Floral Layering: Create dimension by layering multiple blooms with varying heights. It allows for a dynamic arrangement that draws the eye.
-
Edge Borders: Incorporate a decorative border around the bottom of the base for a polished finish. A scalloped edge can add a whimsical touch to the entire piece.
How to Wash and Care for Your Daisy Bouquet Crochet
Machine Washing: Use cold water on a gentle cycle, avoiding any vigorous agitation to prevent felting or pilling of your daisy bouquet crochet masterpiece.
Hand Washing: If you prefer, gently hand wash in cool water. Use a mild detergent and avoid twisting or wringing to maintain the shape of your floral arrangement.
Drying/Blocking: Lay your finished piece flat on a clean towel to dry, reshaping as necessary. This helps enhance the flower shapes while preventing deformation.
Storage: Keep your daisy bouquet crochet in a cool, dry place away from direct sunlight. Consider storing it in a breathable bag to maintain its vibrant colors and texture.
Expert Tips for Daisy Bouquet Crochet
-
Maintain Tension: Consistent tension throughout the project is crucial for achieving the desired shape and look. Regularly check your gauge to avoid any surprises.
-
Use Stitch Markers: These handy tools help you keep track of your rounds, especially when shifting from the base to the floral section of your daisy bouquet crochet.
-
Count Carefully: Miscounts can lead to uneven layers; take your time and count each stitch as you go to ensure precision in your floral arrangement.
-
Post-Production Blocking: Don't skip this step! Blocking your finished piece enhances the flower shapes and helps flatten any bumps, giving your bouquet a polished finish.
-
Secure Weaving: When finishing, ensure all ends are woven in securely to maintain the integrity of your daisy bouquet crochet and avoid any unraveling.
What to Pair with Charming Daisy Bouquet Blanket
As you craft your delightful daisy bouquet crochet, consider building a harmonious set that enhances your blooming home ambiance.
-
Matching Pillows: Create cozy pillows adorned with the same floral stitch, perfect for snuggling up with your blanket.
-
Blooming Coasters: Small, cheerful coasters that mimic the daisy pattern will keep your surfaces bright and charming.
-
Floral Garland: A whimsical crochet garland of daisies and leaves to hang across your mantel or a wall, tying the decor together beautifully.
-
Spring Table Runner: Add a touch of elegance to your dining area with a table runner featuring floral motifs that mirror your bouquet's aesthetic.
-
Charming Tote Bag: Craft a tote that showcases the daisy design, making it both functional and stylish for your next crafting adventure.
Each of these projects perfectly complements your daisy bouquet crochet, offering a joyful crafting journey full of warmth and creativity!
Daisy Bouquet Crochet FAQs
Can I use a different yarn than what's recommended?
Absolutely! While the pattern suggests a medium (Worsted, Category 4) acrylic or cotton blend, you can certainly substitute it with another yarn. Just make sure to check the gauge, as a different weight may change the final look and feel of your daisy bouquet crochet.
How can I adjust the size of my daisy bouquet crochet?
Don't panic! You can easily modify the size by changing your yarn weight and hook size. Using a thicker yarn with a larger hook will create a more substantial piece, while lighter yarn and a smaller hook will yield a more delicate bouquet. Experimenting with these variables allows you to create a size that perfectly suits your space.
Why is my work curling at the edges?
This is a common issue! Curling often occurs when stitches are too tight or when there's an imbalance in stitch types. To fix this, consider loosening your tension and using stitch markers for better stitch placement. If you've already completed the piece, blocking after finishing can also help flatten it out beautifully.
What hook size should I use for the daisy bouquet crochet?
For this project, a 5.0 mm (H-8) hook is recommended, as it allows for neat and tight stitches. However, if you find your stitches are too tight or too loose, feel free to size up or down a hook for a more comfortable crocheting experience!
How do I fix dropped stitches in my floral arrangement?
It's an easy fix! Gently pull the loose yarn until the dropped stitch is at the right level. Use a tapestry needle to reinsert the yarn back through the affected stitch in the same row. If you're unsure, revisiting the row and picking up the dropped stitch with the hook can help you avoid gaps in your lovely daisies.
Can I customize the flowers to use different types?
Of course! Feel free to experiment with various flower shapes and stitch techniques to create a more personalized bouquet. Try adjusting petal shapes or using diverse stitch patterns to give each flower its unique charm in your daisy bouquet crochet project!

Leave a Reply