
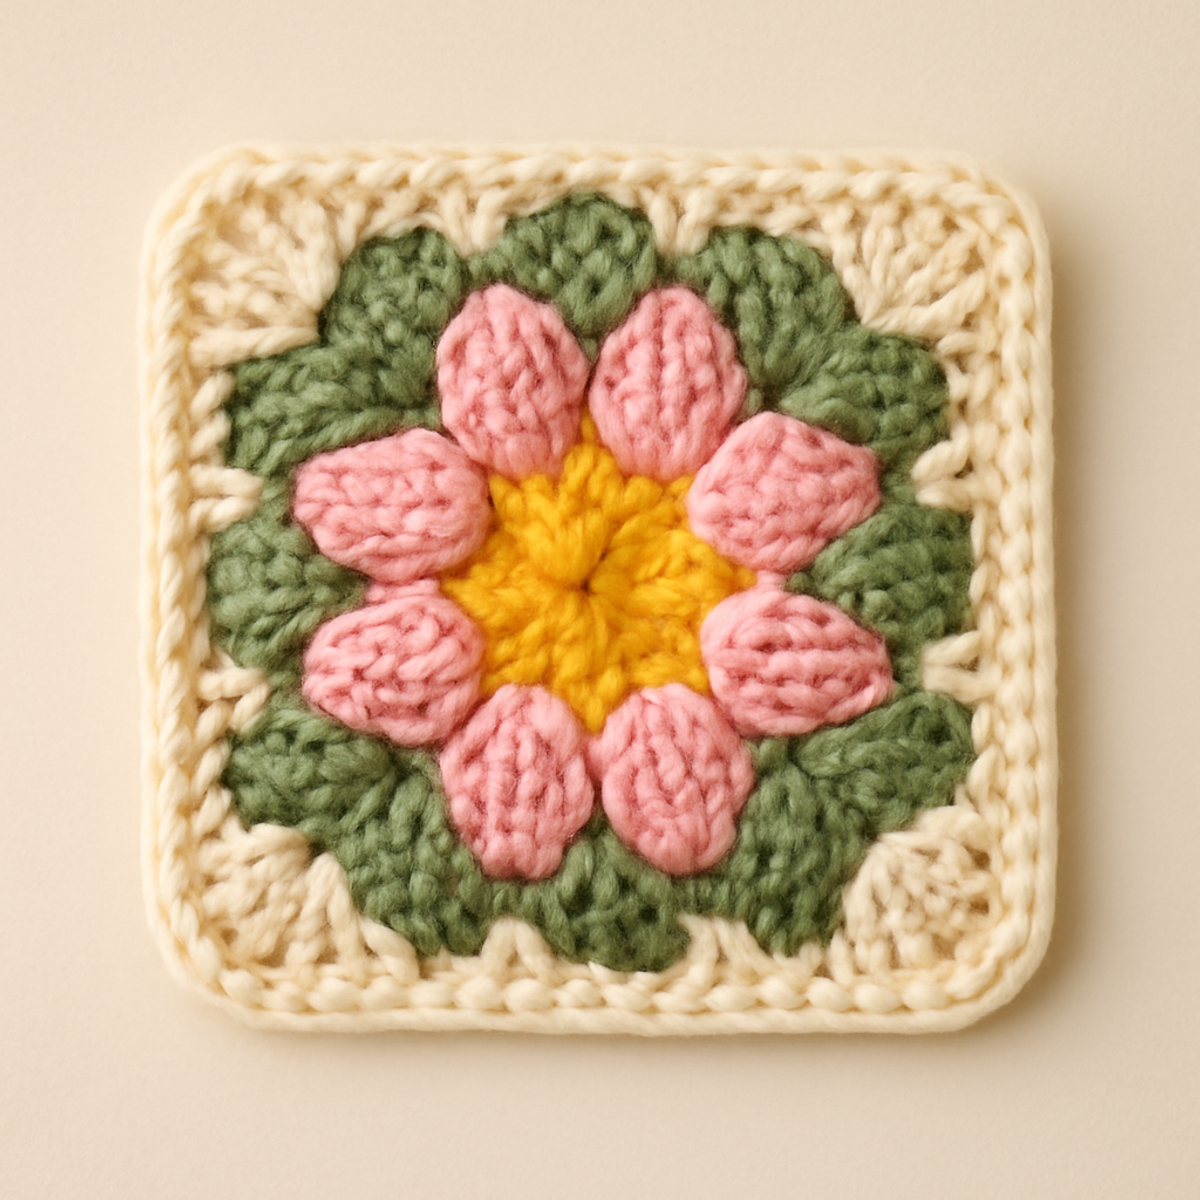
As I settled into my favorite crochet nook, the soft feel of the yarn slipped through my fingers, igniting the urge to create something beautiful. Enter the vibrant flower granny square, a delightful project that adds a touch of cheer to any space. This intermediate-level pattern invites you to explore advanced techniques while producing versatile squares perfect for throws, bags, or even coasters. Imagine the satisfaction of transforming your leftover yarn scraps into charming blooms! With its intricate design and bright colors, this square isn’t just a feast for the eyes—it’s a heartfelt piece that encourages you to stitch your own story. Ready to dive into creating this floral delight? Let’s get started!
Flower Granny Square Materials & Tools
- Medium Weight Yarn – Approximately 50-75 yards of cotton or cotton-blend yarn in vibrant colors for a delightful floral appearance.
- 4.5 mm (US 7) Hook – Ideal for medium weight yarn, helping create a defined stitch for the flower granny square.
- 5.0 mm (US H/8) Hook – Optionally use for a looser gauge, especially if you prefer a softer drape in your squares.
Why is the Flower Granny Square So Appealing?
Versatile Design: This pattern allows you to create squares that fit a range of projects, from delightful throws to whimsical coasters.
Stash-Reducer: Perfect for utilizing those leftover yarn bits, this project transforms scraps into stunning floral pieces.
Textured Beauty: The combination of double crochet and single crochet stitches adds a charming depth and dimension to each square.
Colorful Combinations: With endless color options, you can personalize each square to match your home or seasonal themes effortlessly.
Satisfying Skill-Building: This pattern encourages you to refine your crochet techniques, making the crafting process both enjoyable and rewarding.
Gauge & Sizing Notes
Don't skip the gauge swatch! Ensuring your tension is accurate is crucial for the Flower Granny Square to keep its charming shape and vibrant design. A common guideline for crochet gauge is to create a tension swatch measuring 4×4 inches (10×10 cm), which typically translates to around 14 double crochets by 8 rows—this can vary based on individual tension. If you’d like your squares to be larger or smaller, simply adjust your starting chain in multiples of 6, adding or subtracting to fine-tune the size. If your swatch is smaller, try going up a hook size; if it’s larger, a smaller hook may produce the perfect fit. Happy crocheting!
Step-by-Step Pattern for Flower Granny Square
Row 1: Center Circle
Begin by creating a magic ring. Ch 1, then work 8 sc into the ring. Pull the tail to close the ring and join with a sl st to the first sc. This creates the central yellow circle, which should be snug and round (8 sts).
Round 2: Flower Petals
Ch 3 (counts as first dc), then work 2 dc in the same sc from Round 1, ch 2, and sl st to the next sc. Repeat this pattern: 3 dc, ch 2, sl st into the next sc for a total of 4 petals around the circle. Your work will have a petal-like appearance by the end of this round (4 petals).
Round 3: Add Leaves
In the ch-2 spaces created, make 3 sc into each space to form the green leaves. This will enhance the flower granny square’s layered effect. Ensure that the leaves are evenly spaced, filling in each petal's base and creating a nice balance (12 sc).
Round 4: Create Border
Switch to the cream yarn for the border. Ch 1 and work 1 sc in each sc and ch space around the square. This round adds definition to your flower granny square, creating a nice transition from the vibrant flower to the border. Join with a sl st to the first sc to finish this round (30 sc).
Step 5: Finishing Touches
To finalize the flower granny square, fasten off all yarn and weave in any loose ends using a tapestry needle. For a neat appearance, lightly block your square by dampening it with water and pinning it to shape. This step highlights the floral design and helps your work lay flat.
What to Pair with Vibrant Floral Granny Square?
Creating a collection of matching crochet projects adds a lovely, cohesive touch to your home décor and gifting options.
- Cozy Throw Blanket: Combine multiple squares into a warm blanket that showcases your floral designs, perfect for snuggling up on chilly evenings.
- Charming Coasters: Use the flower granny square pattern to create colorful coasters, protecting your tables while adding delightful charm to your coffee breaks.
- Stylish Tote Bag: Stitch together a few squares to craft a tote bag that brings a splash of color to your daily outings, making errands feel more cheerful.
- Floral Wall Hanging: Attach squares together in a grid or pattern to create a stunning wall piece, brightening up your space with vibrant hues and textures.
- Matching Headband: Turn a square into a fashion-forward headband that adds a floral flair to your outfit while keeping your hair in place.
- Delightful Pouch: Create a small pouch using the same pattern for storing essentials, bringing beauty and function together in your crafting journey.
Expert Tips for Flower Granny Square
-
Consistent Tension: Maintain consistent tension throughout your work to ensure your flower granny square has a neat and even edge. This prevents the square from becoming misshapen.
-
Count Your Stitches: Regularly count your stitches in each round to avoid losing track, which can lead to uneven squares. A stitch marker can be a great help here!
-
Block Your Work: Consider blocking your finished square to enhance the floral details and help the stitches open up beautifully. This added step can elevate your piece.
-
Weave in Ends: Finish by securely weaving in any loose yarn ends with a tapestry needle. This gives your flower granny square a professional look and keeps it neat.
-
Use Scraps Wisely: If using multiple colors, plan and arrange your scraps beforehand. This keeps your project organized and minimizes the risk of running out of a particular shade.
How to Wash and Care for Your Flower Granny Square
-
Machine Washing: Wash your flower granny square in cold water on a gentle cycle to prevent damage to the intricate stitches, and avoid harsh agitation that can cause felting.
-
Hand Washing: If you prefer, hand wash your granny square in cool water with a mild detergent. Gently press the water out without twisting to minimize stretching or distortion.
-
Drying/Blocking: Lay your flower granny square flat to dry on a clean, dry towel, reshaping it to maintain its square form. Blocking enhances the floral design and ensures it looks its best.
-
Storage: Store your finished squares in a cool, dry place, ideally folded gently to prevent creases and keep them fresh for your next project. Enjoy the beauty of your flower granny square for years to come!
Flower Granny Square Customizations
Let your creativity bloom with delightful twists and adjustments to this charming pattern!
-
Color Variations: Experiment with seasonal hues; consider warm oranges and browns for a cozy autumn vibe.
-
Yarn Choices: Swap cotton for a plush acrylic blend for a softer touch, perfect for snuggling. There's nothing quite like the feeling of yarn sliding smoothly through your fingers.
-
Size Adjustments: Use a larger hook to create oversized squares that can stand alone as statement pieces or build into bigger projects.
-
Texture Enhancements: Add popcorn stitches or puffs for playful texture and dimension that draws the eye and adds character.
-
Embellishment Ideas: Consider adding beads or buttons in the center of the flower for a pop of enchantment, transforming your square into a unique treasure.
-
Layered Designs: Try combining multiple squares into a colorful mandala or patchwork blanket to showcase your creativity and style.
-
Borders with Flair: Experiment with textured borders such as scallops or shells for an eye-catching finish that frames your masterpiece beautifully.
-
Personalization: Customize sizes for different projects—mini squares for coasters, or larger versions for pillows. Each one tells a special story!
Flower Granny Square FAQs
Can I substitute yarn for this flower granny square pattern?
Absolutely! You can swap cotton yarn with acrylic or other medium weight fibers, although the drape and texture may vary. Just remember to adjust your hook size if needed to maintain the square's integrity!
How can I adjust the size of my flower granny square?
It's a simple fix! To make your square bigger, use a larger hook or add extra rounds. Conversely, to make it smaller, you could switch to a lighter yarn or reduce the number of rounds, ensuring you maintain a balanced stitch count.
Why is my work curling at the edges?
Don't panic! Curling could be a sign that your tension is too tight. Make sure your stitches are relaxed. You can also block your square after finishing to help it lie flat and showcase its beautiful floral design.
What hook size should I use for this pattern?
I recommend using a 4.5 mm (US 7) hook for a standard medium weight yarn. If you prefer a looser gauge for a softer drape, try the 5 mm (US H/8) hook instead. Just keep an eye on your stitch definition!
How do I fix dropped stitches in my flower granny square?
It's an easy fix! Simply identify the dropped stitch and use your hook to pull that yarn back up. Then, crochet it back into place, ensuring that the surrounding stitches are snug and even. Your floral square will look flawless again in no time!
How do I achieve consistent tension throughout my flower granny square?
To maintain consistent tension, take your time while crocheting. Practice makes perfect, so experiment with different tightness until you find a comfortable rhythm. You might also find it helpful to use a stitch marker to remind yourself to stay relaxed in your stitching.

Leave a Reply