
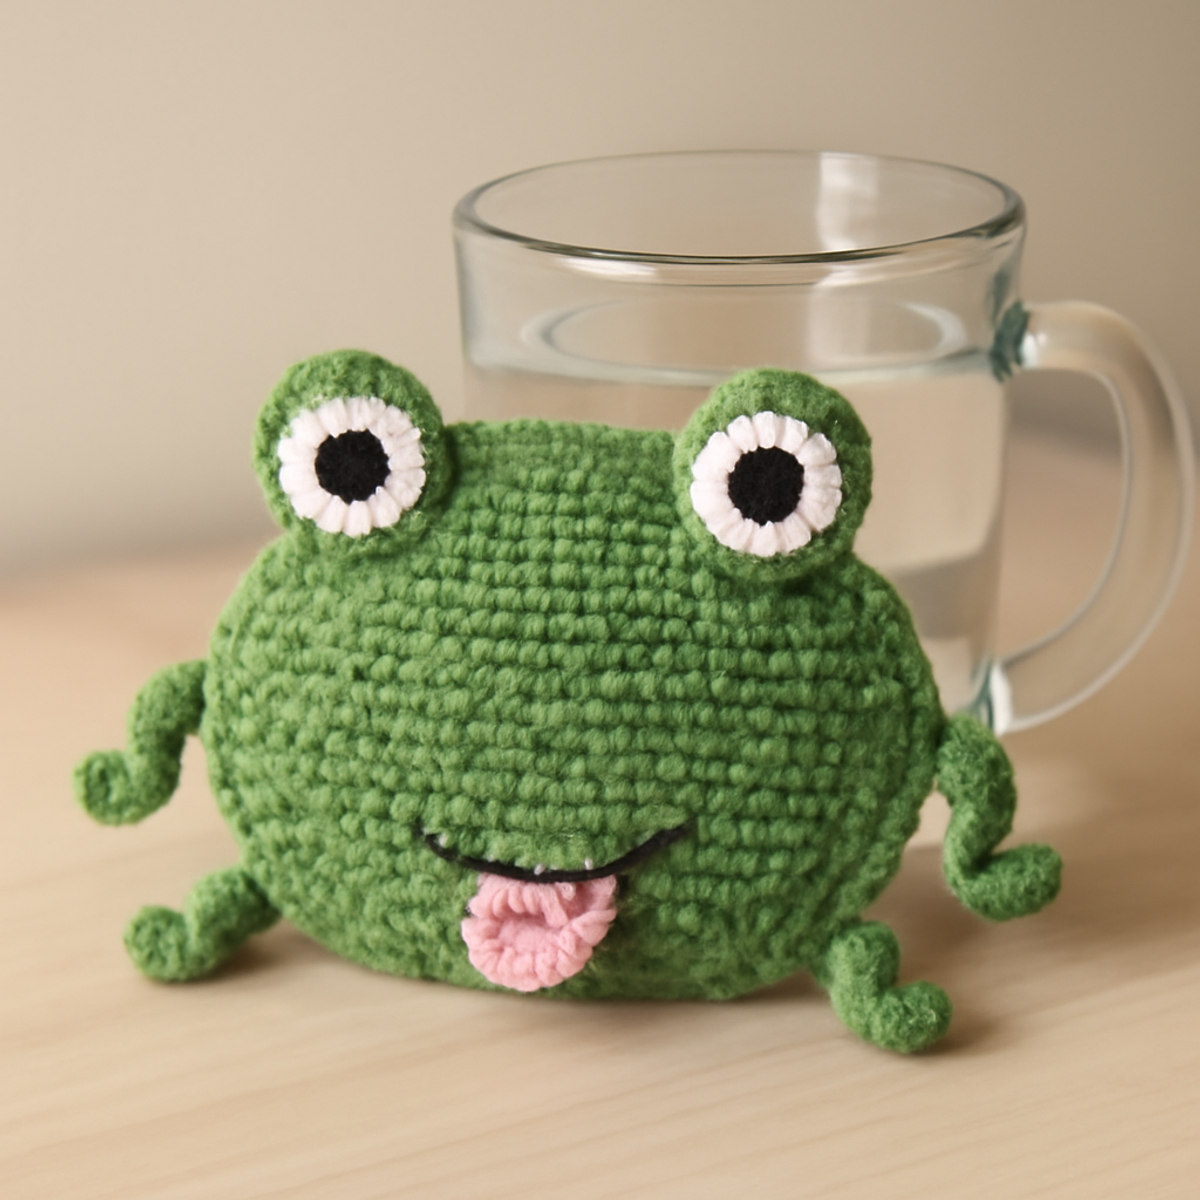
As I sat with my favorite warm mug in hand, I couldn't help but feel the need for a touch of charm to brighten my sipping routine. Enter the delightful crochet frog mug hugger, a whimsical project that combines functionality with a playful flair. Imagine wrapping your warm drink in the embrace of this adorable fellow, not only keeping your hands safe from the heat but also bringing an instant smile to your face. This project is perfect for crafters of all skill levels—especially beginners—and offers the added perk of being a wonderful gift for any frog enthusiast. So, let’s dive into the stitches and bring this cheerful character to life, making your tea or coffee moments just a little more special!
Crochet Frog Mug Hugger Materials & Tools
- Worsted Weight Cotton Yarn – Approximately 40g of vibrant green for the main body; small amounts of white, black, and pink for eyes and tongue.
- 3.5 mm (US E/4) Hook – Ideal for achieving the tight stitch desired for your crochet frog mug hugger.
- Scissors – A must-have for trimming any yarn ends with precision.
- Yarn Needle – Perfect for weaving in ends and assembling your adorable mug hugger.
- Optional Stitch Markers – Helpful for keeping track of rounds, especially if you’re a beginner!
Why Will You Love This Pattern?
Whimsical Design: This crochet frog mug hugger is the perfect way to add a dash of charm to your kitchen décor, captivating everyone who sees it.
Perfect for Beginners: With straightforward rounds and basic stitches, this pattern welcomes newcomers into the crochet world with open arms.
Fun Customizations: Feel free to explore alternative colors or embellishments, allowing you to craft a unique piece that reflects your personality.
Functional & Fun: Not only is it a delightful accessory, but it also serves a practical purpose by protecting your hands from heat.
Quick Project: Complete this little gem in no time, making it an excellent choice for gifting or simply treating yourself.
How to Check Your Gauge for Crochet Frog Mug Hugger
Don't skip the gauge swatch! Ensuring that your tension is correct with the crochet frog mug hugger is key to achieving the perfect fit around your mug. A standard gauge measurement often ranges around 4×4 inches (10×10 cm), with approximately 14 single crochets by 8 rows being a helpful guideline. If you want to make your mug hugger larger, simply increase your starting chain in multiples of 6 to add extra width. Conversely, if your swatch is too small, relax your tension or consider going up a hook size for a looser gauge. Remember, perfecting your crochet gauge will bring your whimsical frog to life in all its charming glory!
Step-by-Step Pattern for crochet frog mug hugger
Row 1: Foundation Chain
Start by making a slip knot and chaining 10 (ch 10). This will serve as the foundation of your crochet frog mug hugger. Make sure your chain is not too tight; it should have a little give, allowing it to easily form the curves needed later.
Round 1: Creating the Base
Join with a slip stitch (sl st) to form a ring. To build the base, work 2 single crochets (sc) in each chain (20 sts total). Your work should begin to curve, forming a snug base for your mug hugger.
Round 2: Increasing the Diameter
In this round, work 1 sc in the next stitch, then 2 sc in the following stitch. Repeat this pattern around (30 sts total). This will gradually increase the size of the mug hugger, ensuring it fits snugly but not too tightly around your mug.
Round 3: Continuing the Base
For this round, work 1 sc in the first two stitches, then 2 sc in the next stitch. Repeat until the end of the round (40 sts total). Your work should begin to take a more pronounced shape, ready to embrace your mug snugly.
Round 4: Setting the Shape
Now, work 1 sc in the next three stitches, and then 2 sc in the next stitch. Continue this pattern around (50 sts total). At this point, the mug hugger should be visually rounded, representing the frog's belly as part of its quirky charm.
Row 5: Base Completion
For the final round of the base, work 1 sc in the next four stitches, followed by 2 sc in the next stitch (60 sts total). At the end of this round, your work should lay flat, forming a solid surface that will support the structure of the entire crochet frog mug hugger.
Step 6: Crafting the Eyes (Make 2)
Using the white yarn, create a magic ring (MR). Work 6 sc into the ring, then pull tight to close. Your eyes should be starting to form a small circle (6 sts). This will add a whimsical focal point to your frog mug hugger.
Step 7: Adding Pupils
Change to black yarn and make a slip stitch in the center of each eye. Work 1 sc in the same stitch, creating a small pupil (2 sts). This tiny detail brings your crochet frog to life, making it more expressive and fun.
Step 8: Making the Legs (Make 4)
Using the green yarn, create a magic ring and work 8 hdc (half double crochet) into the ring, then pull tight (8 sts). These legs will give your mug hugger some playful charm as they dangle on the edges of your mug.
Step 9: Curly Legs
For each leg, in the next row, work 1 dc (double crochet) in each stitch and then chain 5, slip stitch back into the first chain to create a curl. Repeat for all four legs. Your legs should start to form curly ends, adding to the froggy feel!
Step 10: Assembling the Frog
With all pieces complete, use your yarn needle to sew the eyes, tongue, and legs onto the body of the crochet frog mug hugger. Position everything so that it looks charming and playful, ensuring the eyes are centered and the legs hang evenly.
Step 11: Finishing Touches
Weave in any loose ends, blocking gently to set shape. Check that everything is securely attached and that your crochet frog mug hugger is ready to wrap around your favorite mug, showcasing its whimsical character.
How to Wash and Care for Your Crochet Frog Mug Hugger
Machine Washing: Use a gentle cycle in cold water to keep your crochet frog mug hugger looking vibrant. Avoid agitation, as it can cause pilling or felting.
Hand Washing: Gently hand wash your mug hugger in cold water with mild detergent. This method preserves the integrity of the stitches and the playful design.
Drying/Blocking: Lay your crochet frog mug hugger flat on a clean towel to dry. Avoid wringing it out to maintain its shape and whimsical character.
Storage: Store your mug hugger in a cool, dry place, away from direct sunlight. This helps prevent fading and keeps it ready for your cozy sipping moments.
What to Pair with the Crochet Frog Mug Hugger?
As you finish crafting your whimsical froggy friend, consider how you can expand the charm of your cozy corner.
-
Charming Coasters: Add a splash of fun with matching frog coasters, protecting your surfaces while keeping the theme alive. They'll brighten up any coffee table.
-
Frog-Themed Plant Hanger: Bring your love for frogs into your greenery with a playful plant hanger that dangles from the ceiling, adding whimsy to your decor. It's a touch of nature with a creative twist!
-
Crochet Frog Beanie: Create a cozy beanie adorned with frog features to keep your head warm and stylish! It’s perfect for outdoor adventures or simply staying snug inside.
-
Frog Keychain: A cute little keychain to carry your love for this charming creature wherever you go. It's a fantastic gift idea or a fun personal accessory!
-
Mini Frog Plushie: Craft a delightful mini frog plushie as a companion for your mug hugger, providing endless cuteness to your space or making a delightful gift.
Crochet Frog Mug Hugger Customizations
Embrace your creativity and let your crochet frog mug hugger reflect your unique style with these fun customization ideas!
-
Yarn Type: Switch to a cotton blend for a softer, lighter feel and enhanced moisture-wicking properties while enjoying your drink.
-
Color Variations: Experiment with alternative colors like soft tan or cheerful blue to create a totally new character, like a turtle or a whimsical fish.
-
Size Adjustment: Scale up the pattern for larger mugs or downsize for petite cups to perfectly fit every drinkware in your collection.
-
Embellished Eyes: Consider adding small buttons or embroidered details for the eyes, giving your mug hugger an extra touch of whimsy that catches the eye.
-
Added Texture: Introduce wool yarn for a cozy texture or fluffy chenille for a delightful, huggable feel that enhances the overall charm of the design.
-
Curly Legs Variation: Try varying the curliness of the legs; making them longer or shorter adds different personality to your froggy friend and keeps the design fresh.
-
Gorgeous Fringe: Attach a playful fringe around the base for a fun and unique twist, creating an artsy look that enhances your mug’s character.
-
Charming Border: Add a simple contrast color border around the edge for a finished look that beautifully frames your completed masterpiece.
Expert Tips for Your Crochet Frog Mug Hugger
-
Check Your Gauge: Regularly check your tension to ensure your stitches are consistent. This helps maintain the intended size for your mug hugger.
-
Count Stitches: At the end of each round, count your stitches. This prevents unexpected increases or decreases, keeping your crochet frog mug hugger snug and secure.
-
Block for Shape: After completing your project, gently block it to help set the shape. This can enhance the final appearance and ensure it fits well around your mug.
-
Secure Assembly: When attaching eyes, legs, and tongue, make sure everything is firmly stitched in place. A secure assembly will help your mug hugger withstand use and maintain its playful charm.
-
Avoid Tight Chains: When starting your foundation chain, keep it loose. A tight chain can lead to difficulties shaping the mug hugger later. Enjoy your crochet frog mug hugger journey!
Crochet Frog Mug Hugger FAQs
Can I use a different type of yarn for my crochet frog mug hugger?
Absolutely! While worsted weight cotton yarn is recommended, you can experiment with cotton blends or even acrylic yarn. Just be mindful that this might change the texture, so adjust your hook size accordingly to maintain the desired snug fit around your mug.
What if my mug hugger is too small?
Don't panic! If your crochet frog mug hugger doesn’t fit snugly around your mug, you may want to check your gauge. Sometimes using a larger hook or adding a few extra rounds can help increase the size. You could also simply go back and make additional increases in the base rounds.
Why is my work curling while I crochet?
Curling can be quite common, especially if your foundation chain is too tight! Check your tension when starting, and ensure that you’re counting your stitches as you go. If curling persists, consider blocking it gently once finished to help shape it.
What size hook should I use for this project?
For the crochet frog mug hugger, a 3.5 mm (US E/4) hook is recommended. This size works well with worsted weight cotton yarn to create a tight stitch pattern. However, if you find your stitches are far too loose or tight, feel free to adjust your hook size accordingly.
How can I prevent gaps when attaching the legs and eyes?
To avoid gaps, I recommend sewing the pieces on tightly and using a whip stitch or mattress stitch for assembly. Make sure to position everything securely, and don't hesitate to weave in the ends well to maintain the overall durability of your crochet froggy friend.
What should I do if I drop a stitch?
It’s an easy fix! Simply pull back to the dropped stitch and use your crochet hook to lift the strand back up, placing it back on your hook. If you notice several dropped stitches, you might want to slow down and recount your stitches at the end of each round to prevent future mishaps.

Leave a Reply