
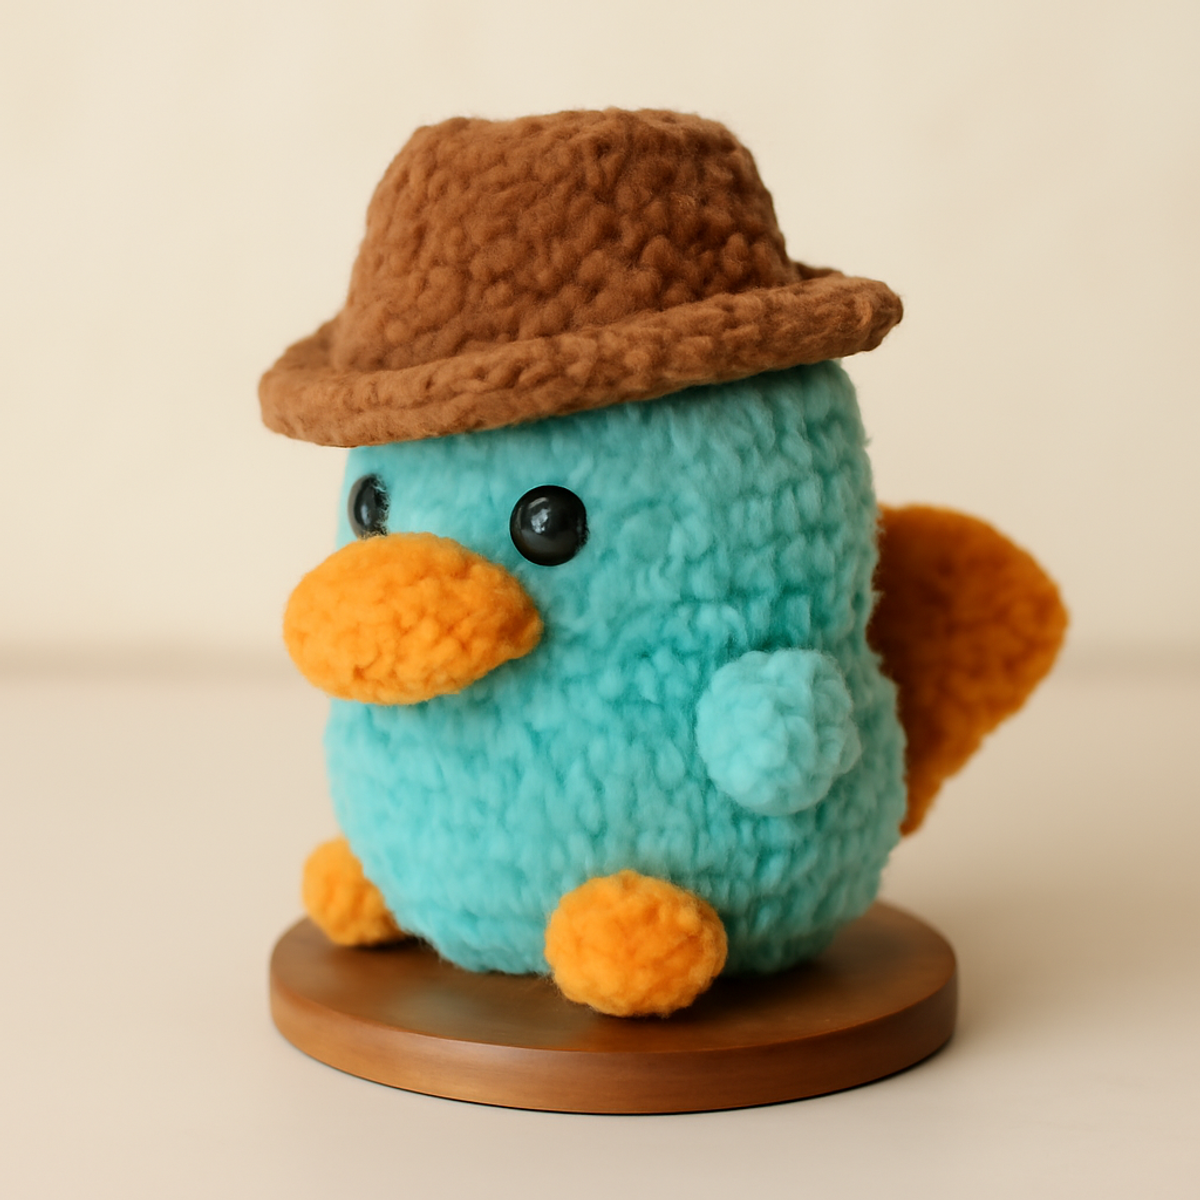
As I settled into my favorite crochet nook, surrounded by colorful skeins, the idea of crafting a crochet platypus doll sparked a joyful whimsy within me. This adorable project offers not just the chance to create a soft, huggable companion, but also presents a delightful opportunity to explore a variety of textured stitches that elevate your skills. What's truly special about this crochet platypus doll is its multifaceted charm; it’s a playful decoration for your home or an unforgettable gift for the children and plush toy enthusiasts in your life. With the chance to enjoy both the process and the outcome, I'm excited to guide you through each step. Grab your hook, and let’s dive into creating a quirky treat that’s bound to bring smiles all around!
Crochet Platypus Doll Materials & Tools
- Medium-Weight Yarn – Ideal in a soft polyester or acrylic blend for achieving that plushy finish, with an estimated yardage of 200-300 yards.
- 4.5mm (US 7) Crochet Hook – Perfectly suited for the medium-weight yarn, ensuring the right tension and texture for your doll.
- Safety Eyes (10mm) – These add a playful look to your crochet platypus doll, providing a safe option for children's toys.
- Stitch Markers – Essential for maintaining your stitch count as you navigate through different sections of this charming project.
Why is the crochet platypus doll special?
Whimsical Design: This crochet platypus doll features a playful style, making it a captivating project that appeals to both kids and adults.
Tactile Experience: The use of textured stitches provides a delightful challenge, enhancing the overall look and feel of your finished creation.
Versatile Creation: This project isn't just about crafting a toy; it serves as a charming home decor piece or a thoughtful gift for plush toy lovers.
Skill Development: Working through this pattern offers the perfect opportunity to practice various techniques, enriching your crochet repertoire.
Cuddle-Worthy Texture: The soft, plush yarn creates a doll that's not just adorable but also perfect for snuggling, making it an ideal companion for any child.
Customization Fun: Get creative by experimenting with yarn colors and embellishments, allowing you to personalize your platypus to match your unique style!
Gauge & Sizing Notes
Don't skip the gauge swatch! Checking your tension is essential when creating your charming crochet platypus doll, as achieving the right measurements will ensure your doll turns out as cute and cuddly as envisioned. A good starting point for gauge is a 4×4 inch (10×10 cm) square made with 14 single crochets (sc) by 8 rows; however, always adjust based on your own crochet style. If you want your platypus to be larger or smaller, simply modify your starting chain in multiples of 6. If your swatch ends up too tight, consider using a larger hook size to achieve the desired gauge for this delightful project!
Step-by-Step Pattern for Crochet Platypus Doll
Row 1: Starting the Body
Begin by making a magic ring and work 6 single crochets (sc) into the ring. Pull the ring snug, and join with a slip stitch (sl st) to the first sc, creating a tight circle for the base of the body. Your work should form a small, defined circle (6 sts).
Round 2: Increasing the Body
Chain 1 (ch 1) and then work 2 single crochets (sc) in each stitch around. This will form the first increase round, leading to a wider body for your crochet platypus doll. Join with a slip stitch (sl st) to close the round, and your work should appear rounder as it expands (12 sts).
Round 3: Shaping the Body
Ch 1 and now work 1 sc in the next stitch, 2 sc in the following stitch around. This helps create a smooth shape for the body of the platypus, providing both form and texture. Join with a slip stitch (sl st) at the end (18 sts).
Round 4: Continuing the Curves
Ch 1 and work 1 sc in the next 2 stitches, 2 sc in the next around. This adjustment continues shaping the body, adding gentle curves that help achieve that adorable plumpness. Your resulting shape should be increasing comfortably (24 sts).
Round 5-8: Building the Body Height
For these rounds, continue working 1 sc in each stitch around for four rows (Rounds 5 to 8). This establishes the height of the crochet platypus doll. You will effectively stack four rounds of sc, giving the body a solid foundation (24 sts each round).
Row 9: Beginning the Tail
To start forming the tail, chain 1 and work 1 sc in the next 3 stitches, 2 sc in the next stitch around. This row subtly begins to taper, shaping the back of your platypus. Ideally, your project should begin to flatten slightly at this stage (30 sts).
Row 10: Finishing the Body Shape
Ch 1 and work 1 sc in the next 4 stitches, 2 sc in the next stitch around. This step continues defining the tail area while maintaining the fullness of the body. At this point, it should seem more elongated as you taper (36 sts).
Row 11: Closing the Body
Ch 1 and work 1 sc in the next 5 stitches, 2 sc in the next stitch around. This will complete the larger body section while reaching for the tip of the tail. You should notice a more symmetric shape happening in your fcrochet platypus doll (42 sts).
Step 12: Beak Creation
Switch to contrasting orange yarn. Chain 6 and work 1 sc in the second ch from the hook, 1 hdc in the next, and 3 dc in the last stitch. This forms the beak of the platypus, giving a cute, playful detail. Your beak should have a nice tapering shape at this point (5 sts).
Step 13: Attaching the Beak
Position the beak on the front of the platypus body. Using a yarn needle, sew it securely to the head while ensuring it has a natural lift. This detail should elevate your doll's charm, making it instantly recognizable as a platypus.
Step 14: Feet Construction
With the same contrasting yarn, chain 4, then work 1 sc in the second ch from the hook, 1 hdc in the next, and 2 dc in the last. You will need to create two feet using this same method, adding to your crochet platypus doll's mobility. Each foot should curve slightly (4 sts for each foot).
Step 15: Hat Creation
Switch to brown yarn and create a magic ring, then work 8 sc into the ring. Pull it tight and join with a sl st. This hat will top off your crochet platypus doll, providing a cozy look fitting for an adorable companion (8 sts).
Step 16: Hat Expansion
Ch 1 and work 1 sc in each stitch around, repeating this for three rounds to build hat height. This simple repeat will yield accumulating rounds for the hat, ensuring it has the perfect depth for the head (8 sts each round).
Step 17: Assembly
Once all components are crocheted, securely stitch the beak, eyes, and feet onto the body. Create placement for each piece, ensuring they feel aligned and natural. Firmly attach them, enhancing the overall character of your crochet platypus doll, making a cuddly companion.
Step 18: Finishing Touches
Finally, weave in any loose yarn ends and consider blocking your crochet platypus doll to set its shapes well. You should have a plush, stable finish to this whimsical creation, making it perfect for snuggling or displaying.
What to Pair with Crochet Platypus Doll
Exploring the whimsical world of crochet can be even more delightful when you create a matching set to accompany your platypus doll.
- Snuggly Blanket: A cozy throw to wrap around your platypus, offering an extra layer of warmth and comfort.
- Charming Crochet Hat: Create a miniature hat to match your doll’s accessory, adding a touch of whimsy and character to your collection.
- Playful Plush Friends: Craft a small assortment of animal friends, like a turtle or a bear, to encourage imaginative play alongside your crochet platypus doll.
- Textured Cushion: Make a matching decorative pillow that enhances the cozy aesthetic of your home and showcases your crochet skills.
- Fun Toy Storage: Crochet a cute basket to store toys or other crochet projects, perfectly complementing your platypus in both function and style.
Crochet Platypus Doll Variations
Feel free to personalize your crochet platypus doll with these delightful options, bringing your unique vision to life!
- Yarn Substitutions: Switch to a cotton blend for a more structured look, perfect for display or decorative purposes.
- Color Play: Experiment with pastel shades for a softer vibe, or go bold with vibrant colors for a playful character that stands out.
- Size Adjustments: Use bulky yarn to create a larger, huggable platypus, ideal for kids who love a supersized cuddle buddy.
- Textured Extras: Add fun elements like pom-poms or fringe to the hat for flair, transforming a simple accessory into a standout feature.
- Border Details: Enhance the edges of the hat or feet with contrasting colors for a pop of detail that makes your platypus even more charming.
- Eye Options: Use safety eyes in different sizes or even embroidery to customize the expression, giving your platypus a unique personality.
- Feature Variants: Experiment with beak colors or shapes, incorporating unique stitches to craft an even more original look.
- Themed Accessories: Create little hats or scarves in seasonal colors to make your platypus a fun companion for any occasion throughout the year.
Expert Tips for Crochet Platypus Doll
-
Watch Your Tension: Maintaining a consistent gauge is crucial for a well-shaped crochet platypus doll, so be mindful of your tension throughout the project.
-
Count Your Stitches: Regularly check your stitch counts after each round to avoid accidental increases or decreases, which can disrupt the shape of your doll.
-
Secure Assembly: When attaching the beak, eyes, and feet, ensure each piece is tightly stitched to prevent loose parts that could be unsafe for children.
-
Consider Blocking: Don't skip blocking your finished project—this helps set the delightful shapes, particularly around the head and hat for a polished look.
-
Use Stitch Markers: Place stitch markers at the beginning of each round; this will help you keep track of your progress and maintain a neat finish.
How to Wash and Care for Your Crochet Platypus Doll
Machine Washing: Use a gentle cycle with cold water to protect the soft fibers of your crochet platypus doll. Avoid agitation to prevent any unwanted felting or pilling.
Hand Washing: For a more delicate approach, hand wash your doll in cold water using mild detergent. This ensures that the plush texture remains intact while removing dirt.
Drying/Blocking: Lay your crochet platypus doll flat on a clean towel to dry. Reshape any areas as needed during this process to maintain its adorable form and cuddly texture.
Storage: Store your platypus in a cool, dry area to keep it safe from moisture and dust. Avoid crushing it to help preserve its shape and fluffy appeal for snuggles!
Crochet Platypus Doll FAQs
Can I substitute yarn types for the crochet platypus doll?
Absolutely! While a medium-weight yarn works best, you can experiment with different blends like cotton for a firmer texture or a super soft acrylic for an extra plush feel. Just keep in mind that yarn weight will affect the overall size and drape of your finished doll.
How can I adjust the size of my crochet platypus doll?
If you're looking to make a larger or smaller version, you can modify the yarn weight. Using a bulky yarn will yield a bigger plushie, while sport or DK weight can create a smaller one. Adjusting your hook size accordingly will also help maintain the shape and finish you desire.
Why is my crochet platypus doll curling at the edges?
Don't panic! Curling is often a sign of tension issues. Make sure you’re keeping a consistent gauge throughout your work. If it’s still curling after finishing, blocking your doll can help set those cute shapes and flatten any stubborn edges!
What size hook should I use for the crochet platypus doll?
For a medium-weight yarn, I recommend using a 4.5mm (US 7) crochet hook for best results. This size helps create the perfect balance of firmness and softness, ensuring your crochet platypus doll retains its plushy charm.
What should I do if I drop a stitch while working on the crochet platypus doll?
It's an easy fix! Simply identify the dropped stitch and use your crochet hook to pull it back up through the work. If you lose track of the count, just recount your stitches, and don’t hesitate to use stitch markers for better accuracy in future rounds!

Leave a Reply