
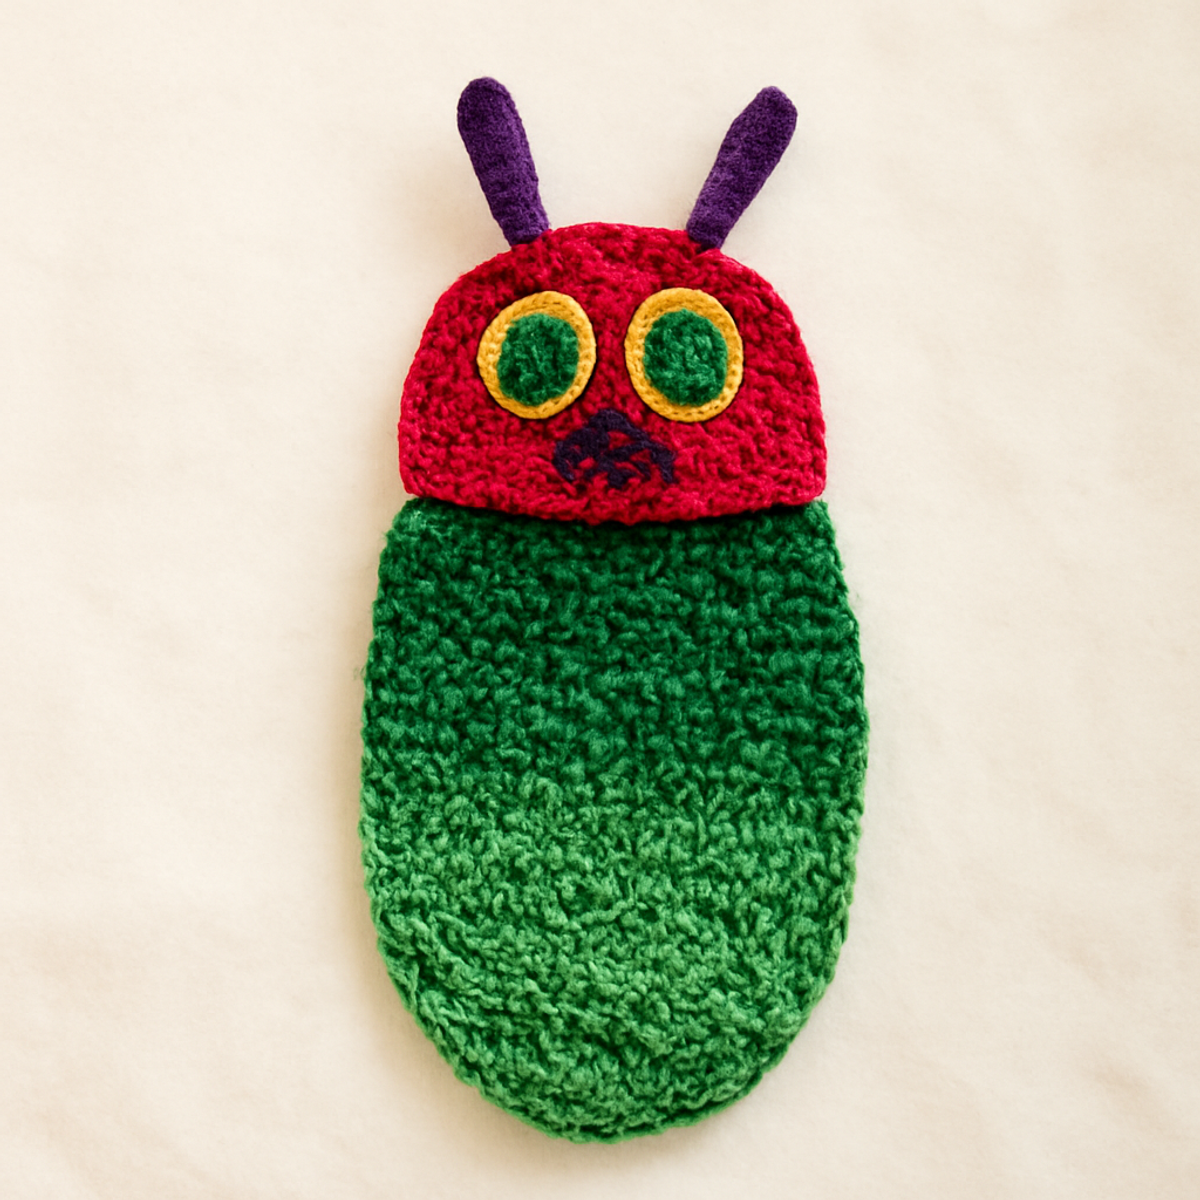
As I cozy up with my yarn, the softness of the worsted weight spreads through my fingers, sparking inspiration for a delightful new project. Enter the 'Cuddly Caterpillar Cocoon,' a whimsical baby cocoon crochet that transforms simple stitches into a charming masterpiece for newborns. This pattern is not only beginner-friendly but also works up quickly, making it a fantastic option for last-minute gifts. Imagine the warmth it provides as little ones snuggle inside, or the adorable photos parents will treasure as they capture those precious moments. With its playful design and vibrant colors, this cocoon will surely bring smiles and warmth to your crochet journey. So, grab your hook and let’s dive into creating something special that your little ones (and the parents!) will adore!
Baby Cocoon Crochet Materials & Tools
- Medium Weight Yarn – Approximately 200-300 yards of acrylic or cotton blend for a snug and soft finish.
- 5.5mm (I-9) Crochet Hook – Ideal for achieving the perfect tension to keep your baby cocoon crochet warm and cozy.
- Yarn Needle – Great for weaving in ends smoothly for a polished look.
- Safety Eyes (optional) – Use these to give your cocoon’s hat character, adding whimsy to the delightful design.
Why Choose This Baby Cocoon Crochet?
Beginner-Friendly: This pattern is perfect for newcomers, featuring simple stitches that you can master quickly, ensuring a successful crafting experience.
Whimsical Design: The adorable caterpillar shape immediately captures the essence of childhood, making it perfect for playful photo sessions.
Soft & Cozy: Crafted from soft acrylic or cotton yarn, the cocoon wraps little ones in warmth, creating a snug environment for peaceful naps.
Fast & Fun: Work it up in no time! It's an excellent choice for those last-minute baby gifts, saving you time while spreading joy.
Endless Customization: With vibrant yarn color options, you can easily put your unique spin on this piece or even experiment with different creature designs!
Gauge & Sizing Notes
Don't skip the gauge swatch! Ensuring your tension is just right is crucial for the baby cocoon crochet project to fit snugly and look delightful. A good guideline to follow for crochet is to aim for a tension swatch of 4×4 inches (10×10 cm), which might result in a specific stich count, depending on your individual tension, so be sure to check this! To size your cocoon larger or smaller, you can adjust your starting chain in multiples of 2 or 4, depending on the desired width. If your swatch is too small, try going up a hook size; conversely, if it’s too large, consider using a smaller hook to achieve that warm, cozy fit for your little one. Happy crocheting!
Step-by-Step Pattern for Cuddly Caterpillar Cocoon
Row 1: Begin the Cocoon Base
Start by chaining 80 (or as desired for width) using the worsted weight yarn. In the second chain from the hook, work a single crochet (sc) in each chain across. Your work should be flat and even, with a total of 79 sts at the end of this row (79 sts).
Row 2: Increase for Curvature
Ch 1, turn your work. In the same stitch, make 2 sc (inc). Then, sc in each stitch across until the last stitch, where you'll do an inc again. This will create a slight curve that will help form the cocoon shape. You should have a total of 81 sts now (81 sts).
Row 3: Continue Increasing
Ch 1, turn your work. Make 2 sc in the first stitch (inc) and sc in each stitch across, performing another inc in the last stitch. The piece should start to take on a rounded shape, showing the delightful transformation of your baby cocoon crochet. Here, your stitch count will be 83 (83 sts).
Row 4: Forming the Body Shape
Ch 1, turn. Sc in each stitch across without any increases this time. This will create the body of the cocoon, providing a smooth, even base. Your fabric should be lying flat and beginning to resemble a cup shape as you work, maintaining 83 sts throughout.
Row 5: Add Texture with HDC
Ch 1, turn. Now switch to half double crochet (hdc) for added texture; hdc in each stitch across. This change will create a luxurious feel to your baby cocoon crochet as you progress. At the end of this row, you will still have 83 hdc sts in total (83 sts).
Row 6: Continue with HDC
Ch 1, turn. Repeat the hdc across, keeping your tension even and comfortable. As the rows build up the cocoon, ensure to monitor the width so it comfortably wraps around a baby. You should still count 83 hdc sts as you finish this row.
Row 7: Begin Decreasing for Tapering
Ch 1, turn your work. Start decreasing by hdc in the first two stitches, then hdc in each stitch across until the last two stitches, where you'll do another decrease (dec). This will gradually shape the cocoon's end, maintaining a snug fit. Your total at the end of this row will be 81 hdc sts (81 sts).
Row 8: Continue Tapering
Ch 1, turn. Hdc dec in the first two stitches, then work hdc across, dec again at the end of the row. This decreases will continue to taper the cocoon shape towards the top, wrapping up the cozy feel. You will have 79 hdc sts at the end (79 sts).
Row 9: Final Tapering
Ch 1, turn. Repeat the decrease process: hdc dec in the first two stitches, then hdc across, finishing with a decrease at the end. Your baby cocoon crochet should be forming a snug shape now, with a total of 77 hdc sts remaining (77 sts).
Step 10: Creating the Hat
Using a contrasting color yarn, ch 4 and join into a ring with a sl st. Work 12 dc into the ring to form the base of the hat. This round will be a focal point of your cocoon ensemble, ensuring it not only looks adorable but is also functional. At this point, you will have 12 dc sts (12 sts).
Step 11: Build the Hat
Ch 3 (counts as 1st dc), then dc in each stitch around, increasing in each stitch (2 dc in each). This will give the hat a fuller look, so it sits nicely on the cocoon. You should have 24 dc sts at the end of this round (24 sts).
Step 12: Finalize the Hat
Ch 3, dc in the first stitch, then dc across, working in each stitch. Continue this pattern without further increases until your hat reaches about 4-5 inches in height. Your delightful caterpillar hat should now take shape comfortably with no increase, maintaining the 24 dc sts (24 sts).
Step 13: Attach the Hat
Position the completed hat onto the top of the cocoon. Using a sl st, securely attach the hat to the cocoon to ensure they stay together. This final assembly step is crucial to create the adorable caterpillar look so parents can enjoy using it for photography.
Step 14: Decorative Details
Optionally, you may sew on two safety eyes to the front of the hat, and embroider a cute smile or facial features. Adding these fun touches elevates the aesthetic of your baby cocoon crochet, making it even more irresistible and charming. Your project is nearly complete!
Step 15: Finishing Touches
Weave in any loose ends with your yarn needle for a clean finish. If desired, block the cocoon to shape it nicely and enhance its overall look. Your Cuddly Caterpillar Cocoon is ready to bring smiles and warmth to little ones and their parents alike!
How to Wash and Care for Your Baby Cocoon Crochet
-
Machine Washing: Use cold water and a gentle cycle to keep your baby cocoon crochet looking fantastic. Avoid agitation to prevent felting or pilling, ensuring it stays soft and cozy.
-
Hand Washing: For extra care, hand wash your cocoon in cold water with a mild detergent. Gently squeeze the fabric without twisting to preserve its shape and texture.
-
Drying/Blocking: After washing, lay the cocoon flat on a clean surface or drying rack to maintain its beautiful shape. Avoid hanging, which can stretch out your lovely piece.
-
Storage: Store your baby cocoon crochet in a cool, dry place, away from direct sunlight. This helps maintain vibrant colors and prevents damage from dust or moths.
Expert Tips for Baby Cocoon Crochet
-
Mind Your Tension: Consistent tension is key! A slightly tighter tension will provide warmth and comfort for the little ones, so check as you go.
-
Count Every Stitch: Losing count can lead to uneven edges. Use stitch markers or a note to keep track and help maintain your stitch count throughout.
-
Block Your Work: After finishing, blocking the cocoon helps shape it beautifully and enhances the texture, ensuring a polished look for your adorable baby cocoon crochet.
-
Avoid Dropping Stitches: Pay close attention to your stitches, especially when transitioning from crochet to assembly. Dropping the first or last stitch can affect the final design.
-
Embrace Personal Flair: Don’t hesitate to customize colors and add embellishments like safety eyes or embroidery. This makes your baby cocoon crochet unique and charming!
Baby Cocoon Crochet Variations
Embrace your creativity and transform this charming pattern into your own unique masterpiece!
-
Yarn Weight Swap: Use chunky yarn for a cozier cocoon, creating an even softer, snugger fit for the little one. This will be perfect for cooler climates!
-
Color Combinations: Experiment with vibrant colors; consider a bright green body with a contrasting blue hat for a playful twist that stands out beautifully in photos.
-
Fiber Alternatives: Opt for natural cotton for breathability. This swap provides a delightful softness while being gentle on delicate skin.
-
Add Texture: Incorporate bobbles or clusters along the cocoon's body for a fun and playful texture that engages little fingers during playtime.
-
Shape Modification: Instead of a caterpillar, try transforming the cocoon into a butterfly! Use different stitch techniques to accentuate the wings and make it truly enchanting.
-
Sizing Adjustments: Adjust the starting chain for a larger cocoon, accommodating older babies and extending the project's usability.
-
Decorative Edging: Add a scalloped or shell stitch border to the edge of the cocoon for a pretty finish that adds a touch of elegance.
-
Fun Embellishments: Attach cute pom-poms or fringe to the hat to enhance the playful nature of your design, making it perfect for whimsical photoshoots.
What to Pair with Cuddly Caterpillar Cocoon?
As you create your charming cocoon, consider extending its whimsy with delightful matching projects that evoke warmth and playfulness.
-
Charming Caterpillar Hat: This adorable companion hat, mimicking the cocoon design, keeps little heads warm and adds to your photo sessions. The cheerful and colorful look will make for delightful memories captured in photos.
-
Cuddly Booties: Create sweet booties that complement the cocoon. They’ll keep tiny toes snug and offer an extra layer of charm. These booties can also be personalized with fun colors or even little antennae!
-
Playful Blanket: A cozy blanket in similar colors can tie your set together beautifully. It becomes a soft backdrop for those precious photos and offers additional warmth during playtime.
-
Matching Toy: Crochet a playful caterpillar toy in vibrant hues to complete the set. Not only does it enhance the whimsy of your baby cocoon crochet, but it also gives newborns a delightful snuggle buddy.
-
Colorful Bib: Craft a sweet bib adorned with coordinating colors and patterns to keep meal times mess-free and stylish. This small addition brings functionality to cuteness, comforting parents while enhancing the visual appeal.
Cuddly Caterpillar Cocoon FAQs
Can I use a different yarn weight than medium weight?
Absolutely! While medium weight yarn is suggested for the baby cocoon crochet project, you can use a lighter or heavier weight. Just keep in mind that the thickness of the yarn will affect the final size and warmth of the cocoon.
How can I adjust the size of the cocoon?
If you want to make your cocoon bigger or smaller, you can adjust the starting chain. For a larger cocoon, simply chain more stitches in the beginning. To make it smaller, chain fewer. Don’t forget to maintain the same stitch pattern and increases as outlined in the pattern for best results!
Why is my work curling at the edges?
Don’t panic! Curling can occur if your tension is too loose or if you’re using the wrong hook size. Make sure to keep an even tension throughout your work. If you suspect a hook size issue, try switching to a slightly smaller hook for tighter stitches.
What if I drop a stitch while crocheting?
It's an easy fix! Just carefully pick up the stitch with your hook and pull the working yarn to secure it. If multiple stitches are affected, it's best to unravel back to the last completed row and redo the stitches for a neat finish.
What hook size should I use for this baby cocoon crochet?
The recommended hook size for this pattern is a 5.5 mm (I-9) crochet hook. This size works well to achieve a cozy, snug fit for the cocoon. If you find your tension is too loose or tight, feel free to experiment with a different hook size until you’re comfortable!
Can I customize the color and design of the cocoon?
Absolutely! This project is perfect for customization. You can swap out the yarn colors for the body and hat to create unique looks, like a blue body with a yellow hat. Feel free to get creative with embellishments or even change the shape to something like a butterfly!

Leave a Reply