
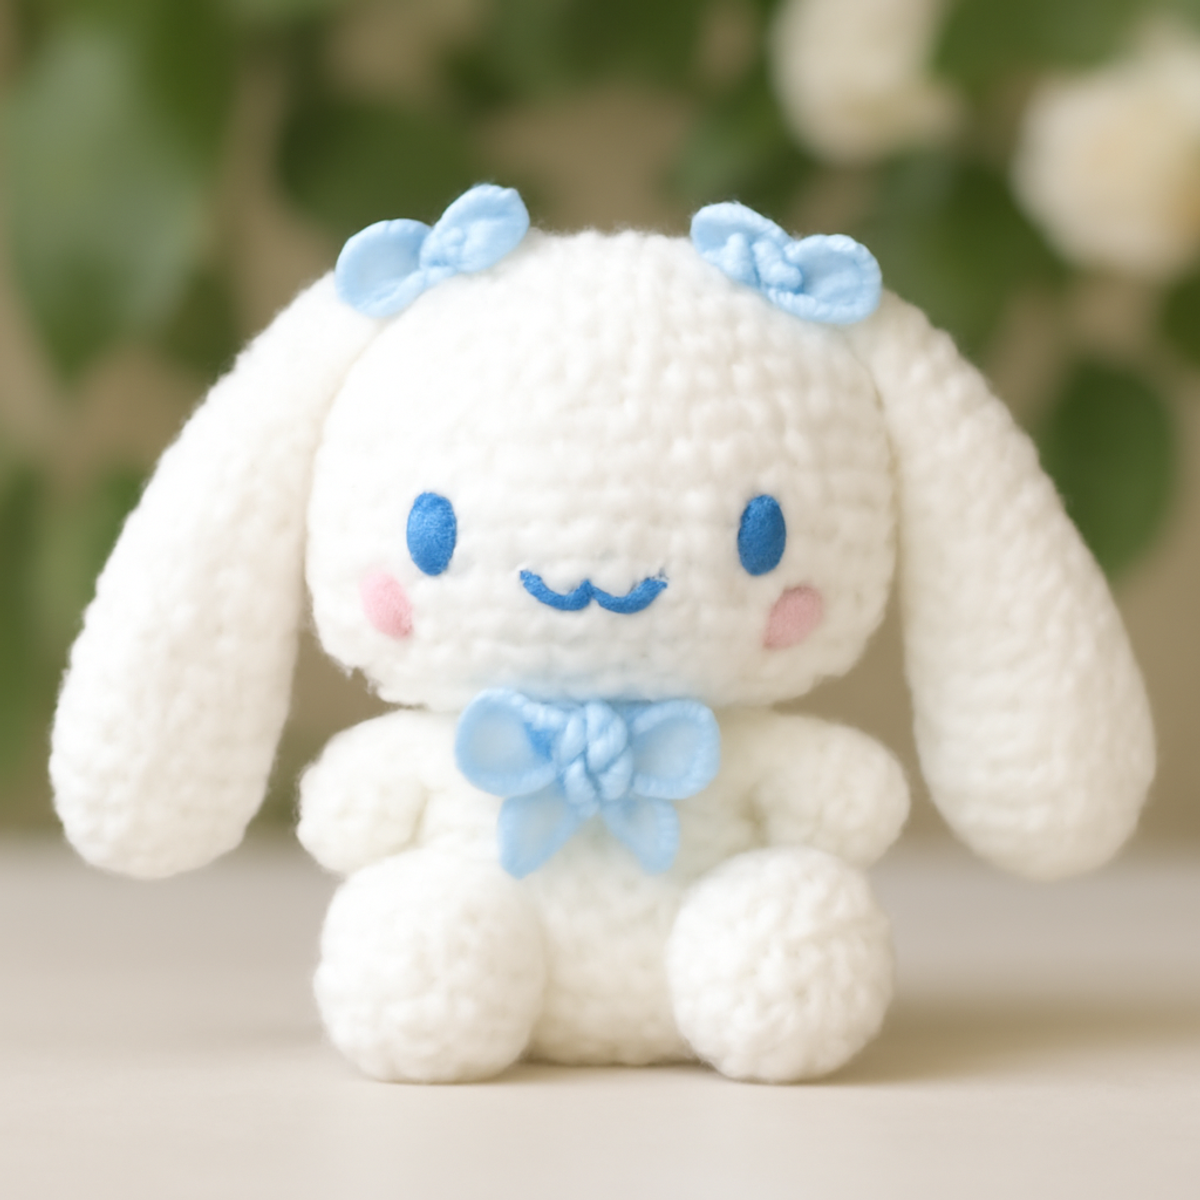
As I settled into my favorite cozy nook, an idea hopped into my mind—why not create a charming bunny amigurumi? With its delightfully soft textures and whimsical design, this lovely little fellow can easily find a spot in any child's toy collection or serve as a heartwarming decor piece. What makes this bunny amigurumi irresistible is not just the fun of working with basic crochet techniques, but the joy of developing those foundational skills while crafting something uniquely yours. Plus, it’s a fantastic stash-buster, allowing you to play with colors and textures to personalize your furry friend! I'm excited to guide you through the steps, so grab your yarn and hook—let’s bring this adorable bunny to life together!
Bunny Amigurumi Materials & Tools
- Medium Weight Yarn (Category 4) – Choose a soft acrylic or cotton blend for a plush look; you'll need approximately 100-150 yards in white for the body, 20-30 yards in light blue for bows, and about 20 yards in a contrasting color for facial features.
- 3.5 mm (US Size E) Hook – This size helps create tight stitches, ensuring no stuffing shows through.
- Yarn Needle – Essential for weaving in ends and finishing your bunny amigurumi neatly.
- Safety Eyes – Add expressive features to your bunny for a charming look.
- Stitch Markers – These will help you keep track of your rounds as you crochet.
Why is this bunny amigurumi special?
Whimsical Design: The adorable bunny amigurumi features a playful style that brightens any space, making it perfect for both kids and cozy decor!
Beginner-Friendly: Designed for crafters of all levels, this pattern employs basic crochet techniques, ensuring a smooth learning experience while boosting your skills.
Soft Texture: Crafted with medium-weight yarn, you'll create a plush, cuddly bunny that invites snuggles and playful interactions.
Customizable Colors: Bring your creativity to life! Personalize your bunny using vibrant hues or soft pastels to match any personality or decor.
Quick Project: With its straightforward construction, you can complete this charming bunny in no time, making it an excellent last-minute gift or weekend project.
Gauge & Sizing Notes
Don't skip the gauge swatch! For your bunny amigurumi, checking your crochet gauge is crucial to achieving the desired size and fluffy texture. As a general guideline, aim for a tension swatch that measures approximately 4×4 inches (10×10 cm), which should yield about 18 single crochets by 22 rows; however, check your specific tension as needs can vary. If you'd like your bunny to be larger or smaller, simply adjust your starting chain or overall rounds in multiples of 6. If your tension doesn't match, don't worry—if your swatch is too small, try going up a hook size for that perfect fit!
Step-by-Step Pattern for Charming Bunny Amigurumi
Row 1: Body Start
Begin by creating a magic circle (MC). Inside the MC, work 6 single crochets (sc). Pull the circle tight to close. This is the base of your bunny amigurumi's body. Your work should appear as a small tight circle. (6 sts)
Row 2: Increase Round
In this round, create an increase in each stitch by working 2 sc in each previous stitch. This will help form a plump shape for your bunny. After completing this round, your body should start expanding nicely. (12 sts)
Row 3: More Increases
Continue increasing by crocheting 1 sc in the first stitch, followed by an increase (2 sc in the next stitch). Repeat this pattern around for a total of 6 increases. Your piece should now start to curve outward. (18 sts)
Row 4: Shaping the Body
For this round, crochet 2 sc in the first stitch, followed by 1 sc in the next 2 stitches. Repeat around. This gradually adds volume to the bunny amigurumi without making it too wide just yet. (24 sts)
Row 5-9: Body Rounds
Work 5 rounds of sc without any increases or decreases to build the bunny's torso. Aim for even tension in your stitches to maintain a uniform appearance. At this point, your body should measure around 4 inches tall. (24 sts per round)
Row 10: Decrease Start
To start closing off the body, crochet 2 sc in the first stitch, then work a single crochet in the next 2 stitches (sc). Repeat this around, allowing the body to taper slightly. Your work should start to look more defined. (18 sts)
Row 11: Further Decreases
Continue with decreases by crocheting 1 sc in the first stitch, then 2 sc together (dec). This will add more shape to the bunny while decreasing the stitch count. Your bunny amigurumi should be looking more compact now. (12 sts)
Row 12: Finished Body
For the final round, work 6 dec around to close up the bottom of your bunny's body. Stuff the body lightly with fiberfill before completing this round. It should be firm but soft to touch. (6 sts)
Row 13: Head Start
Transition to the head by creating a new magic circle (MC). Work 6 sc into the MC. Just like the body, this will form the base for your bunny amigurumi's head. Pull tight to close. (6 sts)
Row 14: Head Increase
Increase in each stitch by crocheting 2 sc in each of the 6 stitches. This forms a rounded head shape and will set the stage for more rounds ahead. You should end up with a smooth circle. (12 sts)
Row 15-18: Work the Head
Crochet 4 rounds of sc without any increases. This helps form the bunny's head, retaining a nice soft structure. Make sure your stitches are even as you go along to keep everything neat! (12 sts per round)
Row 19: Create Face Shape
In this round, do 1 sc, followed by an increase (2 sc in next), and repeat around. This will give the bunny's face a slightly rounded look to enhance its cuteness. (18 sts)
Row 20: Final Head Shape
Next, crochet 1 sc, then a dec across the round. This starts to taper the head, giving it a defined shape. Fill the head lightly with stuffing to keep it cuddly. (12 sts)
Row 21: Complete the Head
Finish off by working 6 dec around. This will close the head entirely. Leave a long tail for sewing and ensure your bunny's head is firmly stuffed. (6 sts)
Step 1: Ears Construction
To create the ears, start with a chain of 15. In the second chain from the hook, work 1 sc and continue with 1 sc in each chain across. This forms a long strip that will be folded for floppy ears. (14 sts)
Step 2: Ear Shaping
For the next row, ch 1, turn, and work even across with sc for 5 additional rows. This adds length and thickness to your bunny amigurumi's ears. (14 sts)
Step 3: Completing Ears
Fold the ear strip in half and slip stitch the edges together to secure. You'll need two ears total. They should have a soft, floppy appearance once sewn onto the head.
Step 4: Arm Creation
For the arms, chain 8 and, in the second chain from the hook, work 1 sc across. Repeat this for 6 rows to form short and stubby arms for your bunny. (7 sts)
Step 5: Edging and Bows
Crochet small bows separately using a simple chain of 10, then slip stitch to form loops. Embellish your bunny amigurumi with these adorable bows by stitching them to the neck or ears.
Step 6: Assembly
Finally, begin assembling your bunny by positioning the head onto the body with a slip stitch or sewing method to secure. Attach the arms and ears accordingly. Your charming bunny is now coming together beautifully!
Step 7: Final Touches
Sew safety eyes for features and add any additional decorative elements you like. These small details will make your bunny amigurumi uniquely yours and full of personality!
What to Pair with Charming Bunny Amigurumi?
Imagine a delightful collection where your bunny amigurumi plays alongside whimsical creations that radiate warmth and charm.
- Matching Teddy Bear: A cuddly companion that complements your bunny, creating an enchanting duo for little ones to cherish.
- Playful Bow Headband: Use leftover yarn to craft a charming headband adorned with bows, echoing your amigurumi's playful accessories.
- Cute Mini Blanket: Perfect for snuggling, a mini blanket in soft hues can create a cozy setting for your bunny's adventures.
- Adorable Plush Carrot: Create a cute carrot to complete your bunny’s whimsical world—it's a playful touch that brings your amigurumi to life.
- Colorful Baby Mobile: If you’re feeling adventurous, crochet a mobile with playful animals, including your bunny, to add whimsy to a nursery.
Care Instructions for Bunny Amigurumi
Machine Washing: Wash your bunny amigurumi in cold water on a gentle cycle to avoid agitation, which can lead to felting or pilling. Keep it safe in a mesh laundry bag.
Hand Washing: If possible, hand wash your bunny amigurumi in cold water using a mild detergent. Gently agitate and avoid twisting to maintain the plush texture.
Drying/Blocking: Lay your bunny flat to dry, reshaping if necessary. Avoid hanging to prevent misshaping, ensuring it retains its cuddly charm.
Storage: Store your bunny amigurumi in a cool, dry place. Keep it in a breathable bag or container to maintain its beautiful shape while protecting it from dust.
Bunny Amigurumi Customization Ideas
Feel the excitement of personalizing your crochet creation with these delightful options that invite your creativity to shine!
-
Yarn Substitutions: Try using a soft cotton yarn for a more breathable, summery bunny. It will give a fresher texture ideal for warmer months.
-
Color Variations: Embrace a playful palette! Mix in pastel shades or bold, vibrant hues to craft a bunny that perfectly reflects the personality of its future owner.
-
Texture Twist: Swap to a fuzzy yarn for an irresistibly cuddly bunny. This variation will transform your amigurumi into a delight that just begs to be hugged.
-
Size Adjustments: For a portable version, use a lighter yarn and smaller hook to create a mini bunny amigurumi. This tiny friend can easily fit into pockets or bags for on-the-go cuddles!
-
Accessorizing with Bows: Experiment with different types of bows, like crocheting hearts or flowers, for an accessory that adds extra flair and charm to your bunny.
-
Bunny Variants: Create a family of bunnies by adding features like a cute tail or different ear styles—stiff, straight ears for a different whimsical look or extra long floppy ones!
-
Surface Embellishments: Consider incorporating embroidery or felt shapes to decorate your bunny with patterns or even initials. This creative touch will make each bunny a unique keepsake.
-
Fringed Ears: Add a fringe effect to the top of the ears by weaving in short strands of contrasting yarn. This fun twist brings playful movement and texture to your bunny's overall look.
Expert Tips for Bunny Amigurumi
- Even Tension: Maintain consistent tension throughout your stitches to ensure your bunny amigurumi has a uniform look. Avoid too tight or loose stitches for best results.
- Count Relentlessly: Regularly count your stitches, particularly in the body and head sections, to prevent unintended increases or decreases that can disrupt proportions.
- Use Stitch Markers: Employ stitch markers to keep track of your rounds, helping you stay aligned in your pattern and preventing confusion along the way.
- Blocking Benefits: Consider gently blocking your bunny after finishing. It helps smooth out any uneven sections, enhancing the final look of your adorable creation.
- Secure Finishing: For safety and stability, ensure that all components are stitched together securely, especially the head and limbs, to make your bunny durable for all those cuddles!
Charming Bunny Amigurumi FAQs
Can I use a different yarn than medium-weight yarn?
Absolutely! While medium-weight yarn (category 4) is recommended for the bunny amigurumi, you can experiment with different yarn weights. Just remember that using a finer yarn may result in a smaller bunny, so you'll need to adjust your hook size accordingly to maintain your desired dimensions.
How do I adjust the size of my bunny amigurumi?
To make your bunny larger, consider using a thicker yarn and a larger hook. Alternatively, work additional rounds in the body and head sections for a bulkier look. Conversely, for a smaller size, use lighter yarn and a smaller hook, and decrease the number of rounds as needed.
Why is my bunny amigurumi curling at the edges?
Don't panic! Curling can happen if your tension is uneven or if you're using a hook that's too small for your yarn. I recommend checking your tension and ensuring it remains consistent throughout. If you find your work is still curling, consider lightly blocking your bunny to shape it.
What hook size should I be using for the bunny amigurumi?
For this pattern, a 3.5 mm (US Size E) crochet hook is ideal to create a tight stitch pattern, preventing stuffing from showing through. If you find your stitches are too loose, you might want to switch to a smaller hook for a denser finish.
How do I fix dropped stitches in my bunny amigurumi?
It's an easy fix! If you notice a dropped stitch, simply pick it up with your hook and work it back into the pattern. For best results, follow up by crocheting a few stitches around the area to secure it, ensuring that your bunny stays cute and balanced!
Can I use safety eyes of different sizes for my bunny amigurumi?
Yes, you can absolutely use different sizes of safety eyes! Just keep in mind that larger eyes might give your bunny a more whimsical and playful look, while smaller ones might lend a more classic style. Experimenting with sizes can add unique charm to your creation!

Leave a Reply