
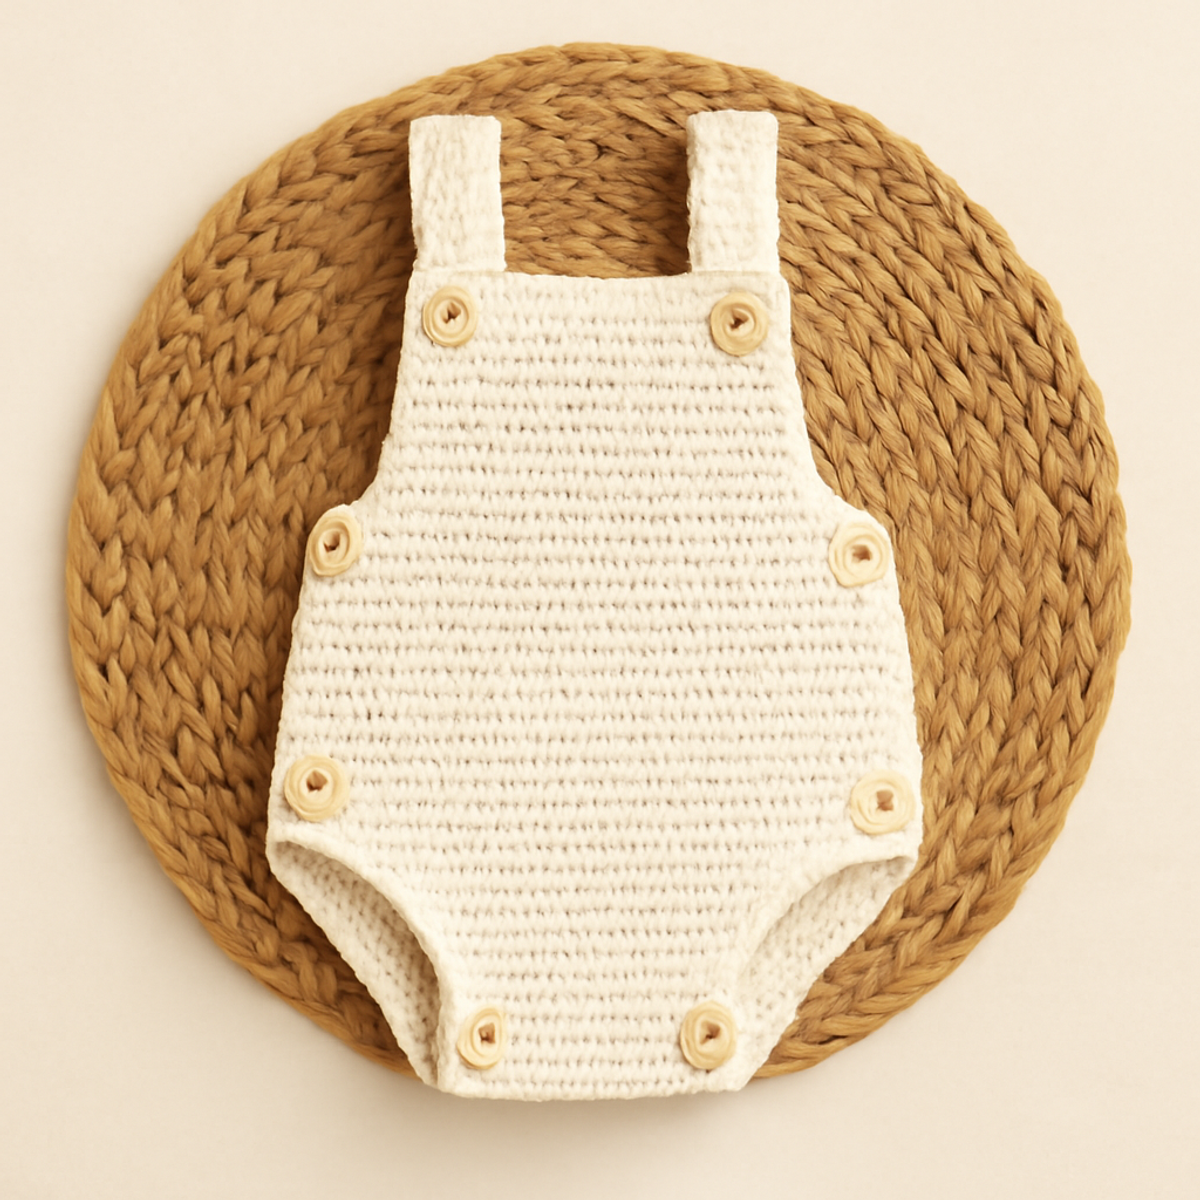
As I sat in my cozy corner, yarn in hand, I couldn’t help but feel the warm anticipation of creating something special. This crochet baby romper is more than just a simple garment—it's a heartwarming blend of practicality and charm, perfect for adorning your little ones in style. With its beginner-friendly design, this romper not only allows you to express your creativity through customizable colors and unique additions like buttons but also serves as a functional piece for playdates and family gatherings alike. Imagine the joy of crafting a cozy and stylish outfit that wraps your baby in comfort while showcasing your love for handmade treasures. Ready to bring this adorable crochet baby romper to life? Let’s dive into those stitches!
Crochet Baby Romper Materials & Tools
-
Yarn
- Worsted Weight Yarn – This versatile yarn is perfect for a cozy feel and is widely available.
- Acrylic or Cotton Blend – Choose a soft fiber type that is easy to care for and gentle against a baby’s skin.
-
Hook
- 4.0 mm (G/6) Crochet Hook – This hook size is essential for achieving the proper gauge for your crochet baby romper.
-
Notions
- 4 Buttons (15-18 mm) – Select fun buttons to add a touch of personality to your romper and make dressing easier.
- Yarn Needle – Use this for weaving in the ends, ensuring a neat finish for your project.
- Scissors – Handy for trimming yarn as you work on this delightful romper.
-
Approximate Yardage
- Expect to use around 150-200 yards of yarn, depending on the size you choose to make.
With these materials and tools, you're all set to embark on your journey to create a charming, customized crochet baby romper! Happy crocheting!
Why Choose This Crochet Baby Romper?
Beginner-Friendly: Perfect for those just starting their crochet journey, this romper features simple stitches and minimal assembly, ensuring a rewarding experience.
Versatile Use: Whether it's for cozy playtime or family gatherings, this romper combines comfort with style, making it a go-to piece in any baby’s wardrobe.
Customizable: Enjoy the freedom to select colors, yarn types, and decorative touches to create a unique outfit tailored specially for your little one.
Soft Texture: Crafted with a gentle drape, this romper provides just the right amount of coverage without overheating, ideal for any season.
Time-Efficient: With a manageable yardage of 150-200 yards, you can whip up this charming garment in no time, perfect for gifts or quick projects.
Gauge & Sizing Notes
Don't skip the gauge swatch! Ensuring your tension is just right with this crochet baby romper is critical for getting a perfect fit, as uneven stitches can impact how the garment wears. While an exact gauge may vary, a good rule of thumb is to aim for a tension swatch of about 4×4 inches (10×10 cm) made with a 4.0 mm (G/6) hook, resulting in a cozy, uniform fabric. If you want to adjust the sizing, simply change your starting chain by multiples of 2 to make the romper wider or narrower. If your swatch is too small, don't worry—simply go up a hook size and try again for that adorable crochet baby romper!
Step-by-Step Pattern for Crochet Baby Romper
Row 1: Back Panel Foundation
Start by chaining 31 (33, 35) stitches depending on the desired size. In the second chain from the hook, make a single crochet (sc), and then continue to sc in each chain across until you reach the end. Your work should lay flat and begin to take shape, with a total of 30 (32, 34) stitches at the end of this row.
Row 2: Establishing the Back Panel Shape
Ch 1 to begin Row 2, and turn your work. Sc in each stitch across to the end of the row. This row will help maintain the rectangular form of your crochet baby romper. At the end, you should have 30 (32, 34) sc again, and your work should feel sturdy and neat.
Row 3: Increasing for the Back Panel
For Row 3, begin with a ch 1 and turn your work. Sc in the first stitch, then make an increase (inc) by sc twice in the next stitch. Proceed to sc in each stitch until the last stitch where you will inc again. You should finish this row with 32 (34, 36) stitches, giving your panel a slight expansion.
Row 4: Continuing the Back Panel
Ch 1 and turn your work again. Sc in each stitch across, keeping the panel flat and even. The goal is to consistently add rows while preserving your desired shape. You will have 32 (34, 36) stitches at the end of this row, and your piece should start to feel thicker and more structured.
Row 5: Repeating Increases
Start Row 5 with a ch 1, turning as usual. Sc in the first stitch, then inc in the next, sc across until the last stitch, where you'll inc again. This row expands your panel further, bringing your total to 34 (36, 38) stitches, ensuring your work remains balanced and symmetrical.
Row 6 to 9: Completing the Back Panel
For Rows 6 through 9, start each row with a ch 1 and turn. Sc in each stitch across for a total of 34 (36, 38) stitches in each of these rows. These steps will build the body of your romper, creating a pleasing length that’s perfect for your crochet baby romper design.
Row 10: Shaping the Armholes
In Row 10, begin with a ch 1 and turn. Sc in the first 12 (13, 14) stitches, then chain 4 to create an opening for the armhole. Skip the next 4 stitches, then sc in the last 12 (13, 14) stitches. Your work will now show the armhole gap, making it ready for the front panel attachment.
Row 11: Front Panel Foundation
For the front panel, start with a new chain of 31 (33, 35) stitches. In the second chain from the hook, sc, and make your way across to the end. This should match the back panel in size and row count, ensuring consistency in your cozy crochet baby romper.
Row 12: Establishing the Front Shape
Ch 1 to turn your work for Row 12. Sc in each stitch until the end. Your front panel will mimic the back panel's form and enhance the overall fit of your crochet baby romper. After this row, you should have 30 (32, 34) stitches, and the piece should feel unified.
Step 1: Assembly of Panels
With both the front and back panels complete, it’s time to assemble. Place the back panel on top of the front panel, ensuring that the armhole openings align correctly. Whip stitch or sew through the edges of the panels using your yarn needle to secure them, creating the body of your crochet baby romper.
Step 2: Making the Straps
To create the straps, start with a chain of 6. Work in sc across for 10 rows (or until desired length), maintaining a consistent tension. After finishing two straps, they should feel sturdy and strong enough to support the romper. Attach them securely to the front and back panels, ensuring they are evenly placed.
Step 3: Final Edging and Buttons
In the final steps, you can add a simple sc border around the neckline and edges of the romper. Finish with placing the buttons on one side; ensure they're affixed securely for easy dressing. Your finished crochet baby romper should have a lovely clean edge and completion for your little one to enjoy!
How to Wash and Care for Your Crochet Baby Romper
Machine Washing: Use cold water on a gentle cycle to maintain the integrity of your crochet baby romper and prevent any unwanted stretching or damage. Avoid harsh agitation to keep the shape intact.
Hand Washing: For an even gentler approach, hand wash in lukewarm water with mild detergent. This method helps to preserve the soft texture and charming appearance of your cozy romper.
Drying/Blocking: Lay flat to dry on a clean, dry surface. Avoid hanging, as this can distort the romper's shape. After drying, you may lightly block it to restore its beautiful form and drape.
Storage: Store your romper in a cool, dry place. Use breathable fabric bags or bins to keep it safe from dust and avoid folding to prevent creasing.
Crochet Baby Romper: Creative Variations
Customize your crochet journey by exploring these delightful twists on the baby romper pattern, infusing each piece with your personal flair.
- Color Swaps: Replace cream yarn with vibrant pastels or bold colors for a playful twist, perfect for any season.
- Yarn Substitutes: Experiment with organic cotton or bamboo yarn for an eco-friendly, breathable option that feels gentle against baby's skin.
- Size Adjustments: Create matching outfits by adjusting sizes for toddlers or down for newborns; make every occasion special with a coordinated look.
- Texture Enhancements: Add a stunning border or playful pom-poms to the bottom edges for added charm, giving the romper a unique personality.
- Creative Straps: Instead of simple straps, opt for crisscross or ruffled designs that not only look adorable but also provide extra support and comfort.
- Detail Customization: Embroider whimsical patterns or appliqués to make the romper truly one-of-a-kind; these lovely touches will delight both you and the recipient.
- Contrast Panels: Incorporate different color panels for the front and back to create a modern look while highlighting your crochet skills.
- Button Variations: Choose fun, quirky buttons in various shapes, adding character and making dressing an enjoyable moment for both parent and baby.
Expert Tips for Your Crochet Baby Romper
-
Consistent Tension: Maintain even tension throughout your work; inconsistent stitches can lead to a poor fit, especially in the arms and body.
-
Stitch Markers: Use stitch markers to keep track of your rows and counts. This simple habit will save you from miscounts and help manage your crochet baby romper's assembly.
-
Blocking Benefits: After completing your romper, consider lightly blocking it. This technique can refine the shape of your stitches and enhance the overall finish.
-
Secure Buttons: When adding buttons, ensure they are sewn securely. This not only enhances the durability but also ensures easy dressing for quick diaper changes.
-
Practice Edging: For a polished look, practice adding a simple scalloped or single crochet edging around the neckline and openings to finish your crochet baby romper beautifully.
What to Pair with Crochet Baby Romper
As your crochet baby romper comes together, why not continue your crafting journey with delightful matching pieces that complete the look?
- Tiny Booties: A sweet addition, these booties keep little toes warm and can be made in matching colors. Imagine tiny feet nestled in your very own creations!
- Cozy Blanket: A soft, snuggly blanket not only complements the romper but is perfect for wrapping up your little one for chilly moments. Create a cohesive set that embraces comfort.
- Matching Hat: Top off the outfit with an adorable hat that mirrors the romper’s design, adding extra warmth and style for outings. A hat will not only be practical but also enhance the charm!
- Playful Toy: Crochet a small plush toy to accompany the romper—perfect for playdates and sure to spark joy. This personal touch makes the outfit truly special.
- Sweet Headband: A matching headband adorned with bows or flowers can complete the look, giving your little one that extra touch of cuteness. Picture those precious moments captured in photos!
Crochet Baby Romper FAQs
Can I use a different yarn for my crochet baby romper?
Absolutely! While the pattern calls for a worsted weight yarn, you can substitute with acrylic, cotton, or even an organic blend. Just make sure to check your gauge to maintain the size and drape of the romper.
How do I make the crochet baby romper bigger or smaller?
To adjust the size, you can add or remove chains to the starting chain for the back and front panels. Adding a few stitches will increase the width, while decreasing stitches will help size it down. Remember to maintain consistent tension for the best fit!
Why is my work curling at the edges?
Don’t panic! Curling is often a result of tension that's too tight or an unbalanced stitch count. Ensure you’re using the right hook size, and try relaxing your tension as you work. If it persists, you can lightly block your completed romper, which should help flatten the edges.
What hook size should I use for this crochet baby romper?
The pattern specifically recommends using a 4.0 mm (G/6) crochet hook. This size is essential for achieving the proper gauge to ensure the romper fits comfortably on your little one.
How do I fix dropped stitches in my crochet project?
It's an easy fix! If you find a dropped stitch, use your yarn needle to carefully weave the yarn back through the missed stitch and stabilize it. If you're unsure, simply re-crochet that section for a neater finish—your romper will look impeccable in no time!

Leave a Reply