
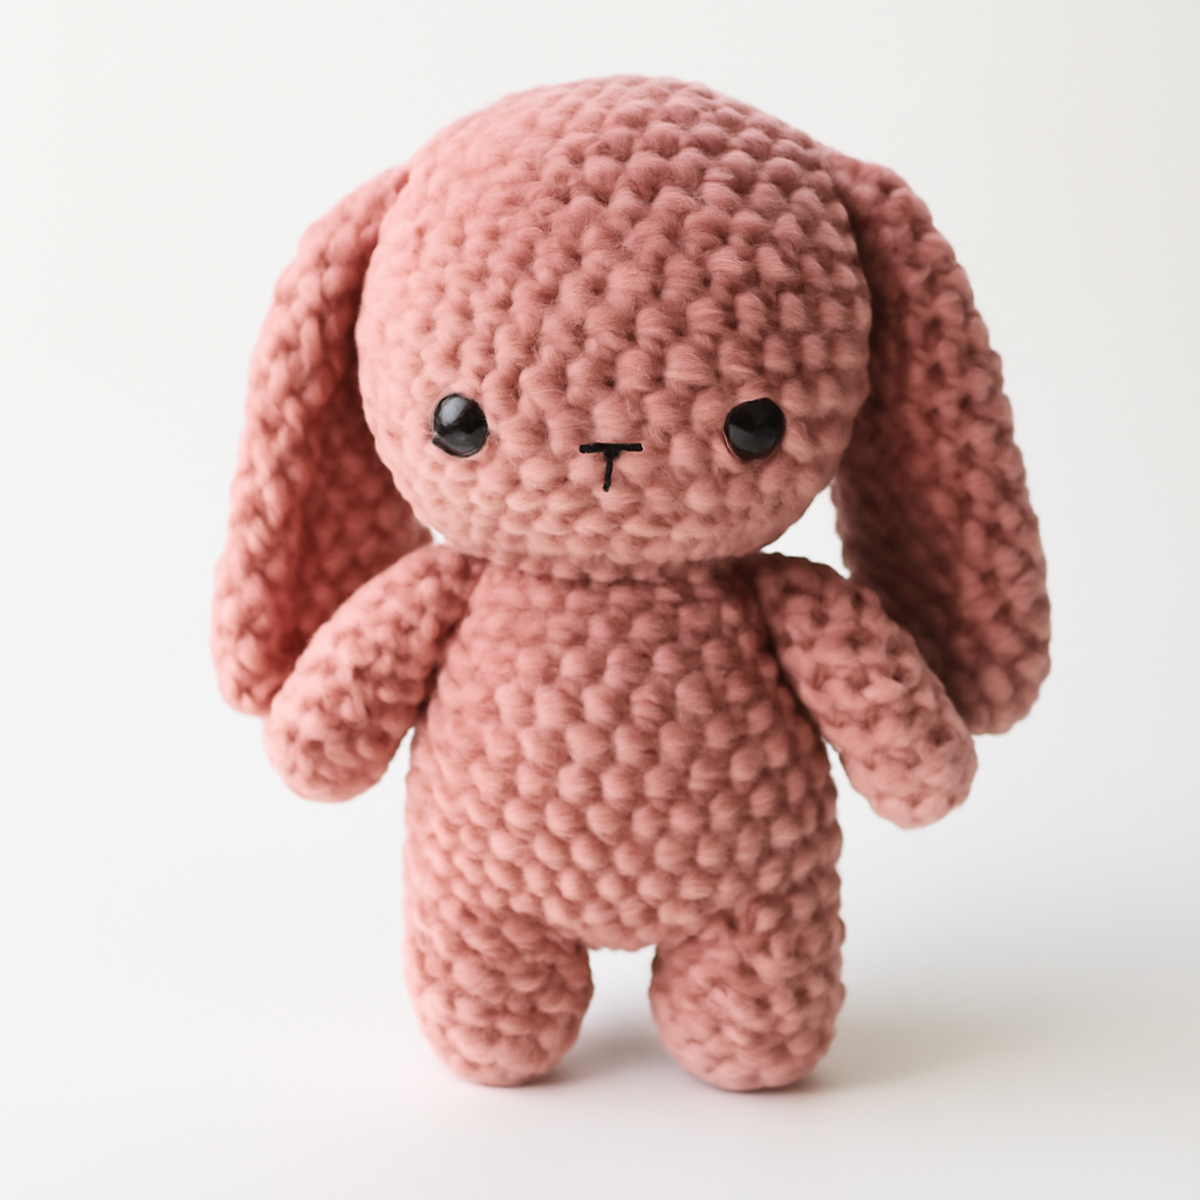
As I sank into my favorite armchair, surrounded by colorful skeins of yarn, the idea of crochet bunnies popped into my mind, instantly igniting that familiar creative spark. This "Charming Bunny Rabbits Crochet Pattern" is not just an ordinary project; it’s a journey into whimsy and joy, perfect for those looking to create delightful gifts or decorations. What makes this crochet bunny project so appealing is its quick and easy construction—often finished in just two hours—making it a satisfying choice for both intermediate crocheters and caring beginners ready to embrace the challenge. With their plush texture and adorable charm, these bunnies will surely steal hearts and add a cozy touch to any space. Are you ready to hop into this delightful project and bring some charm into your life?
Crochet Bunny Materials & Tools
- Medium Weight Yarn (Category 4) – Approximately 100 to 150 yards of soft acrylic or polyester for that plush look and feel.
- 4.0 mm (G/6) Crochet Hook – Ideal for achieving the desired gauge for your crochet bunny.
- Black Safety Eyes – Perfect for adding detail and personality to your bunnies’ faces.
- Embroidery Floss or Small Buttons – Use these for extra features and facial embellishments to enhance your bunnies' charm.
Why You'll Love Making Crochet Bunnies
Quick Completion: These delightful bunnies can be finished in just two hours, allowing you to whip up several in one sitting!
Plush Texture: Using soft acrylic or polyester yarn creates a lovely, huggable feel that makes your bunnies a charming cuddle companion.
Endearing Aesthetic: The playful design and floppy ears bring a whimsical charm to your crochet collection, perfect for any decor.
Beginner-Friendly: With some careful attention, new crocheters can tackle this project, boosting confidence and skill along the way!
Customizable Colors: Feel free to experiment with pastel shades or embellishments, making each bunny uniquely yours and ideal for any occasion!
Gauge & Sizing Notes
Don't skip the gauge swatch! Checking your tension is crucial when crafting your adorable crochet bunny, as it affects the final size and shape of your creation. A typical gauge for this pattern is approximately 4×4 inches (10×10 cm) = 12 single crochets by 12 rows, but it's always best to check before diving in. If you want a larger bunny, simply adjust your starting chain or rounds in multiples of 6; conversely, if you'd like a smaller version, consider going down a hook size or reducing the chain. If your swatch is too tight, relax your hands a bit or try using a larger hook size to achieve that soft, plush texture this crochet bunny is meant to have!
Step-by-Step Pattern for Charming Crochet Bunny
Row 1: Begin the Body
Start with a magic ring, ch 1, then work 6 sc into the ring (6 sts). Pull the ring tight to close it. Your work should feel compact and secure. This forms the base for the body of your crochet bunny.
Row 2: Increase the Base
In Round 2, 2 sc in each stitch around (12 sts). You should notice your work beginning to widen. Take care to keep your stitches smooth and consistent to maintain an even round shape.
Row 3: Continue Increasing
For Round 3, sc in the next stitch, inc in the next (18 sts). Repeat this pattern until you complete the round. Your piece should start to have a slight dome shape, perfect for the plump bunny body.
Row 4: More Increases
In Round 4, sc in the next 2 stitches, inc in the next (24 sts). The work should feel more substantial and rounded at this stage. Make sure to keep tracking your stitch count for accuracy.
Row 5: Build Up the Body
Now, sc in each stitch around without increasing (24 sts). Your crochet bunny should be taking a delightful shape, with smooth sides and an inviting texture.
Row 6: Start to Shape the Head
In Round 6, sc in the next 3 stitches, inc in the next (30 sts). This will start forming the transition to the head of your crochet bunny. Notice how the shape is evolving—if you touch it, it should feel more rounded.
Row 7: Build the Head Further
For Round 7, make another round of sc in each stitch (30 sts). Your bunny's head should feel soft and plush as it continues to grow, moving further away from the body.
Row 8: Finalize the Head Shape
In Round 8, sc in the next 4 stitches, inc in the next (36 sts). At this point, your crochet bunny should have a well-defined head that's starting to look adorable and inviting.
Row 9: Begin Decreasing for the Neck
For Round 9, sc in the next 5 stitches, dec in the next (30 sts). This marks the start of forming the neck of your crochet bunny, preparing for the gentle taper down to the body.
Row 10: Continue Neck Shaping
In Round 10, sc in the next 4 stitches, dec in the next (24 sts). Your bunny's neck should begin to narrow, offering a nice transition from the head to the body.
Row 11: Shape the Base
In Round 11, sc in the next 3 stitches, dec in the next (18 sts). As the neck continues to taper, the fullness of the body will provide contrast, ensuring your crochet bunny has an appealing silhouette.
Row 12: Final Decrease Round
In Round 12, sc in the next 2 stitches, dec in the next (12 sts). Ensure your work is soft and plush while continuing to shape your bunny beautifully.
Step 1: Finish the Body
Stuff the bunny to your desired firmness before continuing. To finish, sl st to close the round, ensuring everything is securely in place.
Step 2: Create the Ears
Start with a magic ring, ch 1, and work 4 hdc into the ring (4 sts). Your ears will be developing a lovely shape as you crochet this section.
Step 3: Form Ear Shape
For Row 2, hdc inc in each stitch (8 sts). The ears should show a lovely rounded form, perfect for those big floppy details!
Step 4: Lengthen the Ears
In Row 3, hdc in each stitch (8 sts). The width and thickness should feel substantial between your fingers as you work.
Step 5: Gently Curve the Ears
In Row 4, hdc in the next stitch, dec in the next (6 sts). This will shape the top of your bunny ears with an inviting arch.
Step 6: Finish the Ears
In Row 5, hdc across (6 sts), then leave a long tail for sewing later. The ears should have a soft curve, waiting to be attached to the body.
Step 7: Assemble the Bunny
Sew or glue the ears onto the top of your crochet bunny's head; position them at an angle for that floppy look.
Step 8: Create Arms and Legs
For each arm and leg, use the same magic ring technique, starting with 6 sc in the ring, then follow the same increase and sc pattern as for the body (up to 12 sts). The arms and legs should mimic the body’s round shape.
Step 9: Final Attachments
Stuff the arms and legs lightly before sewing them onto the body securely with your long tail, aligning them for a balanced look.
Step 10: Add Eyes and Features
Sew or attach the black safety eyes securely and embroider the facial features using embroidery floss or small buttons. The final touches bring your crochet bunny to life with personality!
Step 11: Optional Edging
If desired, add a decorative border around the base of the bunny using a simple sc around the edge, giving it a neat, polished finish. Your crochet bunny is now ready to steal the spotlight!
Care Instructions for Your Crochet Bunny
-
Hand Washing: Gently wash your crochet bunny in cold water using a mild detergent to prevent any potential felting or damage to the plush texture. Avoid excessive agitation for best results.
-
Drying/Blocking: Lay your crochet bunny flat on a clean towel to dry, reshaping gently as needed. This helps maintain its adorable form without compromising its cuddly appeal.
-
Storage: Keep your crochet bunny in a cool, dry place when not in use. Storing it upright will help preserve its charming shape and prevent compression.
-
Cleaning Accents: If you’ve added any small accessories, check that they are securely attached, and clean them carefully according to their material to ensure your crochet bunny stays fresh and delightful!
Expert Tips for Crochet Bunnies
-
Consistent Tension: Maintain even tension throughout your stitches to prevent unsightly gaps, especially in the body and limbs. This ensures a polished finish.
-
Track Your Stitches: Keep a close eye on your stitch count at the end of each round. Using stitch markers can help you avoid losing track and maintain your crochet bunny's shape.
-
Block Your Work: Lightly block the finished bunnies to enhance their shape and smooth out any unevenness. This enhances their cuddly appeal and brings out the texture.
-
Stuff Firmly: When filling your crochet bunny, aim for a balance between softness and structure. Stuffing too loosely can lead to a sad, floppy bunny, while overstuffing may cause seams to stretch.
-
Embellish Thoughtfully: Feel free to personalize your crochet bunnies with unique colors and accessories. Just ensure any added details are securely attached to withstand cuddly love!
What to Pair with Charming Bunny Rabbits
Imagine the delight of creating an enchanting menagerie that shares the same playful spirit as your crochet bunny!
- Fluffy Bunny Blanket: A cozy, snuggly blanket adds warmth to your decor, perfect for wrapping around your bunny creations.
- Bunny Ear Headband: Craft an adorable headband that mimics your bunnies' large floppy ears, making for an irresistible accessory.
- Pastel Bunny Pillows: Whip up some matching plush pillows to complement the vibrant hues of your crochet bunny—ideal for cuddle time.
- Garden of Crochet Flowers: Make whimsical flowers that embellish your bunnies' environment, creating a cheerful scene straight from a fairytale.
- Cute Matching Baskets: Create small baskets that coordinate with your bunnies, perfect for storing yarn or little treasures, enhancing your crafting experience.
Crochet Bunny Customization Ideas
Let your imagination run wild as you explore fun ways to personalize your crochet bunnies!
-
Color Variations: Experiment with different pastel colors like mint green or baby blue to create unique charmers. Every shade can transform the mood of your bunnies and make them distinct.
-
Yarn Substitutions: Swap the plush yarn for a soft cotton yarn for a more traditional feel. The textured finish will bring a classic elegance to your delightful rabbits.
-
Size Adjustments: Create larger or smaller versions of your bunnies by adjusting your hook size and yarn weight. Bigger bunnies can become whimsical pillows, while smaller ones make adorable keychains.
-
Texture Enhancements: Add texture by incorporating techniques like bobbles or clusters in specific areas. These added elements will make your bunnies stand out and invite tactile exploration.
-
Embellished Bunnies: Personalize with bows, scarves, or tiny outfits. A little clothing can elevate your creations, allowing them to express warmer tones of personality.
-
Fringe Fun: Attach fringes to the base for a playful, whimsical look. This can give your bunnies additional dimension and flair, turning them into eye-catching decor.
-
Expressive Faces: Use embroidery floss or buttons for facial features, making each bunny’s expression uniquely heartwarming. Every stitched smile adds character to your cuddly critters.
-
Decorative Borders: Finish your bunnies with a delicate edging. A simple border around the base can tie together the overall look, giving your creations a polished, loving touch.
Charming Bunny Rabbits Crochet Pattern FAQs
Can I substitute my yarn choice for this crochet bunny pattern?
Absolutely! While the pattern calls for medium-weight yarn, you can certainly use different fibers. For instance, if you prefer a more traditional cotton look, just be aware that the texture and drape may change. Always check your gauge to ensure the size of your finished bunnies remains consistent.
How can I make my crochet bunnies bigger or smaller?
To adjust the size of your crochet bunny, you can modify both your hook size and yarn weight. Using a thicker yarn or a larger hook will yield larger bunnies, while opting for a thinner yarn and a smaller hook will result in petite cuties. Just remember to keep an eye on your stitch count as you adjust!
Why is my work curling while I crochet?
Don't panic! Curled edges, especially in the initial rounds, are often due to tension inconsistencies. Maintaining even tension when crocheting can help prevent this issue. If it persists, try blocking your bunny to shape it more evenly.
What do I do if I drop a stitch in my bunny?
It’s an easy fix! If you notice a dropped stitch, gently pull on the yarn strand to tighten the loops around the dropped stitch back to your hook. If it's too far down, you can use a crochet hook to pick it back up. Just be sure to stay calm, and your bunny will still look great!
What crochet hook size should I use for this pattern?
For this charming bunny pattern, a 4.0 mm (G/6) crochet hook is recommended. This size helps achieve the desired gauge for that plush texture. If you need to adjust your yarn type, considering a different hook size might also be beneficial—just ensure the final gauge remains consistent to maintain the pattern's integrity.
How do I securely attach the safety eyes to my crochet bunny?
To ensure those adorable black safety eyes stay put, I recommend using a good amount of force when attaching them—press until you hear a click! Make sure they are snug and secure as you handle your finished bunnies. If you're concerned about their safety (especially for small children), consider sewing them in rather than using safety eyes below a certain age demographic.

Leave a Reply