
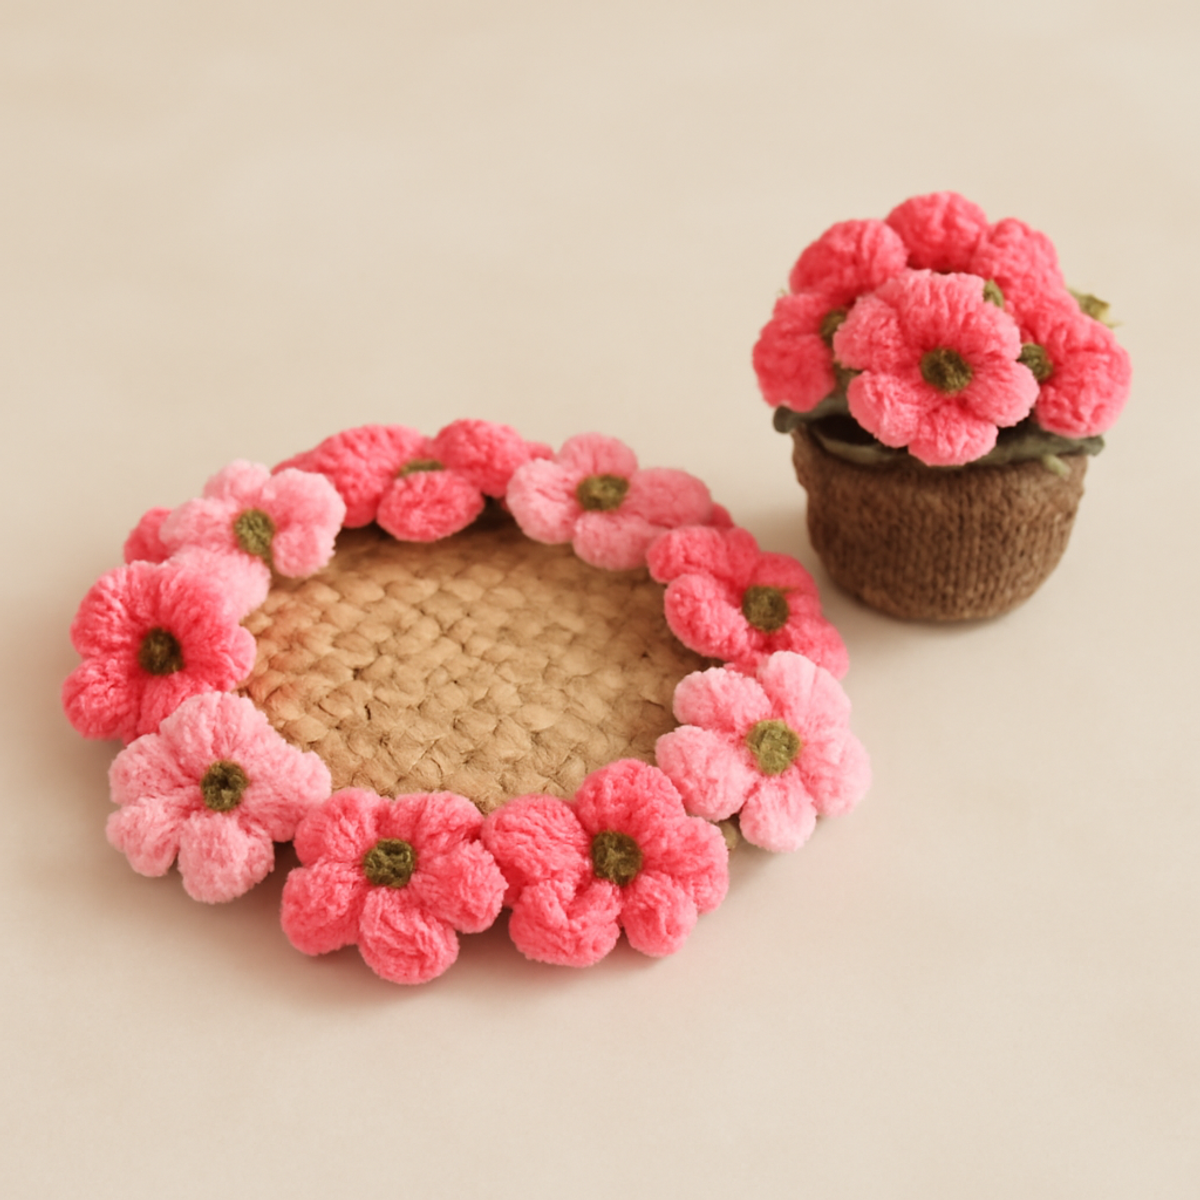
As I curled up on the sofa with my latest yarn find, the vibrant hues whispered springtime dreams into my heart. This whimsical project, the Charming Floral Crochet Coaster with Pot, not only brightens up any space but also allows us to showcase our crochet skills. Picture yourself impressing friends with this eye-catching centerpiece that seamlessly blends beauty and functionality. One delightful perk is the chance to play with vibrant colors, making each piece uniquely yours. Plus, the combination of the coaster and pot offers a practical solution to protect your surfaces while celebrating your creativity. Let’s dive into this enchanting pattern, and I encourage you to let your imagination blossom with each stitch!
Charming Crochet Coaster Pot Materials & Tools
- Medium Weight Yarn (Category 4) – Approximately 150-200 yards will bring this colorful crochet coaster pot to life.
- 5.0mm (H) Crochet Hook – Ideal for working with medium weight yarn to achieve the perfect drape and structure.
- Stitch Marker – Essential for keeping track of your rounds and ensuring uniformity in your floral designs.
- Small Embellishments (optional) – Consider adding buttons or beads for a personal touch to your whimsical crochet coaster pot.
Why Choose This Crochet Coaster Pot?
Vibrant Colors: The use of lively yarn choices brings an explosion of color to your decor, making this piece a delightful focal point for any room.
Whimsical Design: The floral motifs are not only charming but also incredibly fun to create, offering an engaging challenge for intermediate crocheters.
Functional Decor: This set is more than just eye-candy; it effectively protects your surfaces while adding a cozy ambiance to your home.
Customization Opportunities: With endless possibilities for color combinations and embellishments, you can make each coaster and pot pair truly one-of-a-kind.
Perfect for Spring: Designed with a lively aesthetic, this pattern is ideal for celebrating the beauty of spring and summer, brightening your home with seasonal cheer.
How to Check Your Gauge for Charming Floral Crochet Coaster Pot
Don’t skip the gauge swatch! Ensuring your tension is just right is crucial for the Charming Floral Crochet Coaster Pot, as it ensures your finished pieces fit and look as beautiful as you envision. A general guideline to keep in mind is that a 4×4 inch (10×10 cm) square in this pattern should reflect about 14 double crochets by 8 rows, but be sure to check against your own work. To adjust your coaster's size, you can add or subtract your starting chain in multiples of 6 for the base. If your swatch comes up too small, simply go up a hook size to loosen your tension!
Step-by-Step Pattern for Charming Floral Crochet Coaster Pot
Row 1: Magic Ring Creation
Begin by forming a magic ring. Chain (ch) 1, then single crochet (sc) 6 into the ring, pulling tight to secure. This will serve as the base for your crochet coaster pot. As you crochet, ensure the magic ring is snug; your work should resemble a small circle (6 sts).
Round 2: Increasing the Base
For the second round, work 2 single crochets (sc) in each stitch around, increasing the size of your base. This should give you a nice flat disk that grows wider. Remember to place a stitch marker to keep track of your rounds. Your work should continue to flatten without curling (12 sts).
Round 3: Expanding the Circle
Now, chain (ch) 1 and work 1 sc in the first stitch, 2 sc in the next around. Repeat this pattern to create an increasing scalloped effect. Keep an eye on your stitch count, as this round prepares the base for the coaster pot's sturdy foundation (18 sts).
Round 4: Adding a Floral Touch
To transition into the floral design, switch to half double crochet (hdc). Chain (ch) 2, then hdc in the same stitch, followed by 2 hdc in the next stitch. This round should start to evoke a lovely floral motif with a nice lift. Aim for a round that feels soft and rounded (24 sts).
Round 5: Floral Petals Formation
Begin forming flower petals by working 1 dc in the next stitch, then ch 2 for each petal. Skip the next stitch, and repeat this process until you reach the start of your round. You should see petals forming; ensure they’re evenly spaced for a beautiful floral effect (12 petals).
Round 6: Assembling the Flowers
Next, you will connect the petals. Slip stitch (sl st) in the second ch of the previous round to secure and create the flower shape. Continue to slip stitch into each flower base, ensuring they sit firmly around the coaster. Your coaster should start feeling dimensional and lovely (12 connection points).
Step 7: Finishing the Coaster Edge
To create a decorative edge, chain (ch) 1 and work a round of single crochet (sc) around all edges of your floral coaster. This enhances durability and gives a polished look. As you finish, your coaster should feel sturdy yet soft and ready for use (estimated around 6 inches in diameter).
Step 8: Creating the Pot Base
Start the pot by chaining (ch) 12 and joining to form a circle. This will serve as the foundation for the spiral design. Single crochet (sc) in each stitch all around, creating a smooth base for your charming crochet pot that matches the coaster beautifully (12 sts).
Step 9: Building the Pot's Body
From here, work in continuous rounds, performing 1 sc in each stitch. This simple spiral building allows your pot to grow upward. Keep your tension consistent for an even, neat finish, ensuring that your pot has a nice basket shape (continue until desired height, approx. 3 inches).
Step 10: Adding the Pot’s Decorative Edge
Finally, for the finishing edge of your pot, work 1 double crochet (dc) in each stitch around. This will give the top of the pot a beautiful flair, coordinating with the flowers you crafted earlier. Your finished pot should complement the floral coaster perfectly, adding a whimsical touch (final round polished look).
Crochet Coaster Pot Customization Ideas
Embrace your creativity as you explore the endless possibilities for personalizing this delightful crochet project.
-
Color Swaps: Choose pastel shades like lavender or bright yellows for a cheerful spring vibe. Each color selection tells a story and transforms the whole piece!
-
Fiber Alternatives: Opt for cotton yarn for a rustic feel or an acrylic blend for a shiny, glossy finish. The texture change can make the crocheted items feel entirely new.
-
Size Adjustments: Experiment by enlarging or shrinking the coaster and pot to create a unique set for different occasions. A mini pot could hold tiny succulents, perfect for gifting!
-
Textured Edges: Add a fringe or crochet a wavy border to your coaster for extra flair. Textures can create inviting, tactile experiences for you and your guests.
-
Embellishments: Integrate charming beads or delicate embroidery into the floral designs for a personal touch. These small details can elevate your project and make it truly one-of-a-kind.
-
Layering Colors: Try color-blocking by using two or three colorways to create a gradient effect on the coaster. This playfulness adds depth and personality.
-
Pot Finishings: Consider embellishing the pot with ribbon or twine to attach a small tag or note. This thoughtful detail makes it a perfect gift for a friend!
-
Seasonal Themes: Change up the colors and motifs to reflect different seasons, like warm autumn hues or icy winter shades. Adapting to the seasons keeps your decor fresh and lively!
What to Pair with the Charming Floral Crochet Coaster Pot
Embrace the joy of crafting a delightful set that harmonizes in both color and texture, perfect for sprucing up your decor.
-
Matching Flower Pot Cover: Create a cozy cover that complements the pot, enhancing the floral design while adding a touch of whimsy.
-
Cozy Mug Cozy: Whip up a charming mug cozy that matches your coaster, keeping your drink warm and your hands stylishly protected.
-
Vibrant Plant Hanger: Elevate your green thumb aesthetic with a crochet plant hanger that echoes the colors of your coaster and pot.
-
Decorative Flower Garland: Crochet a whimsical garland using the same floral motifs for a cohesive look that adds cheer to any space.
-
Charming Table Runner: Craft a playful table runner featuring similar floral patterns, beautifully uniting your coaster and pot for a stunning display.
How to Wash and Care for Your Crochet Coaster Pot
Machine Washing: Use a gentle cycle with cold water to protect your crochet coaster pot's vibrant colors. Avoid agitation to prevent any potential felting or pilling of the yarn.
Hand Washing: For extra care, hand wash your piece in cool water with mild detergent. Gently squeeze the fabric; do not wring or twist to maintain its lovely shape.
Drying/Blocking: Lay your crochet coaster pot flat on a clean towel to dry. Reshape while damp to enhance its structure, ensuring it looks its best upon completion.
Storage: Store your finished piece in a cool, dry place away from direct sunlight. This will help maintain its colors and prevent any unwanted fading over time.
Expert Tips for Crochet Coaster Pot
-
Watch Your Count: Consistently count your stitches, especially in floral motifs, to avoid uneven shapes. A stitch marker is your best friend here!
-
Tension Consistency: Maintain even tension throughout your project to ensure a finished crochet coaster pot that is uniform and well-structured.
-
Block for Beauty: Don’t skip blocking your finished pieces; it enhances their shape and texture, making your whimsical design pop!
-
Avoid Foundation Mistakes: Be cautious when starting with a magic ring; pulling it too loose could lead to a floppy base in your crochet coaster pot.
-
Double-check Rounds: Regularly check your rounds while creating the floral edges to guarantee the petals remain evenly spaced and visually appealing.
Charming Floral Crochet Coaster with Pot FAQs
Can I use a different type of yarn instead of medium weight?
Absolutely! You can substitute worsted weight yarn with lighter options like DK, just remember that it may affect the dimensions of your finished crochet coaster pot. I recommend adjusting the hook size accordingly to maintain the structure and shape of your design.
How do I resize the crochet coaster and pot?
To make your floral crochet coaster pot bigger or smaller, you’ll need to adjust the base round counts. For a larger size, simply add more rounds in the base before transitioning to the floral part. For a smaller version, you can skip a round or two in the base. Just keep an eye on your stitch count!
Why is my work curling at the edges?
Don’t panic! Curling edges are often due to tight tension or not enough stitches in your base. Make sure to keep your tension consistent and check your stitch count, especially when increasing. Blocking your coaster after finishing can also help it lay flat and prevent curling.
What hook size should I use for this project?
For this crochet coaster pot, I suggest using a 5.0mm (H) crochet hook, which is perfect for medium weight yarn. It provides a nice balance of drape and sturdiness. If you find your stitches too tight or loose, feel free to adjust with a different hook size!
How can I fix dropped stitches while crocheting?
It’s an easy fix! Simply turn back to the point where you dropped the stitch and carefully pull the yarn back up through the loops. Then continue crocheting as normal. Consistent tension can help prevent this, so keep a close eye on your stitches as you work.
What’s the best way to block my finished crochet coaster pot?
To block your piece, wet it with cool water (either by soaking or spraying) and lay it flat on a clean towel. Shape it gently into the desired dimensions and let it dry completely. This will enhance the visual appeal and help set those lovely floral designs in place beautifully!

Leave a Reply