
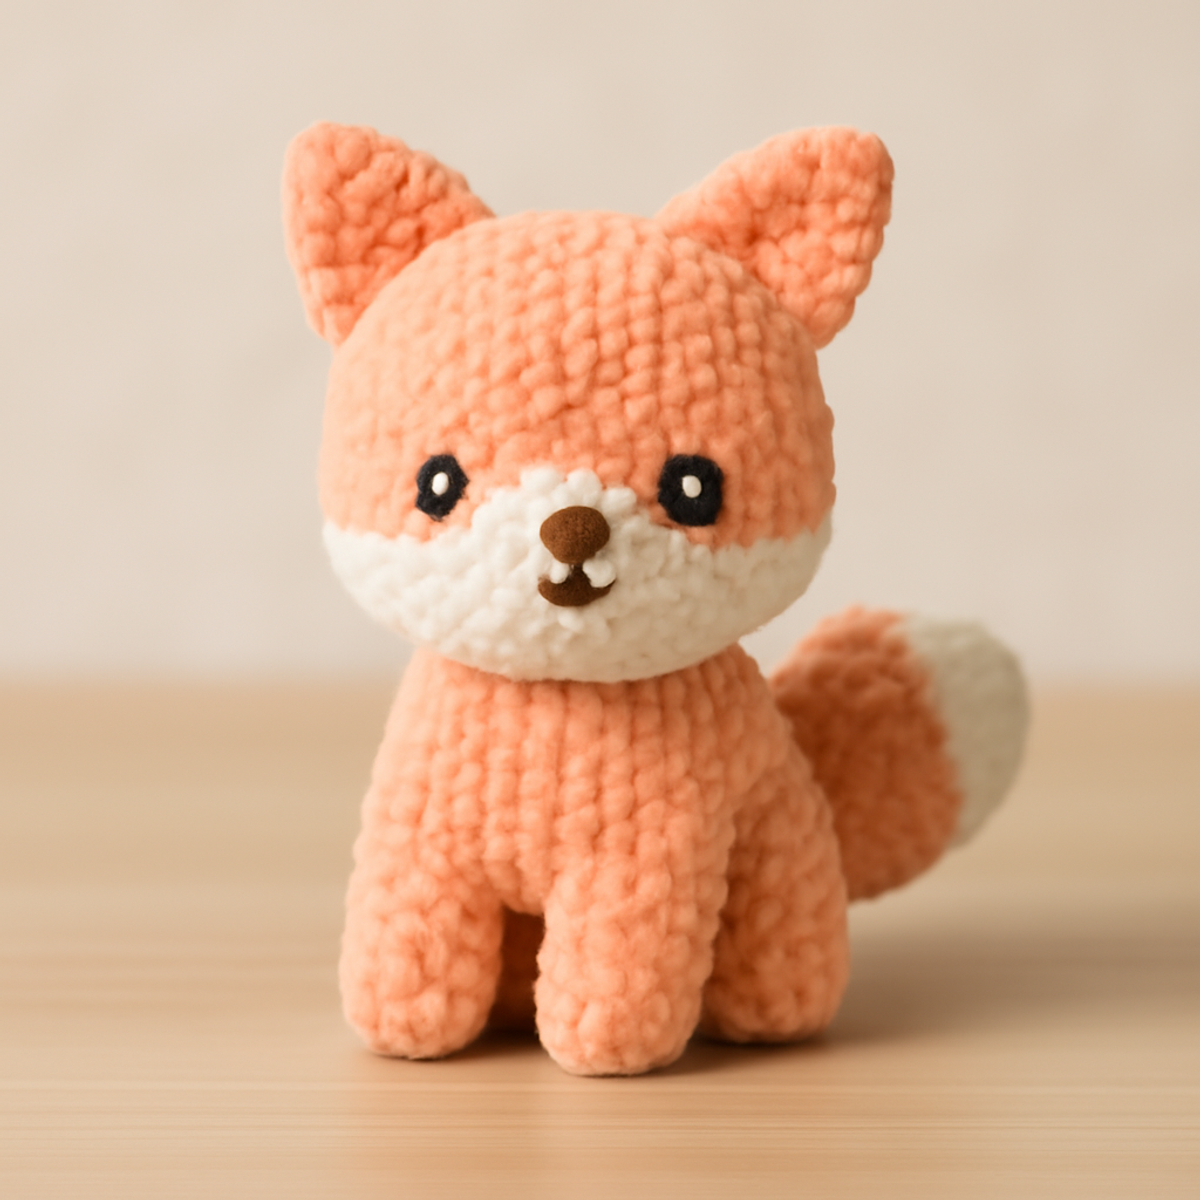
As I sat by the window, the gentle light spilling in, I couldn't help but notice the charm of handmade toys—they hold whispers of love and warmth. Today, I'm excited to share my latest creation: an adorable crochet fox that’s not just a delightful project but also perfect for cozy décor or playtime fun. This crochet fox pattern is designed with beginners in mind, offering straightforward instructions while enabling you to hone your skills with every stitch. Crafting this sweet little fox brings the joy of transforming soft yarn into a huggable friend, while also giving you the chance to customize its colors and features, making it uniquely yours. Let’s dive into the world of amigurumi and start stitching together a piece that’s sure to bring smiles and cherished moments!
Crochet Fox Materials & Tools
- Worsted Weight Yarn – Approximately 150-200 yards in peach/orange for the body, white for the face, and brown for the eyes; soft plush or chenille yarn is ideal for a cuddly finish.
- 4.0 mm (G-6) Hook – Perfect for crocheting your main stitches while keeping the fox's form tight and sturdy.
- Safety Eyes (10 mm) – Essential for the adorable facial features; adds a lively expression to your crochet fox.
- Scissors – Handy for trimming yarn and finishing off threads, ensuring a neat final touch.
Why Make a Crochet Fox Today?
Delightful Appeal: This charming crochet fox is perfect for both children’s playtime and home decor, adding warmth to any space.
Beginner-Friendly: Designed for ease, the pattern walks you through each step, making it accessible no matter your experience.
Soft and Cuddly: Crafted with plush yarn, the finished fox feels fantastic, inviting hugs and snuggles.
Endless Customization: Change colors, add patterns, or even swap out the safety eyes for a personal touch, ensuring your fox is truly one-of-a-kind.
Satisfying Experience: Enjoy the joy of creating a 3D character that allows your creativity to shine while honing essential crochet skills.
Gauge & Sizing Notes
Don't skip the gauge swatch! Ensuring that your tension is correct plays a crucial role in making your crochet fox turn out just the right size. For this project, aim for a standard gauge of approximately 4×4 inches (10×10 cm) which typically results in 14 single crochets by 8 rows, though it's important to check what works best for you based on your yarn choice. If you’d like to make your fox larger, simply increase your starting chain in multiples of 6 for a fuller body, or adjust your hook size: if your swatch is smaller than desired, try going up a hook size to achieve that cuddly, huggable feel!
Step-by-Step Pattern for crochet fox
Row 1: Start the Head
Begin by making a magic ring and ch 1. Work 6 sc into the ring, pulling it tight to close. This will form the center of the head. Continue to work in a spiral fashion, using a stitch marker to mark the beginning of each round. Your work should start to cup slightly as you increase.
Row 2: Increase for Roundness
In this round, make 2 sc in each stitch around (12 sts). This will create the shape of the fox's head. Remember to keep your tension consistent for a smooth finish. By the end, your head will begin to take form and should feel snug and round.
Row 3: Continue Shaping the Head
Now, work 1 sc in the first stitch, then 2 sc in the next stitch, repeating this pattern around (18 sts). This gradual increase helps to achieve the rounded shape of the fox's head. Your work should start to look more defined as it expands.
Row 4: Final Round for Head Shaping
In this round, sc in the first 2 stitches, then inc in the next (24 sts). Continue to keep your stitches tight, as this makes for a more stable structure. At this point, the head should feel plush yet firm, ready for some facial features!
Row 5: Begin the Body
To transition into the body, without cutting your yarn, ch 1, then sc in each stitch around the head (24 sts), ensuring a smooth connection. Your body will begin right below the head, keeping the overall shape round and inviting.
Row 6: Body Expansion
Continue to work in spirals with 1 sc in each stitch around (24 sts). This round helps to maintain the integrity of the shape before we add more volume. You should notice a wider profile as it begins to gently curve outward.
Row 7: Increase for the Body
Work 1 sc in the first 3 stitches, then inc in the next (30 sts). The body will gain volume, making it appear more robust and huggable. Your piece should retain its rounded appearance, perfect for an adorable crochet fox.
Row 8: Add More Volume
In this round, sc in the first 4 stitches, then inc in the next stitch around (36 sts). Continue to ensure your transitions between rounds are fluid. The body should feel fuller and rounder at this stage, inviting you to proceed to the legs!
Row 9: Create the Legs
To make the legs, change your focus. Start a new magic ring and ch 1. Work 6 sc into the ring (6 sts) to form the first leg. Securely pulling the ring tight will keep these pieces from unraveling as you progress.
Row 10: Shaping the Legs
Now, inc in each stitch around (12 sts). Complete this for each of the four legs, ensuring they are all similar in size. Your legs will begin forming a sturdy base for the fox, propelling you closer to completing this adorable toy.
Step 11: Assemble the Ears
For the ears, create a magic ring and work 4 sc into it (4 sts). In the next round, inc in each stitch (8 sts). Finish by sc in each stitch for a couple of rounds before securing the ear shapes. These will give your crochet fox its characteristic alertness.
Step 12: Tail Work
For the bushy tail, start with a magic ring and work 6 sc (6 sts). Next, inc in each stitch (12 sts) and shape by alternating rounds of sc and dec. The tail should lay fluffy and curvy, adding charm to your lovely crochet fox.
Step 13: Final Assembly
With all pieces completed, it's time to assemble your crochet fox! Begin by sewing the head to the body securely. Attach the legs, ensuring they are evenly spaced for stability. Finally, sew on the ears and tail, giving your fox personality and flair.
Step 14: Face Embroidery
For the finishing touch, use embroidery to create the fox’s face. Add small details for the nose and eyes, ensuring each feature adds to the overall cuteness. Your crochet fox is now complete and ready for cuddles or display!
What to Pair with Adorable Amigurumi Fox
As you embark on crafting this charming crochet fox, why not explore beautiful projects that will complement it perfectly?
-
Cozy Crochet Blanket: A soft, cuddly blanket provides a perfect backdrop for your fox, inviting comfort and warmth to any space. Imagine your furry friend snuggled up in its own little nest!
-
Whimsical Woodland Friends: Create an ensemble of adorable critters; think cute bunnies or playful bears to add a playful touch to your decor. These companions will enhance the theme and make for delightful gifts.
-
Charming Crochet Bag: A small tote or pouch using similar yarn will create a seamless match with your crochet fox. This way, you can carry your love for amigurumi wherever you go!
-
Cute Creature Hat: Craft a hat with fox ears to celebrate your finished project. It's a fun accessory that brings joy, especially when shared with family or friends during the colder months.
-
Matching Little Pouch: Use leftover yarn to make a mini pouch, perfect for holding small treasures or crafting tools. This way, you keep a piece of your crochet journey close at hand!
How to Wash and Care for Your Crochet Fox
-
Machine Washing: Use a gentle cycle with cold water to protect the soft yarn; avoid using fabric softeners as they can alter the texture of your crochet fox.
-
Hand Washing: For best results, hand wash your crochet fox in cold water with mild soap, gently pressing out dirt without agitating to prevent felting or pilling.
-
Drying/Blocking: Lay your crochet fox flat on a clean towel and reshape as needed to maintain its form. Avoid hanging it up when wet as it may stretch out.
-
Storage: Keep your crochet fox in a dry place away from direct sunlight to maintain its vibrant colors and plush texture, ensuring it remains a cherished companion for years to come.
Crochet Fox: Variations & Substitutions
Feel inspired to put your own spin on this adorable crochet fox pattern and let your creativity shine!
- Yarn Weight Swaps: Experiment with lighter or heavier yarns for different sizes, creating unique takes on the classic fox shape.
- Fiber Alternatives: Switch to cotton yarn for a more structured finish or wool for added warmth and texture.
- Color-Blocking Fun: Create a playful look by adding stripes or polka dots to the body, transforming the fox into a whimsical character.
- Size Modifications: Scale down for a tiny pocket fox or scale up for a giant cuddle buddy—adjust your stitches accordingly!
- Textural Touches: Add a fluffy pom-pom tail or fringe along the back for extra flair; these small tweaks can make a significant difference.
- Face Feature Changes: Swap safety eyes for embroidered features to achieve a softer, handmade look, enhancing the fox’s personality.
- Tail Variations: Utilize a contrasting color for the tail, adding a fun twist that can complement the rest of your fox's design.
- Ears Modification: Shape the ears differently—try round ears for a more cartoonish feel or make them larger for added character!
Get ready to dive into a world of creativity and bring your own unique vision of this sweet crochet fox to life!
Expert Tips for Your Crochet Fox
-
Use a Stitch Marker: Place a stitch marker at the beginning of each round to keep track of your stitches and avoid losing count.
-
Check Your Tension: Consistent tension is vital for a uniform shape; if you notice your fox is loosening up, gently tighten your stitches.
-
Stuff Adequately: Ensure each part is stuffed enough to hold its shape but avoid overstuffing, which might stretch seams or cause breakage.
-
Try a Heavier Yarn: As a beginner, opting for slightly thicker yarn can help define stitches more clearly, making it easier to follow your crochet fox pattern.
-
Sew Securely: When assembling the fox, sew the pieces firmly to prevent them from coming apart during playtime or display—especially important for the legs and tail.
Crochet Fox FAQs
Can I substitute yarn for my crochet fox project?
Absolutely! While medium (worsted weight) yarn is recommended, you can substitute with other yarn types. Just make sure your alternative has a similar thickness to maintain the right dimensions. For instance, swapping acrylic for cotton is an option, but remember that cotton may yield a firmer result.
How can I adjust the size of my crochet fox?
If you want a larger or smaller fox, consider adjusting your hook size as well as the yarn weight. Using a bigger hook can create a less dense fabric, while a smaller hook will lead to a tighter, more compact fox. Just be mindful to maintain stitch count so the parts still fit together nicely.
Why is my crochet fox’s work curling?
Don't panic! Curling can often happen if your stitches are too tight, or if you’re working in such a way that the tension is uneven. I recommend checking your tension and possibly loosening your grip while crocheting, or ensuring you're using the correct hook size.
How do I fix dropped stitches in my crochet fox?
An easy fix! Simply pull the working yarn gently to rewind the last few stitches and place them back onto your hook. Be careful to maintain the stitch count, and if it happens frequently, check your tension to see if it’s consistently too tight.
What hook size should I use for my crochet fox?
For this adorable crochet fox, a 4.0 mm (US G-6) hook is ideal. This size balances the stitch definition while keeping your fox structure solid and huggable. If you choose to use a heavier yarn, you might consider a slightly larger hook for a good fit.

Leave a Reply