
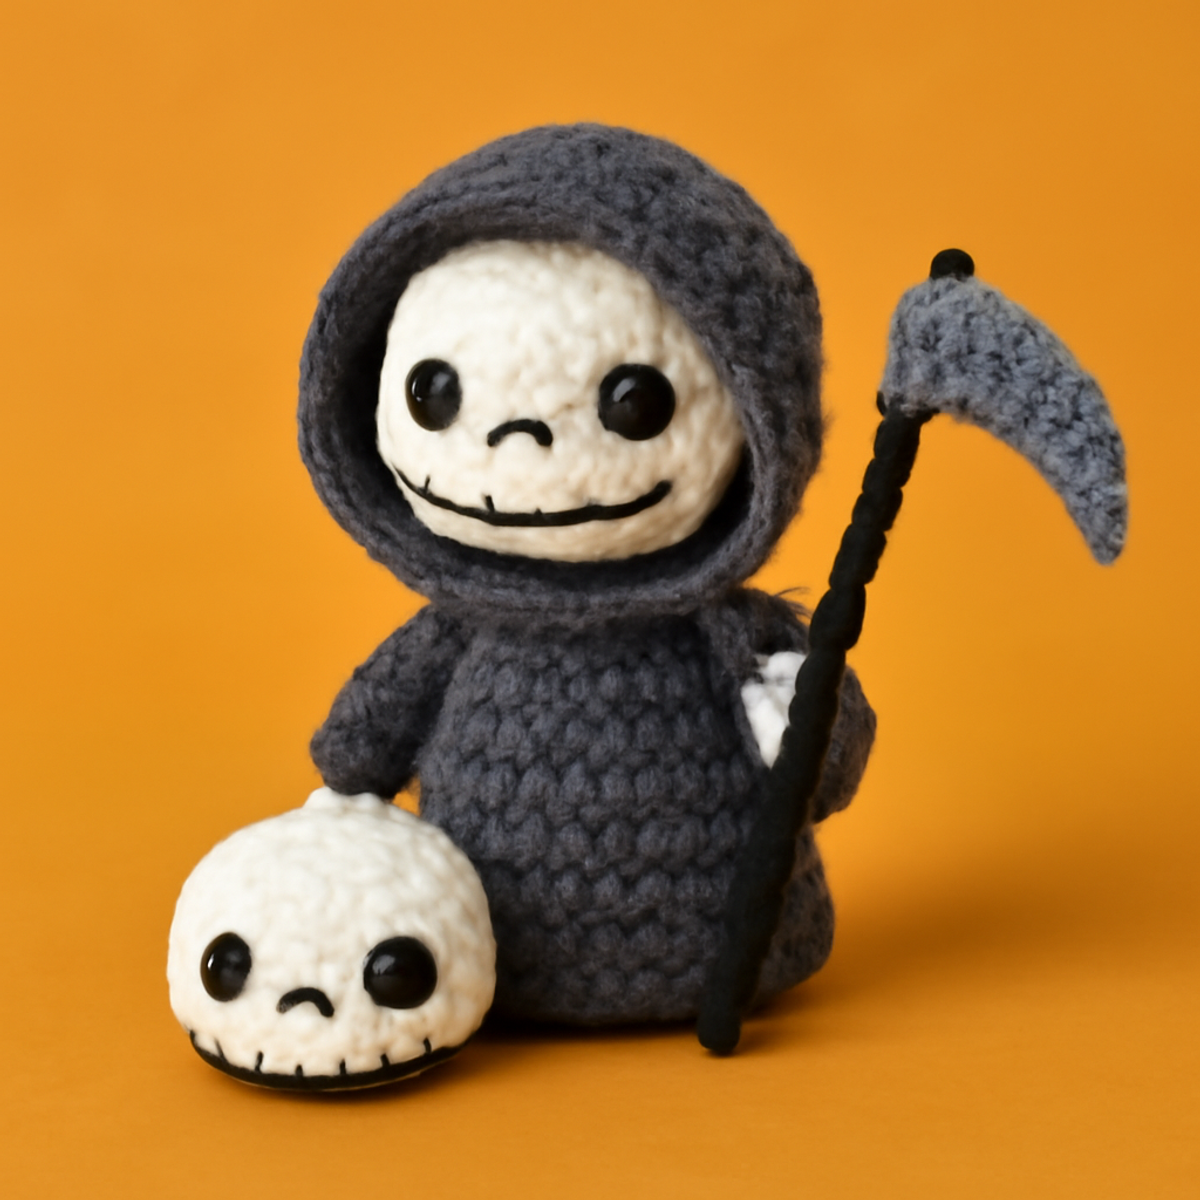
As I sat with my hook in hand, I couldn’t help but grin at the idea of crafting my own charming crochet grim reaper. This project isn't your typical spooky décor; rather, it’s a delightful amigurumi that adds a playful touch to any yarn lover's collection. Perfect for those chasing a little Halloween magic year-round, this pattern allows for personal flair, so you can choose colors that make your heart sing. Plus, it combines basic stitches with just enough detail to keep things interesting for intermediate crafters. Whether it's a cuddly companion or a quirky display piece, get ready to create a character that brings joy instead of chills! Let’s dive in and bring this cute creature to life together.
Creepy Cute Crochet Grim Reaper Materials & Tools
Note: Get ready to gather your supplies for this delightful crochet grim reaper project!
Yarn
- Worsted Weight Acrylic Yarn – Roughly 100-150 yards each in dark gray and white; consider adding a bit of black for details.
Tools & Notions
- 4.0-5.0mm (G-H) Crochet Hook – This size will help create a snug yet plush amigurumi texture.
- Safety Eyes – Use 10mm for the skull face to bring your character to life.
- Fiber Fill – Needed for stuffing to give your reaper its delightful squishiness.
- Stitch Marker – Essential for keeping track of your rounds and ensuring consistent stitch count.
- Tapestry Needle – Perfect for sewing pieces together and weaving in ends.
Why Will You Love This Crochet Grim Reaper?
Charmingly Unique: This project offers a whimsical twist on traditional Halloween themes, making it a standout piece in any collection.
Fun Detailing: Intermediate crafters will enjoy incorporating delightful features, like safety eyes and a charming scythe, adding extra personality.
Year-Round Appeal: While perfect for spooky season decoration, this adorable reaper can also serve as a quirky plush companion anytime.
Customizable Colors: You have the freedom to choose your yarn hues, creating a unique amigurumi that reflects your style.
Squishy Softness: The plush texture ensures it’s cuddly enough for hugs while maintaining a sturdy shape. Embrace your creativity with this cozy crochet project!
How to Check Your Gauge for Crochet Grim Reaper
Don't skip the gauge swatch! Checking your tension is essential for achieving the adorable proportions of your crochet grim reaper. A standard guide suggests making a 4×4 inch (10×10 cm) tension swatch to ensure your stitches are consistent; ideally, it should yield around 14 single crochets by 16 rows. If you find your swatch is smaller, increase your hook size to loosen your stitches; conversely, if it’s larger, switch to a smaller hook for a snug fit. To customize your crochet grim reaper for different sizes, adjust your starting chain or rounds in multiples of 6 and add any extra stitches to maintain the style! Happy hooking!
Step-by-Step Pattern for crochet grim reaper
Row 1: Start the Skull
Begin by creating a magic ring with your white yarn. Chain 1, then work 6 single crochet (sc) into the ring. Pull the tail to tighten, and join with a slip stitch (sl st) into the first sc. Your work should form a small circle (6 sts).
Row 2: Increase for Shape
For the second row, chain 1 and make an increase (inc) in each stitch around. This means you will work 2 sc in each previously made stitch. Join with a sl st. Your circle should begin to take shape and should measure approximately 12 stitches (12 sts).
Row 3: Expanding the Skull
Chain 1 and then make 1 sc in the first stitch, followed by an increase in the next stitch. Repeat this pattern around the row: 1 sc, inc. Join with a sl st at the end of the round. You should now have a total of 18 stitches (18 sts), and the shape should be rounding out nicely.
Row 4: Continue Shaping
For this round, chain 1 and sc in the first two stitches, then make an inc. Continue this pattern: sc in 2 stitches, inc around. Join with a sl st at the end. Your work should appear fuller and measure 24 stitches (24 sts) at the end of this row.
Row 5-6: Form the Skull
For Row 5, chain 1 and sc in each stitch around for a total of 24 stitches, keeping your work snug and uniform (24 sts). In Row 6, repeat this same stitch pattern, allowing the skull to gain height and become more three-dimensional (24 sts).
Row 7: Add Safety Eyes
In the next round, sc in the first 12 stitches, then add safety eyes in the center of the face. Continue sc for the remaining 12 stitches to secure them in place. Your work should look lively with the eyes set in (24 sts).
Row 8: Finish the Skull
For this round, chain 1 and work in the established pattern. Sc in the first stitch, then make a dec (decrease) twice. Work 1 sc in the following two stitches, and repeat the pattern. Join with a sl st to finish – your skull shape continues to emerge beautifully (20 sts).
Step 1: Start the Body
Switch to dark gray yarn and chain 1. For the body, work 1 sc in each of the next 18 stitches to create the base of the hood. This round creates an enchanting little gown shape (18 sts) that will complement the spooky skull.
Step 2: Create the Hood
For the second row of the body, chain 1 and work an inc, then sc in 4, repeating until the end. This allows the body to have a widening base at the hood while maintaining an elegant silhouette (24 sts).
Step 3: Form Body Length
Continue to crochet in rounds for about 10 more rows, keeping the body in long rounds (24 sts). During this time, adjust the length as desired, allowing the gown to expand. The cozy feel of the piece will start to take shape.
Step 4: Add Arms
To create arms, chain 1 with dark gray and work 6 sc in a magic ring. Pull tight and join with a sl st. Work 2 additional rounds of sc around, which adds a plump feeling to the arms (8 sts). Repeat this to create a second arm.
Step 5: Attach the Arms
Position one arm on each side of the body, reinserting your hook through both layers to secure. Use a tapestry needle to weave ends and attach firmly, giving your crochet grim reaper a delightful appearance.
Step 6: Create a Scythe
Using black yarn, chain 10 for the scythe handle and sc back down, which creates structure. For the blade, chain 5, and sc in the second chain from the hook, then hdc (half double crochet) and finally a dc (double crochet), creating a pointed shape. Attach the scythe to your grim reaper for an extra touch.
Step 7: Add Decorative Border
Finish your crochet grim reaper by stitching a small decorative border around the hood with white yarn. This adds charm and helps provide a polished finish, wrapping the gown together beautifully. Your project is now complete and ready to show off!
What to Make after Creepy Cute Crochet Grim Reaper?
Imagine the joy of creating a whimsical family of crochet friends to complement your delightful grim reaper, bringing warmth and charm into your crafting space.
-
Playful Witch Hat: Create a fun witch hat that adds an enchanting touch to your decoration, making your reaper’s look even more festive.
-
Mini Skull Plushies: These little skulls can be made in various colors, enhancing your grim reaper’s charm and giving it some vibrant company.
-
Cozy Cauldron Basket: Crochet a cauldron to hold your crafting supplies, perfectly matching the Halloween spirit of your grim reaper while adding practicality.
-
Charming Ghost Companion: Make a matching ghost to float alongside your reaper, using soft pastels to create an adorable contrast that captures the seasonal cheer.
-
Webby Spider Friend: A cute spider with tiny legs can add a whimsical element to your display, tying together the Halloween vibes beautifully.
Each project can be crafted using the same yarn, ensuring a delightful harmony throughout your crochet grim reaper ensemble. Happy crafting!
How to Wash and Care for Your Crochet Grim Reaper
Machine Washing: Use a gentle cycle with cold water to prevent any felting or pilling, ensuring your crochet grim reaper stays adorable and intact.
Hand Washing: For best results, hand wash your amigurumi in cold water using a mild detergent. This method protects the yarn and keeps your creation looking fresh.
Drying/Blocking: Lay your crochet grim reaper flat on a clean towel to dry. Avoid hanging it to prevent stretching. If desired, lightly block with steam to enhance shape.
Storage: Store your finished project in a cool, dry place, away from direct sunlight. This preserves the vibrant colors and soft texture for years of enjoyment!
crochet grim reaper Variations & Substitutions
Embrace your creativity with these fun ways to customize your crochet grim reaper pattern.
- Yarn Weight Swap: Experiment with lighter DK weight yarn for a smaller version, creating a delightful pocket-sized charm!
- Cotton Instead of Acrylic: Try using cotton yarn for a soft, summery feel, perfect for year-round cuteness in warmer climates.
- Bold Color Blocking: Alternate dark gray and vibrant colors—imagine pink, green, or blue stripes for a whimsical spin on the traditional design!
- Larger Size Option: Use a larger hook and bulkier yarn to create a cuddly giant grim reaper that’s sure to steal hearts!
- Texture Additions: Introduce charming pom-poms or fringe to the edges of the hood for added flair and some playful texture.
- Facial Expressions: Stitch different smiles or quirky frowns to your grim reaper's face for unique personalities with each creation.
- Accessorize with Props: Create tiny props like a pumpkin or a ghost companion to enhance its Halloween theme and provide more character.
- Decorative Scythe Variations: Craft the scythe using metallic yarn or by adding glitter to give it a magical touch in the hands of your amigurumi.
Expert Tips for Your Crochet Grim Reaper
-
Consistent Tension: Always maintain an even tension as you work, especially on facial details, to keep the features looking sharp and defined.
-
Count Carefully: Pay close attention to your stitch count, especially in rounds. Use a stitch marker to help track where each round begins, preventing errors.
-
Final Touches: Don't forget to block your finished project; it enhances drape and style, especially around the hood. This step can give your crochet grim reaper a lovely, polished look.
-
Secure Loose Ends: When finishing, weave in the ends thoroughly to avoid any unraveling. A tidy finish lets your amigurumi shine!
-
Personalize with Details: Feel free to customize your grim reaper with different accessories or yarn colors, making this project truly your own while exploring your creativity!
Creepy Cute Crochet Grim Reaper FAQs
Can I substitute different yarns for this project?
Absolutely! While worsted weight acrylic yarn is recommended for durability and texture, you can experiment with other fibers like cotton or bamboo. Just remember that changing the yarn may affect the final sizing, so it’s best to check your gauge if you use a different material.
How can I adjust the size of my crochet grim reaper?
If you'd like to make your reaper bigger or smaller, simply adjust your hook size or yarn weight. Using a bulkier yarn or a larger hook will yield a larger amigurumi, while a smaller hook can create a more compact version. But definitely keep an eye on your stitch count to maintain shape!
Why is my work curling up around the edges?
Don’t panic! Curling can occur if the tension is too tight or if the starting chain is too loose. Consider relaxing your grip when you crochet or adjusting the initial chain's tension to ensure a smoother edge. A little bit of blocking at the end can also help flatten it out!
What should I do if I drop a stitch?
It's an easy fix! Gently pull the working yarn to loosen the surrounding stitches, and using your tapestry needle or hook, pick up the dropped stitch and guide it back into place. Keep practicing, and don’t hesitate to ask for help if you need it!
What hook size is best for this crochet grim reaper project?
I recommend using a hook size between 4.0mm and 5.0mm (G/6-H/8 US) to achieve the plush texture and durability you’ll want for your amigurumi. If you find your stitches are too tight or loose, feel free to adjust the size based on your tension preferences.

Leave a Reply