
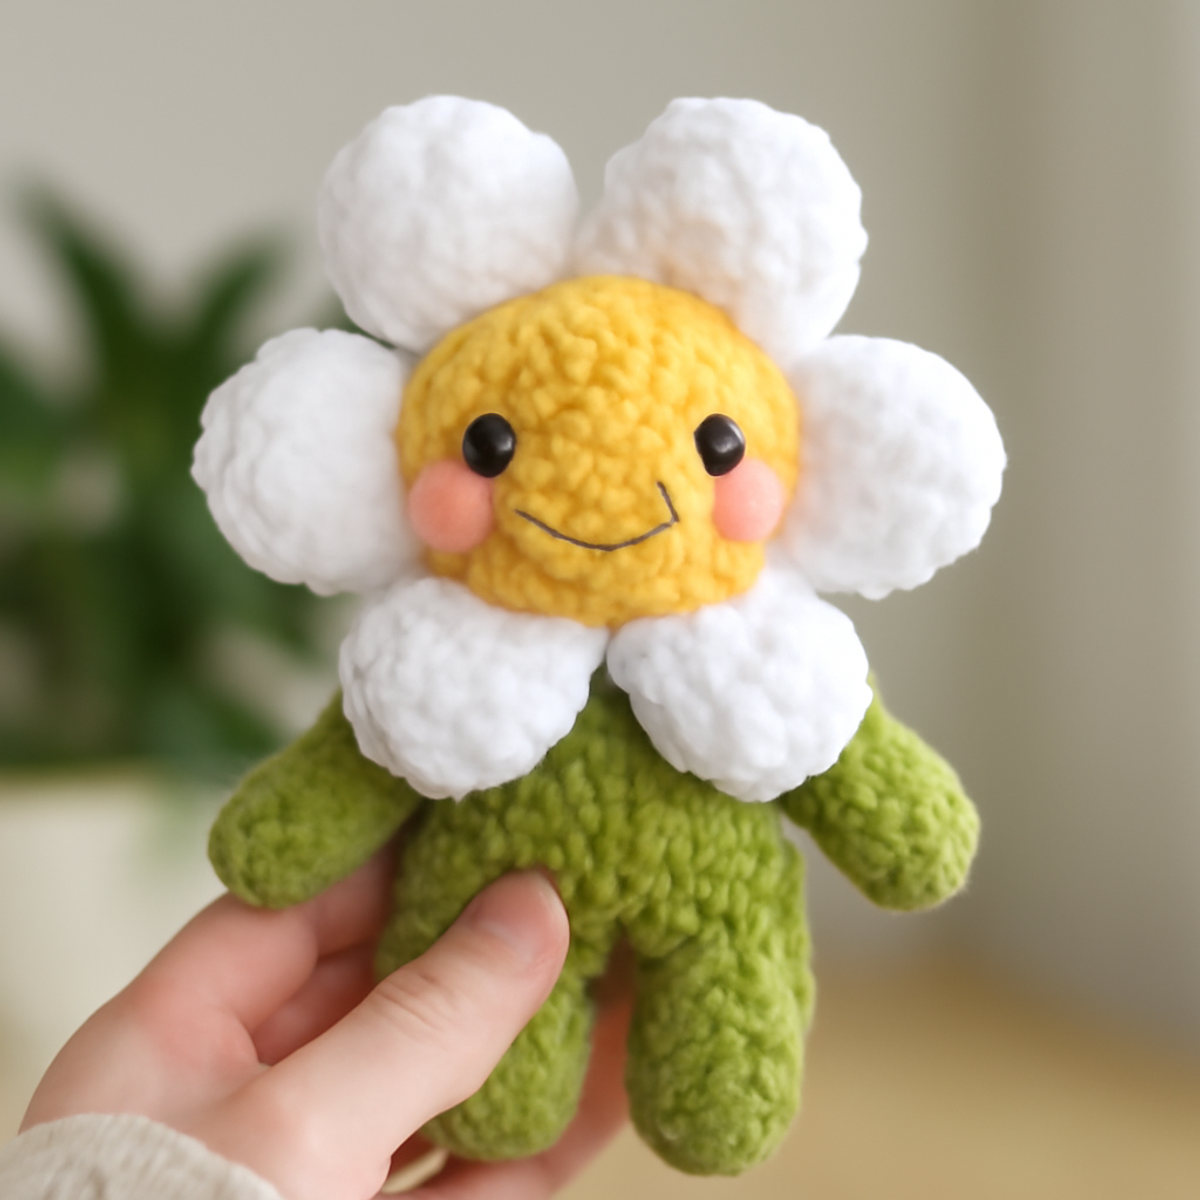
As I settled into my favorite corner of the couch, the gentle rhythm of my hook weaving through vibrant yarn always brings a sense of peace and joy. Today, I’m excited to share the delightful daisy flower buddy crochet pattern! This whimsical project, perfect for any level of crafter, embodies the cheerful spirit of spring while creating charming little flower companions. One of the best parts? The soothing repetition of simple stitches makes it an enjoyable and quick make—ideal for those of us with busy lives or the need for a last-minute gift. These daisy flower buddies also serve as lovely decorations that can brighten any space, infusing warmth and happiness into your home. Let’s dive into this creative journey together and stitch up some joy!
Daisy Flower Buddy Materials & Tools
To create your cheerful daisy flower buddy, gather the following materials to let your creativity blossom!
Yarn
- Worsted Weight Yarn – A medium weight yarn works best; around 100-150 yards in soft yellow, bright white, and fresh green will bring your buddies to life.
Tools & Notions
- 4.5 mm (G-6) Hook – This size is perfect for achieving the plush look that makes your daisy flower buddy charming.
- Safety Eyes – Add some personality to your buddy; choose 6mm safety eyes for that perfect expressive look.
- Blush (for cheeks) – A soft touch to give your flower buddies a sweet look; any acrylic-safe blush will do!
- Yarn Needle – Essential for sewing pieces together; a blunt tip will work best to avoid splitting the yarn.
Feel free to explore various colors and textures to personalize your daisy flower buddy even further!
Why Choose the Daisy Flower Buddy?
Whimsical Design: The charming daisy flower buddy is not only visually appealing but also brings a playful touch to any space, perfect for all ages.
Simple Stitches: Ideal for beginners, this pattern leverages basic crochet techniques, making it accessible and enjoyable for crafters at any skill level.
Quick Project: With its efficient construction, you can complete these sweet buddies in no time, making them a great option for last-minute gifts or quick crafting sessions.
Customizable Touches: Feel free to experiment with colors and accessories, allowing you to put your unique spin on each flower buddy for a personalized finish.
Joyful Vibes: Infusing your creation with the spirit of spring, these delightful buddies are sure to evoke smiles and happiness, lighting up your home or brightening someone else's day.
Gauge & Sizing Notes
Don't skip the gauge swatch! Ensuring the correct tension is vital for your daisy flower buddy to achieve the perfect plush and rounded shape. A general guideline for amigurumi projects is aiming for a gauge of approximately a 4×4 inch (10×10 cm) square, which typically yields about 14 single crochets by 8 rows. If you're looking to scale your daisy flower buddy up or down, consider adjusting the starting chain in multiples of 6 to modify the size of the body and petals. If your tension swatch is too small, simply go up a hook size to ensure your daisy flower buddy has that adorable, inviting look you desire!
Step-by-Step Pattern for Daisy Flower Buddy
Round 1: Starting the Head
Begin with a magic ring using soft yellow yarn. Work 6 single crochets (sc) into the ring and pull tightly to close. You should have a small circle. This forms the center of your daisy flower buddy’s head.
Round 2: Expanding the Head
Crochet 2 single crochets (sc) in each stitch around for Round 2, yielding 12 stitches (12 sts). Your project should begin to round out nicely. Maintain even tension to keep the stitches uniform.
Round 3: Shaping the Head
For Round 3, work 1 sc in the first stitch, 2 sc in the next and repeat around. This will result in 18 stitches (18 sts). You'll notice the head puffing out slightly, forming a lovely round shape.
Round 4: Continuing the Head
In Round 4, crochet 1 sc in the first two stitches, 2 sc in the next around, bringing you to 24 stitches (24 sts). Your daisy flower buddy’s head should look quite round and plump now, ready for its petals!
Round 5: Petal Foundation
Switch to bright white yarn for the petals. In Round 5, chain 3 (ch 3) for the first petal, then work 1 double crochet (dc), 1 slip stitch (sl st) back into the center of the head. Repeat this process around, creating 6 petals for your daisy flower buddy.
Round 6: Finishing Petals
Continue chaining 3 (ch 3) and working your slip stitches (sl st) and double crochets (dc). After completing all petals, your work should now display a lovely flower shape, ready to move on to forming the body.
Round 7: Starting the Body
Change to fresh green yarn and slip stitch (sl st) into the base of the petals. In Round 7, work 6 single crochets (sc) into the space between petals. This will create the bottom of your daisy flower buddy’s body.
Round 8: Shaping the Body
For Round 8, crochet 1 sc in the first stitch, 2 sc in the next around, to yield 9 stitches (9 sts). You’ll begin to see a bulbous body forming, adding character to your creation.
Round 9: Continuing Body Structure
Round 9 consists of 1 sc in each of the first 2 stitches, 2 sc in the next. Repeat this to achieve 12 stitches (12 sts). Make sure your daisy flower buddy feels firm yet plush at this stage.
Step 10: Adding Limbs
To create the limbs, crochet 2 separate pieces: chain 6 (ch 6) and work 5 single crochets (sc) back to the starting end for each arm. For each leg, chain 8 (ch 8) and repeat the same as the arms but place a few extra stitches for added width.
Step 11: Attaching Limbs
Using a yarn needle, gently attach the prepared limbs to the body. Secure with slip stitches (sl st) or by sewing. Your daisy flower buddy should now have a lively stance!
Step 12: Finishing Touches
Finally, add 6mm safety eyes and some blush on the cheeks using soft acrylic-safe colors. Ensure the head sits firmly atop the body and check that everything is secure. Your adorable daisy flower buddy is now ready to be enjoyed!
How to Wash and Care for Your Daisy Flower Buddy
Machine Washing: Use cold water and a gentle cycle to care for your daisy flower buddy; this protects the yarn and maintains its vibrant colors.
Hand Washing: For delicate cleaning, gently submerge in cold water with mild detergent, pressing lightly to clean without agitating the fibers; avoid felting.
Drying/Blocking: Lay your daisy flower buddy flat on a clean towel to dry; reshaping your buddy while damp will retain its charming form and soft texture.
Storage: Keep in a cool, dry place away from direct sunlight to prevent fading; using a breathable bag can help maintain the daisy flower buddy’s texture and vibrancy.
Expert Tips for Daisy Flower Buddy
- Tension Consistency: Maintain even tension throughout to achieve a well-proportioned daisy flower buddy. Avoid loosening your grip, especially when switching between yarn colors.
- Stitch Counting: Keep a careful count of your stitches per round to prevent any discrepancies in size. Using a stitch marker can be very helpful for tracking your progress.
- Secure Assembly: When attaching limbs, ensure they are stitched tightly to avoid any wobbling. Double-check that all pieces are securely fastened before completing your buddy.
- Color Changes: When changing yarn colors, avoid tight pulls to prevent distortion. Gently weave in ends to keep your work neat and tidy, enhancing the final look.
- Final Blocking: Lightly steam block your daisy flower buddy after finishing. This not only improves shape but also adds a polished touch to your charming creation.
What to Pair with Daisy Flower Buddy
As you bask in the joy of crafting your daisy flower buddy, consider creating complementary projects that deepen your springtime vibe.
-
Cheerful Grapevine Wreath: Adorn your door with a vibrant wreath by weaving in the same colors for a seasonal touch. A delightful way to welcome guests!
-
Flower Pot Cozy: Transform plain pots into charming displays by crocheting co ordinating cozies; a lovely home for your daisy flower buddy!
-
Mini Flower Buds: Create a bouquet of tiny flower buddies in assorted colors to accompany your larger daisy, making an enchanting spring centerpiece.
-
Buddy Storage Basket: Crochet a matching basket using the same yarn to store small items, blending functionality with whimsy—ideal for a cheerful space!
-
Petal Garland: Craft a playful garland of crocheted petals that can drape across windows or walls, infusing the atmosphere with joy and light.
Let your creativity flourish and enjoy the journey of making a cohesive, enchanting collection!
Daisy Flower Buddy Variations
Unlock your creativity and infuse your daisy flower buddy with a personal touch through these delightful variations!
- Yarn Weight Swaps: Try lighter or heavier yarn to create a mini or larger version—just adjust your hook size accordingly.
- Color Palette Changes: Explore pastel tones for a soft look, or opt for vivid colors for a striking, cheerful buddy that pops.
- Texture Additions: Introduce texture by adding a fuzzy yarn around the petals or body to enhance the cozy feel and visual interest.
- Size Customization: Use sport weight yarn for a daintier buddy, or go chunky for an oversized version that makes a statement.
- Seasonal Accessories: Craft themed accessories like a tiny sun hat or a pair of sunglasses to celebrate summer vibes—charmingly playful!
- Fringe Fun: Add fringe to the bottom edges of the petals to create a whimsical, bohemian vibe that adds flair to your design.
- Multiple Flower Combinations: Stitch together different flower buddies into a bouquet, varying your colors and shapes to create a delightful centerpiece.
- Whimsical Faces: Add unique embroidered facial expressions or add cute felt features to personalize each buddy’s character and charm.
Daisy Flower Buddy FAQs
Can I use a different yarn besides Worsted weight for the daisy flower buddy?
Absolutely! You can experiment with other yarn weights, such as Sport weight for a smaller buddy or Bulky yarn for a larger one. Just remember to adjust your hook size accordingly to maintain the plush look!
How do I make my daisy flower buddy bigger or smaller?
To adjust the size, simply switch to bulkier yarn for a larger version or use a lighter weight yarn for a smaller buddy. Additionally, you could increase the number of rounds in the head and body to achieve the desired size while keeping your tensions in check.
Why is my daisy flower buddy curling at the edges?
Don't panic! Curling can happen due to tight tension or uneven stitches. I recommend checking your gauge, ensuring your tension is consistent, and relaxing your grip a bit while crocheting. If curl persists, gently blocking the finished work can help flatten and shape it beautifully.
What hook size should I use for the daisy flower buddy?
A 4.5 mm (G-6) crochet hook is ideal for creating this charming daisy flower buddy. This size helps achieve the perfect plushness while keeping your stitches uniform. Feel free to adjust slightly if you find a different tension comfortable for you.
How do I fix a dropped stitch in my crochet work?
It's an easy fix! Just use your crochet hook to pull the dropped stitch back up through the work, redoing any stitches as necessary. If you've lost several stitches, simply pick up the last loop and crochet through the remaining stitches until you reach the end.
Can I add more petals to my daisy flower buddy?
Absolutely! Adding more petals can create a fuller flower and give your buddy a unique twist. Just remember to evenly space out your stitches to keep the shape balanced as you work around the head. Happy crocheting!

Leave a Reply