
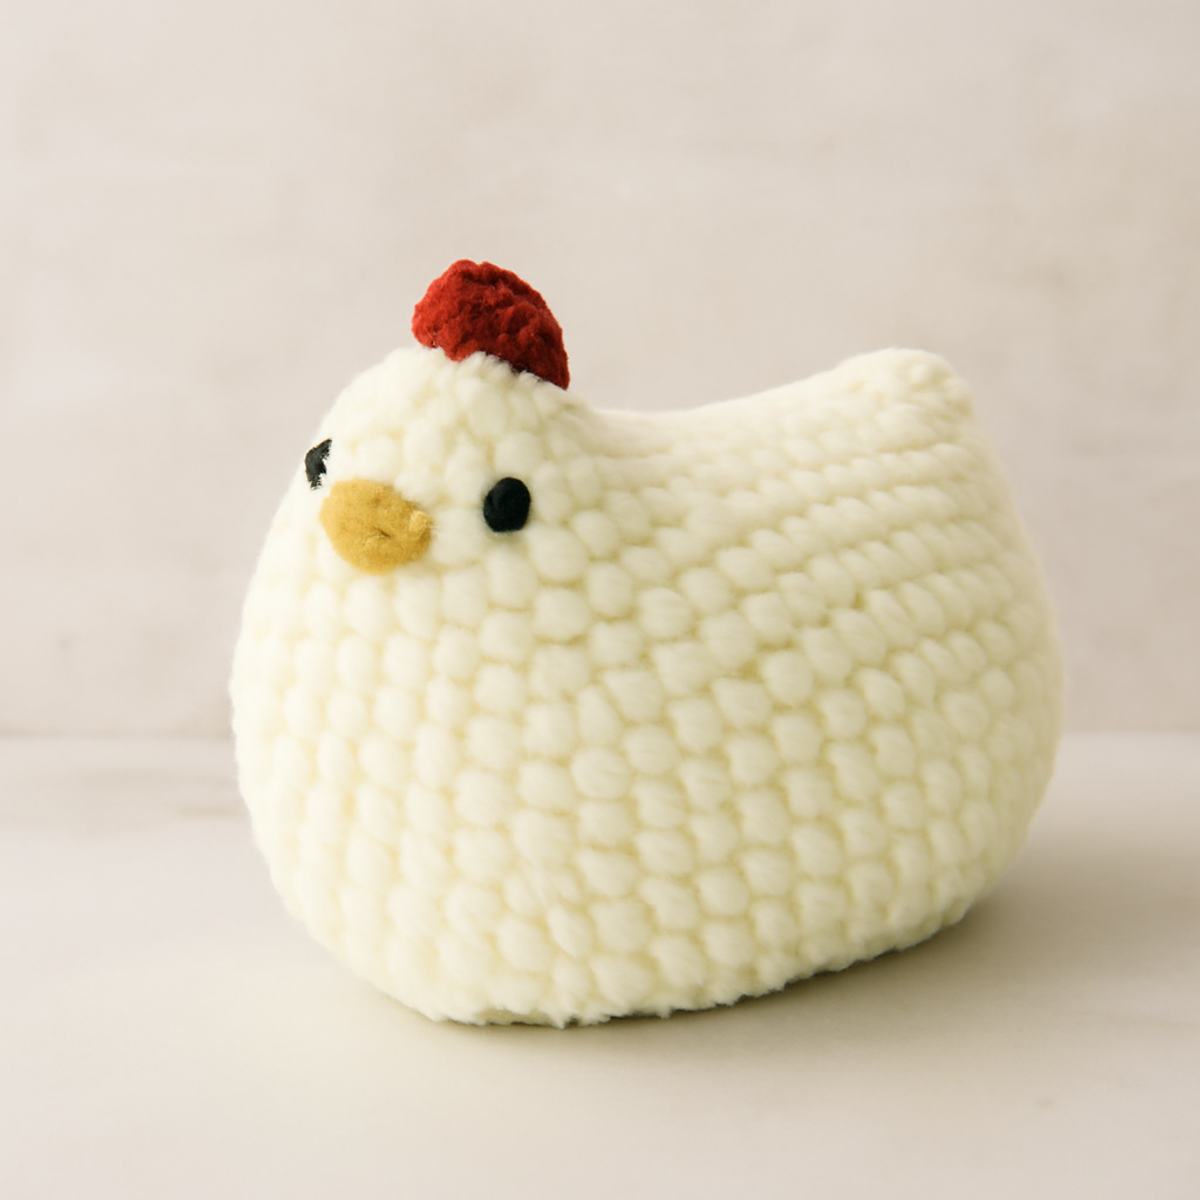
Have you ever felt the urge to create something both joyful and cozy? That’s exactly why I designed this Whimsical Emotional Support Chicken! This delightful crochet project not only adds a playful charm to any room but also serves as an endearing companion. Perfect for beginners and those with a bit of crochet experience, this soft poultry friend is designed to help you hone your skills while crafting a whimsical item that can lift anyone's spirits. Plus, with its squishy texture and adjustable size, you can make it a stash-buster triumph or a delightful gift that sparks conversation. So, let’s dive into this joyful crafting adventure and bring some laughter and comfort into our lives, one stitch at a time!
Emotional Support Chicken Materials & Tools
Yarn
- Bulky Weight Yarn (5) – You'll need about 150-200 yards of soft acrylic fiber for that plush, cozy feel.
Tools & Notions
- 6.5mm (K) Hook – This size will help you achieve a lovely texture for your emotional support chicken.
- Safety Eyes – Opt for black and glossy ones to give your chicken an expressive gaze.
- Tan or Yellow Yarn – Just a small amount is needed to craft the adorable beak.
- Stitch Markers – These are a must for tracking your rounds during assembly, especially when making increases.
Why Is This Chicken So Special?
Endearing Design: The Whimsical Emotional Support Chicken exudes charm that brightens any space. Its playful design makes it a wonderful conversation starter, ideal for those who appreciate humor in décor.
Cozy & Huggable: Crafted with soft acrylic yarn, this chicken boasts a squishy texture that invites snuggles and comfort. Its dimensions make it the perfect companion for all ages.
Beginner-Friendly: The project uses basic crochet stitches, ensuring that both beginners and intermediates can enjoy crafting this delightful piece without feeling overwhelmed.
Stash-Buster Potential: Use up your leftover yarn with this low-yardage project, making it a great option for those little bits you've been saving!
Customizable Colors: Experiment with colors and expressions to create a chicken that reflects your style, or even add tiny accessories like a scarf or bowtie for extra charm!
How to Check Your Gauge for Emotional Support Chicken
Don't skip the gauge swatch! Checking your tension is crucial for crafting the perfect emotional support chicken that turns out just as plush and lovely as you envision. A standard measurement to aim for is a 4×4 inch (10×10 cm) square that features about 14 single crochet stitches by 8 rows. If your gauge swatch is smaller than this, simply go up a hook size for a looser stitch. To adjust the size of your emotional support chicken, increase your starting chain in multiples of 6 plus 2 for added width—this allows you to tailor the finished product to your desired dimensions. Happy crocheting!
Step-by-Step Pattern for emotional support chicken
Round 1: Start the Base of the Body
Begin by making a magic ring. Crochet 6 single crochet (sc) stitches into the ring. Pull the ring tight to close it and join with a slip stitch (sl st) to the first sc. Your work will form a small circle, laying the foundation for the body of your emotional support chicken. (6 sts)
Round 2: Increase for a Round Shape
Chain 1, then work 2 single crochets (inc) in each stitch around the circle. This will create a wider base for the emotional support chicken. Keep an eye on the stitch count; you should have 12 stitches by the end of this round. Your circle will start to form a cup shape. (12 sts)
Round 3: Continue Increasing
Chain 1 and then (1 sc, inc) in each stitch around. This technique will help to form the rounded body of the chicken, adding to its plush appearance. After completing this round, your total stitch count will be 18 stitches, and the shape should be expanding nicely. (18 sts)
Round 4: More Stability
Chain 1, now crochet (2 sc, inc) around. This continuing increase will provide more space for the body, making your emotional support chicken rounder. The fabric should begin to curve, and your stitch count will increase to 24 stitches. (24 sts)
Rounds 5-7: Establish the Body Height
For these rounds, simply chain 1 and sc in each stitch around for a total of 3 rounds. This step helps build the height of your plush chicken without any increase, helping it to stand taller. By the end of Round 7, you will have maintained your stitch count at 24 total stitches, and the body will feel lovely and plush. (24 sts each round)
Round 8: Begin Decreasing
Chain 1, then work (2 sc, dec) around to start shaping the top of the body. This decrease will gently taper the shape, helping your chicken start moving towards its more rounded head. Complete the round with a total of 18 stitches remaining. (18 sts)
Round 9: Final Decrease to Secure the Body
Chain 1 and work (1 sc, dec) around; this will bring the body closer to the top while closing its shape snugly. With each decrease, your emotional support chicken will start to take on a more finished form. You should be down to 12 stitches at this point. (12 sts)
Round 10: Prepare to Finish the Body
Chain 1, then work 1 sc in each stitch around for a final tidy round, bringing the body full circle. This will ensure a neat finish to the body before moving on to the head. At this point, your total remains at 12 stitches, and the body should feel securely closed. (12 sts)
Step 1: Add the Belly Color
Now, switch to your contrasting color for the belly. Join the new color with a slip stitch, then chain 1. Work 1 sc in the same stitch and across, placing 12 stitches total. This nice belly addition will bring your emotional support chicken to life, making it more visually appealing. (12 sts)
Step 2: Create the Head
For the head, begin with a magic ring and crochet 6 sc into the ring. Pull tight to close, and join with a sl st. This smaller round will serve as the head of your emotional support chicken, starting the process of making its delightful features. (6 sts)
Step 3: Increase the Head Size
Chain 1, and then work (1 sc, inc) in each stitch around for this round. The head should be nice and plump, just like your emotional support chicken wants to be. You should have 9 stitches total after completing. (9 sts)
Step 4: Finish Head and Add Eyes
Work a round of sc across (9 sts) before fastening off, leaving a long tail for sewing. Attach safety eyes between rounds 1 and 2 of the head, ensuring they are securely in place. Your charming chicken is taking shape, and its adorable personality will soon shine through!
Step 5: Make the Beak
Using the tan or yellow yarn, create a small triangle by chaining 3, then crocheting (1 dc, 1 hdc, and 1 sc) into the second chain from the hook. This will give you the cute beak for your emotional support chicken. Fasten off, leaving a tail for sewing.
Step 6: Add Features and Assemble
Position the beak on the head, pinning it in place with a stitch marker if needed. Sew the beak securely, and then sew the head onto the body. Pay attention to the alignment; your emotional support chicken should feel snug and cohesive. With all parts in place, it’s ready to be the perfect companion!
Expert Tips for Your Emotional Support Chicken
Check Your Tension: Ensure your tension is consistent while crocheting. A tighter tension yields a denser chicken, which can affect its overall squishiness.
Mark Your Rounds: Utilize stitch markers to keep track of your rounds, especially when increasing. Losing count is a common mistake, but markers can help you stay organized.
Blocking for Shape: After completing your chicken, consider blocking it gently to refine its shape. This small step enhances its appearance and helps it sit well.
Secure Features: When adding safety eyes and the beak, ensure they're sewn tightly. Proper placement emphasizes the chicken's charm and avoids any assembly mishaps.
Final Inspection: Before finishing up, double-check that all stitches are secure, and the assembly is snug. This will ensure your emotional support chicken holds up to lots of love!
emotional support chicken Variations
Embrace your creativity by customizing the emotional support chicken to make it uniquely yours.
-
Yarn Weight: Swap to a lighter yarn for a smaller, pocket-sized chicken that can accompany you everywhere. This option is great for keychains or cute gifts!
-
Color Play: Experiment with vivid hues or pastel shades for a seasonal twist. A rainbow chicken can bring smiles all year round, while soft colors evoke springtime joy.
-
Fiber Alternative: Consider using cotton or bamboo yarn for a more breathable option. These fibers can lend a different texture, perfect for a warm-weather companion.
-
Texture Modifications: Add some playful accents like a fluffy pom-pom on the head or delicate fringe around the bottom. Little details can bring your chicken to life in whimsical ways.
-
Facial Expressions: Change the size or position of the safety eyes to create distinctive looks. How about a cheeky wink or wide-eyed surprise for added character?
-
Size Adjustments: Increase or decrease hook size for greater or lesser plushiness. A larger hook will yield a squishier chicken, while a smaller hook can give a firmer texture.
-
Accessory Additions: Dress your chicken up with tiny accessories like a scarf, bowtie, or even a beret! These little personal touches can elevate your chicken from cute to utterly charming.
-
Seasonal Themes: Transform your chicken into a festive version by adding seasonal elements, like a turkey costume for Thanksgiving or bunny ears for Easter, brightening your home all year!
What to Pair with Your Emotional Support Chicken?
As you craft your whimsical chicken, consider creating matching items that enhance its charm and coziness.
- Playful Chicken Pillow: A delightful addition that offers comfort when paired with your chicken, perfect for snuggling up during movie nights.
- Cheerful Egg Cozies: Crochet colorful egg cozies to keep your breakfast stylish while adding whimsy to your kitchen décor.
- Matching Chicken Scarf: Wrap up in a soft scarf using the same yarn, ensuring you stay cozy and playful while out and about.
- Adorable Mini Chick Keychains: Create tiny versions of your emotional support chicken for keychains, making your joy portable and spreading smiles wherever you go.
- Charming Chicken Blanket: A cozy lap blanket with the same yarn gives warmth, pairing beautifully with your emotional support chicken for ultimate comfort during chilly evenings.
How to Wash and Care for Your Emotional Support Chicken
Machine Washing: Use cold water on a gentle cycle to avoid any unwanted felting or pilling. Place your emotional support chicken in a mesh laundry bag for extra protection.
Hand Washing: Alternatively, hand wash your chicken in lukewarm water with a mild detergent. Gently agitate to remove dirt without overstressing the fibers.
Drying/Blocking: After washing, lay your chicken flat on a clean towel to dry—this prevents misshaping and helps maintain its plump design. Avoid hanging to preserve its adorable form!
Storage: When not in use, store your emotional support chicken in a cool, dry place to keep it fresh and ready for cuddles!
Whimsical Emotional Support Chicken FAQs
Can I use a different yarn than bulky acrylic?
Absolutely! While bulky acrylic works wonderfully for this project, you can use other yarn types. Just ensure that the weight corresponds with Bulky (5). If you're trying cotton yarn, be mindful that it may yield a firmer texture but can still look cute!
I want to make my emotional support chicken bigger. How can I adjust the size?
No problem! To create a larger chicken, consider using a heavier yarn, like a bulky weight (6) or increasing your hook size. This will naturally result in a bigger finished piece. You can also add more rounds to the body before starting to decrease!
My chicken is curling at the edges; what should I do?
Don't panic! Curling can happen if your tension is too tight or if your starting chain isn't loose enough. I recommend checking your tension and using a looser stitch for any starting edges. Blocking the finished piece can also help it sit flat.
What size hook should I use if I don’t have a K (6.5 mm) hook?
If you don’t have a size K hook handy, you can try using a size J (6 mm) or L (8 mm) as alternatives. Just keep in mind that your finished chicken may turn out slightly smaller or larger, depending on your chosen hook and yarn tension.
How do I fix dropped stitches when crocheting the chicken?
It’s an easy fix! Simply pull up the loop above the dropped stitch and use your crochet hook to guide it back through the stitch below. If you find multiple dropped stitches, it might be best to rip back to the last section you were confident in, and re-crochet those stitches back up.
Can I personalize my emotional support chicken with different expressions?
Absolutely! Have fun with this! Experiment with different sizes and placements of the safety eyes and beak to create various cute expressions. Adding accessories like hats or scarves will also give it more personality and make it uniquely yours!

Leave a Reply