
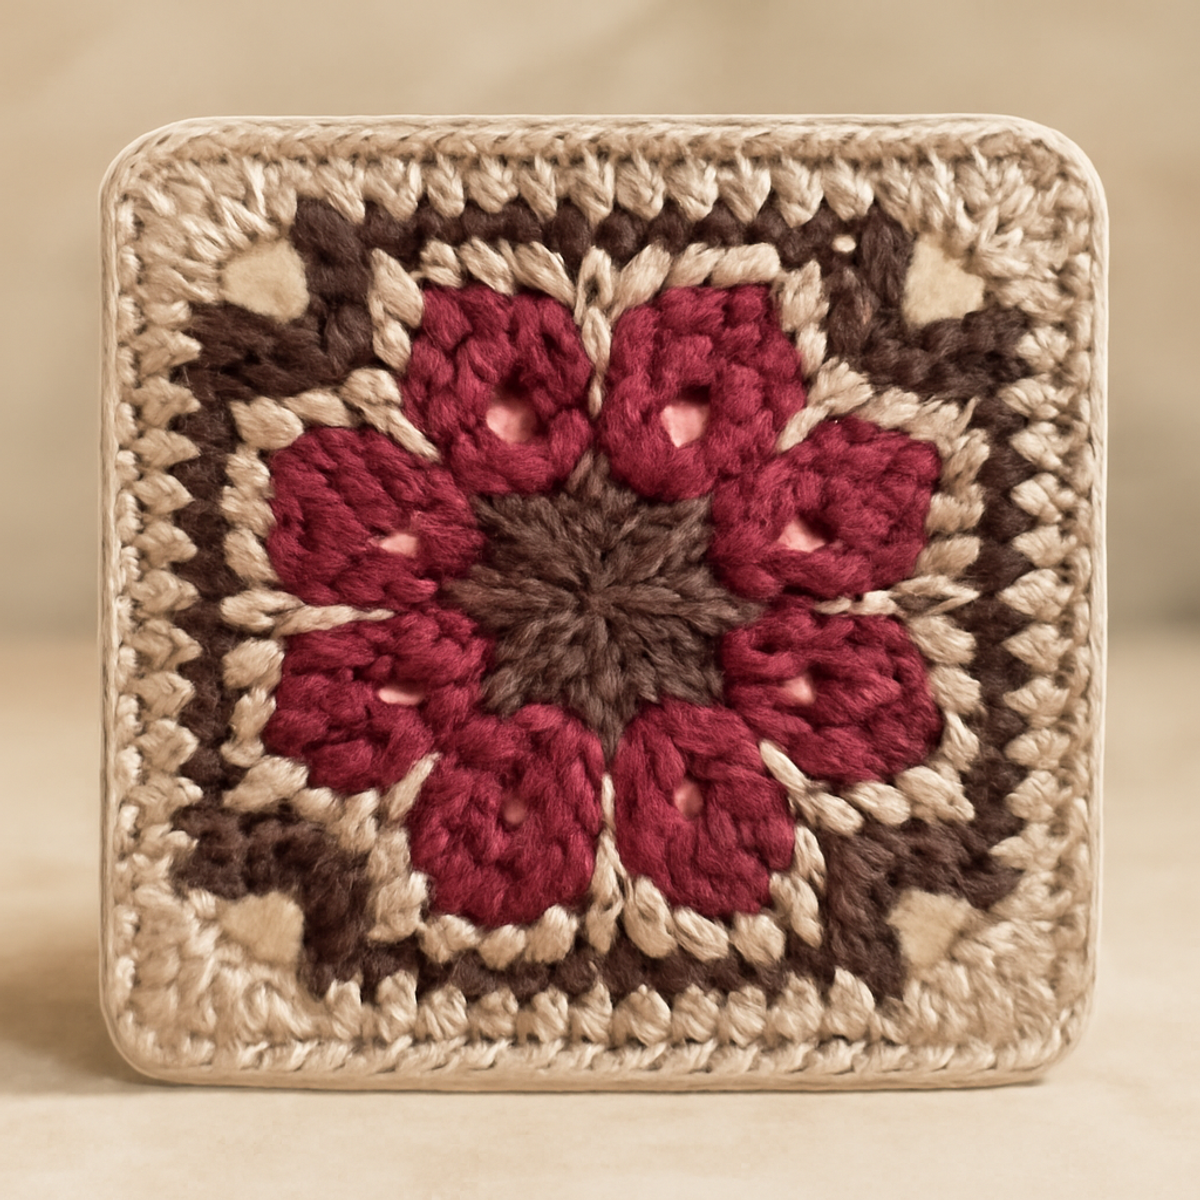
There’s something magical about the intricate details of a floral granny square that makes my heart flutter with creativity. This Charming Floral Motif Granny Square combines vibrant floral motifs with a classic design, creating a delightful crochet piece that's sure to brighten up your next project. Perfect for those who are ready to take on an intermediate challenge, this pattern not only promises the satisfaction of mastering new techniques but also invites you to play with color and style. Whether you’re envisioning a cozy blanket, a whimsical tote, or a statement home accessory, each square can be tailored to fit your unique vision. Ready to immerse yourself in a world of stitches and florals? Let’s get started on this enchanting crochet journey!
Charming Floral Motif Granny Square Materials & Tools
- Medium Weight Yarn – Use a cotton or acrylic blend, with approximately 150 to 200 yards estimated for each square.
- 4.5mm (US 7) Hook – This size is recommended for achieving the right stitch density in your floral granny square.
- Stitch Markers – Handy for keeping track of rounds or significant changes in the pattern to maintain your progress.
- Tapestry Needle – Essential for weaving in ends and finishing your project neatly.
Why is this floral granny square special?
Versatile Design: The eye-catching floral motifs offer a stunning touch that can elevate any project, from bags to home decor. Intermediate Challenge: Perfect for those looking to enhance their skills, this pattern provides a rewarding experience as you learn new techniques. Color Customization: You have the freedom to choose shades that match your personal style, making each square uniquely yours. Stunning Texture: The combination of various stitches ensures a captivating texture that is both visually appealing and practical. Classic Appeal: This granny square style blends seamlessly with various design aesthetics, making it an enduring favorite among crafters. Get ready to fall in love with this charming floral journey!
How to Check Your Gauge for Charming Floral Granny Square
Don't skip the gauge swatch! Checking your tension is essential for the Charming Floral Granny Square to ensure your finished piece maintains its beautiful shape and size. A general guideline is to aim for a gauge of 4×4 inches (10×10 cm) to achieve the right stitch density. If you're looking to scale your square larger or smaller, simply adjust your starting chain in multiples of 6 + 2 to maintain the floral design's integrity. If your tension swatch is too small, try using a larger hook size, while crocheting too loosely may require you to switch to a smaller hook. Remember, a little gauge check today can lead to a perfect floral square tomorrow!
Step-by-Step Pattern for Charming Floral Granny Square
Row 1: Magic Ring and Center Flower
Start by creating a magic ring. Ch 3 (counts as your first dc) and then work 11 dc into the ring. Pull the ring tight, then join with a sl st to the top of the beginning ch-3. Your work should form a nice circle with a total of 12 stitches (12 sts).
Row 2: Petals Creation
Ch 3 (counts as your first dc) and do 2 dc, ch 2, sl st into the next stitch; repeat from * around the circle until you have 6 petals formed. Join with a sl st to the top of the beginning ch-3. Your work should now display flower-like shapes around the center (6 petals).
Row 3: Expanding the Square
Ch 1, then sc in the ch-2 space of each petal. After reaching the last petal, make 3 sc in the same space to create a corner. Repeat this for each petal while working 3 sc in each corner space. Sl st to join, resulting in 18 stitches total plus the corners (24 sts).
Row 4: Clusters for Texture
Ch 3 (counts as your first dc), work 2 dc in the next sc, then 3 dc in the corner sc, repeat around the square. Join with a sl st to the top of the beginning ch-3. The texture should be prominent, and you will have 36 stitches around (36 sts).
Row 5: Adding Chains and More Edging
Ch 1, then in each dc, work 1 sc. For each corner, make 1 sc, ch 2, and 1 sc. This will add space between your corners and enhance the square's shape. Join with a sl st to the first sc, leading to a more defined structure (48 sts total).
Step 6: Final Decorative Border
Ch 3 (counts as dc) and work 2 dc, ch 2, 3 dc in each corner (the same as the previous round). For the sides, work 1 dc in each sc, evenly distributing the stitches. Join with a sl st to the first ch-3, providing a beautiful finishing touch and a total of 72 stitches (72 sts).
Step 7: Weaving in Ends
Carefully weave in all ends using a tapestry needle. Block the finished floral granny square to enhance the design's structure and texture, ensuring that your piece lies flat and the colors pop vibrantly. Your charming floral granny square is now ready for use in your next creative project!
How to Wash and Care for Your Floral Granny Square
-
Machine Washing: Use a delicate cycle with cold water to gently clean your floral granny square, ensuring to place it in a mesh bag to prevent snagging.
-
Hand Washing: If you prefer a more gentle approach, hand wash your square in cold water with mild detergent, carefully swishing it without agitation to avoid felting or pilling.
-
Drying/Blocking: Lay your finished floral granny square flat on a clean, dry surface to reshape and block it, allowing it to retain its defined stitches and vibrant colors while preventing any curling.
-
Storage: Store your square in a cool, dry place away from direct sunlight to protect its colors and preserve the intricate details that you’ve lovingly crafted.
What to Pair with Charming Floral Motif Granny Square
As you venture into the delightful world of crochet, consider creating a matching ensemble that enhances your intricate floral masterpiece.
-
Vibrant Throw Pillow: Make a cozy pillow cover featuring the same floral pattern for a pop of color in your living space. This project allows you to play with textures and cozy up your home aesthetic.
-
Floral Bag: Craft a chic tote using your squares, perfect for showcasing your crochet skills wherever you go. It’s a practical way to flaunt your love for floral designs while carrying essentials.
-
Charming Blanket: Combine several floral granny squares to create a snug throw blanket, ideal for chilly evenings or a lovely picnic. With various color combinations, your blanket can be a true reflection of your style.
-
Ornate Coasters: Use a smaller version of your floral granny square to whip up charming coasters. These colorful accents bring warmth and creativity to your coffee table while protecting surfaces.
-
Delicate Headband: Create a stylish headband or hair accessory that features a simplified floral motif, perfect for adding a whimsical touch to your outfit. It’s a delightful way to take the floral theme off your hook and into your wardrobe.
Expert Tips for Floral Granny Squares
-
Even Tension: Maintain consistent tension while crocheting to ensure your floral granny square retains its shape without distortion, making your work look polished.
-
Count Carefully: Don't lose track of your stitches! Regularly count your stitches after each round to ensure you're on the right track and avoid major mistakes.
-
Stitch Markers: Use stitch markers at the beginning of each round or at crucial transitions in your pattern. This helps keep your place, especially in intricate floral designs.
-
Blocking Matters: Always block your finished square to define the shapes and prevent curling at the corners. This simple step enhances the overall appearance.
-
Avoid Curling: When joining rounds, be mindful of tight slip stitches, as they can lead to curling edges. Loose joins can create a more even edge for your floral granny square.
-
Weave Ends Neatly: Use a tapestry needle to weave in all ends securely. This gives your square a clean finish, contributing to a delightful overall look.
Floral Granny Square Variations
There’s no limit to the creativity you can unleash with your floral granny square! Embrace the joy of customizing this pattern to suit your unique style.
-
Yarn Weight Switch: Experiment with bulky yarn for a cozier look, resulting in a more substantial square that’s perfect for blankets.
-
Fiber Alternative: Try using a soft cotton yarn instead of acrylic to add a breathable feel, ideal for summer accessories.
-
Color-Blocking Fun: Combine several colors in each square, creating a patchwork effect that will make your blanket truly one-of-a-kind.
-
Size Adjustment: Opt for a larger hook or thicker yarn to craft oversized squares, perfect for making stunning cushion covers.
-
Texture Twist: Add a delightful pom-pom to each corner for a playful vibe. This small detail can bring extra whimsy and texture.
-
Fringe Finish: Incorporate fringe along the edges of your square for a modern touch. This softens the overall design while offering visual interest.
-
Contrasting Borders: Select a bold color for the border that contrasts with the center motif, creating an eye-catching frame around your square.
-
Multiple Motifs: Combine two or three different floral designs to create a varied tapestry of squares, reflecting your crafting journey. This approach adds depth and dimension to your project.
Let your imagination roam, and each floral granny square you create will tell a story of warmth and creativity!
Charming Floral Motif Granny Square FAQs
Can I substitute the yarn type in my floral granny square?
Absolutely! While a medium-weight cotton or acrylic blend is recommended for this project, you can certainly swap it out for different yarns based on your preferences. If you want a soft and cozy feel, consider using a baby or soft wool blend. Just be sure to adjust your tension and check your gauge for the best results!
How can I make my floral granny square larger or smaller?
It's an easy fix! To increase the size of your granny square, simply use a thicker yarn and an appropriate hook size, or add more rounds to your pattern. For smaller squares, you can use a lighter weight yarn and a smaller hook. Remember to keep an eye on your stitch count if you’re altering the pattern!
Why is my work curling at the edges?
Don't panic! Curling edges can happen for a few reasons. Often, it’s due to tight tension or not enough stitches in the corners. Ensure you're keeping your tension even, and try making the corner stitches a bit looser. Blocking your finished square can also help smooth things out!
What hook size should I use for this floral granny square?
The recommended hook size for this project is a 4.5 mm (US 7). This size helps create the right stitch density for the intricate details of the floral motifs. If you find your work too tight or loose, feel free to experiment with a hook size up or down!
I dropped a stitch while working on my granny square. What should I do?
Don't worry, it happens to the best of us! Quickly locate the dropped stitch, and use a crochet hook to bring it back up through the work. If it’s too far down, you might need to unravel a few rows or use a tapestry needle to weave it back in carefully. With a little patience, you’ll have it fixed in no time!
How can I avoid losing my place in the pattern?
Using stitch markers can be a real lifesaver! Place a stitch marker at the end of each round or at significant pattern changes. This way, you’ll always know where you are in your project, and it will help you maintain a consistent stitch count. Happy crocheting!

Leave a Reply