
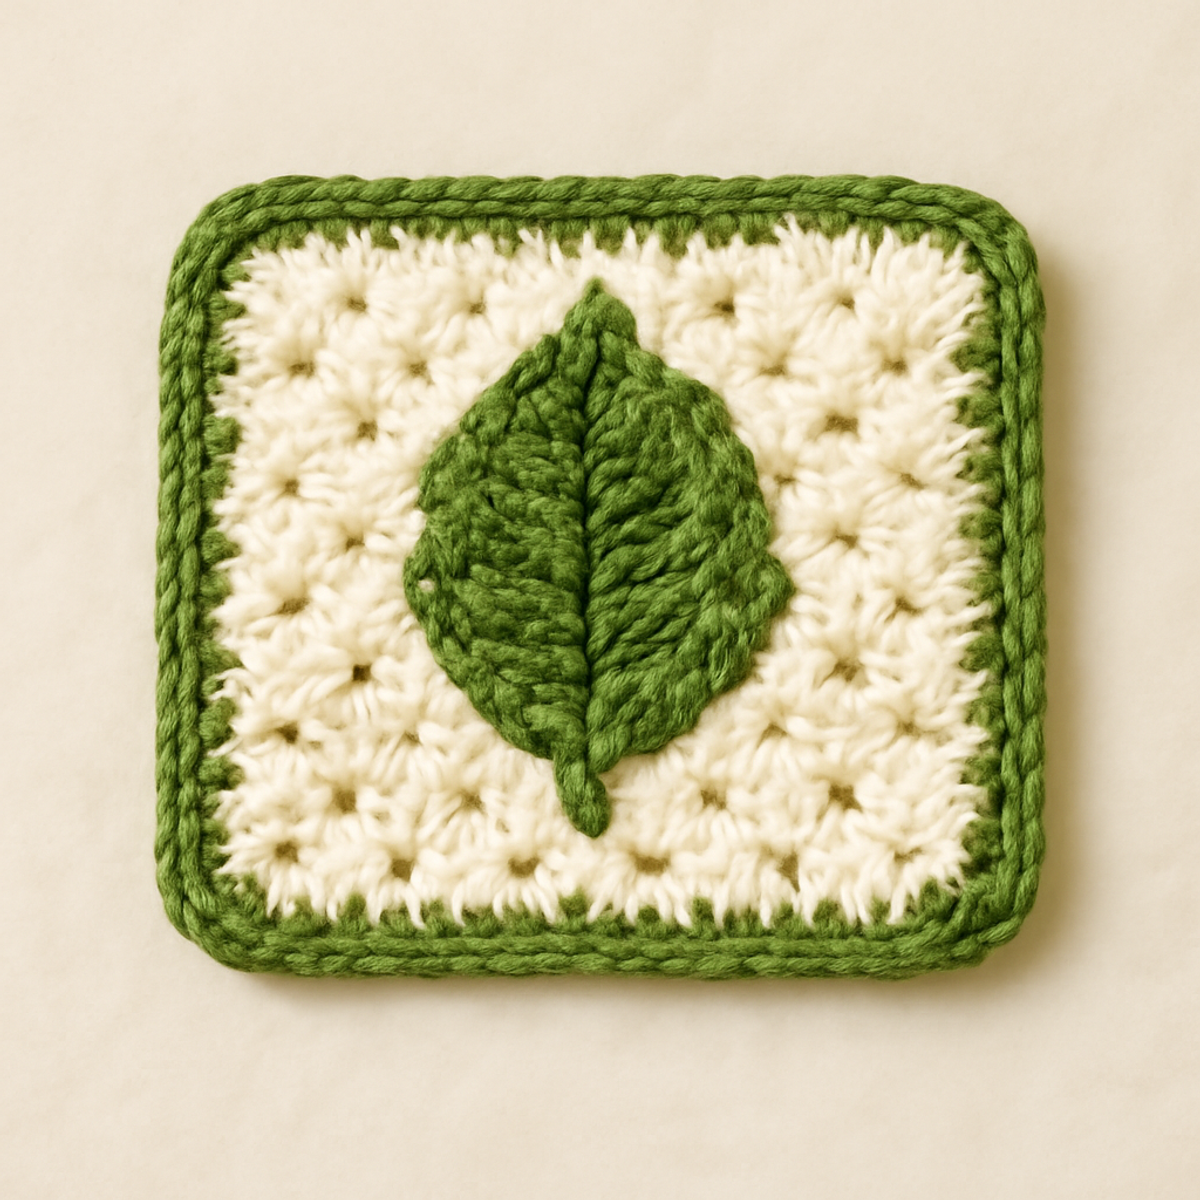
As I settled into my favorite nook, the soft texture of the yarn gliding through my fingers sparked an enchanting idea—why not bring a touch of nature indoors with a Leaf Granny Square? This charming crochet pattern is not only visually captivating but also perfect for expressing your creativity. The leaf motif is ideal for crafting both cozy home décor and delightful accessories, allowing you to enhance your space with seasonal flair. Plus, it’s beginner-friendly, giving you the confidence to tackle basic and intermediate stitches while you learn. Versatile enough to be transformed into anything from a vibrant throw blanket to delightful bags, the possibilities are truly endless. Ready to let your creativity sprout with this delightful project? Let’s dive into the pattern and get those stitches flowing!
Leaf Granny Square Materials & Tools
Estimated supply list for your Leaf Granny Square project:
Yarn
- Worsted Weight Yarn – Approximately 150-200 yards of medium-weight yarn, perfect for achieving the cozy texture of the leaf granny square.
- Acrylic or Cotton Fibers – Durable options that are easy to care for and allow for vibrant color choices.
Tools & Notions
- 5.0mm (H-8) or 4.5mm (7) Hook – Choose based on your tension to create neat stitches and achieve the desired square size.
- Yarn Needle – Essential for weaving in ends and finishing your beautiful leaf granny square.
- Stitch Markers – Helpful for keeping track of rounds, ensuring your square maintains its shape throughout the process.
Why Love the Leaf Granny Square?
Versatile Inspiration: The Leaf Granny Square offers tremendous flexibility, making it perfect for seasonal décor, cozy accessories, or even unique gifts.
Beginner-Friendly: With its easy-to-follow stitches, this pattern caters to both novices and those looking to hone their skills, ensuring everyone can enjoy the crafting journey.
Aesthetic Appeal: Featuring a lovely leaf motif, this design enhances any project with a touch of nature-inspired whimsy that brightens your space.
Quick to Create: Each square can be whipped up in no time, making it a satisfying choice for a weekend project or as an enjoyable break from larger endeavors.
Creative Customization: Feel free to experiment with colors and embellishments, tailoring each square to reflect your personal style and seasonal themes beautifully.
Gauge & Sizing Notes
Don’t skip the gauge swatch! Ensuring your tension is just right is crucial for your Leaf Granny Square, especially if you want it to fit perfectly in your desired project. For this granny square, a general guideline is to aim for a 4×4 inch (10×10 cm) square with approximately 12 double crochets by 8 rows. If you find your square coming out larger than expected, simply switch to a smaller hook size, or to make the square wider, increase your starting chain in multiples of 3. Remember, if your swatch is too small, trying a larger hook can help you achieve the ideal gauge for your Leaf Granny Square!
Step-by-Step Pattern for Leaf Granny Square
Row 1: Foundation Chain
Begin by making a slip knot and chain 6 (ch 6). Join with a slip stitch (sl st) to form a ring. This ring will serve as the center of your leaf granny square. Make sure the ring is snug, as this will create the base for your following stitches. Your ring should feel secure and ready for the next round.
Row 2: First Round of Double Crochets
Ch 3 (counts as your first double crochet, dc) and then work 11 dc into the ring, totaling 12 dc (12 sts). This round will create a nice base for your leaf motif. Ensure you space your stitches evenly as you work, and the round should start to look circular.
Row 3: Creating the Leaf Points
Ch 2 (this will form your corner), then work 1 dc in the next dc, ch 2 three times in this round to form leaf points. Finish the round with a sl st in the top of the initial ch 3 (12 sts). Your square will begin to take shape, and you should see gentle points forming, reminiscent of leaves.
Row 4: Expanding the Leaf Motif
Ch 3, then do 2 dc in the same space (this is an increase). Now, 1 dc in the next dc, 2 dc in the next dc and repeat from * to * around, ending with a sl st in the top of your previous ch 3 (18 sts). The square should look fuller, with the leaves becoming more pronounced at the corners.
Row 5: Adding the Corner Spaces
Ch 3, work 2 dc in the next dc, ch 2, 2 dc in the same space for each corner and then 1 dc in the next dc to complete the sides. Continue around to finish with a sl st at the top of ch 3 (24 sts). Your square will grow larger, with accents forming a beautiful leaf pattern.
Row 6: Final Round of Single Crochet Edging
For the border, ch 1 and then sc in each stitch around the square. Create 3 sc in each corner space for a rounded edge, joining with a sl st to the first sc (total stitches will vary). This final round gives your leaf granny square a polished, finished look, enhancing the lovely leaf design beautifully.
Step 7: Weaving in Ends and Blocking
Once all rounds are complete, use your yarn needle to weave in any loose ends. To enhance the shape of your leaf granny square, consider blocking the finished piece by wetting it and shaping it to size. Your cozy leaf granny square will now showcase its charming details and natural-inspired aesthetic!
Leaf Granny Square Variations
Embrace your creativity and personalize your crochet adventure with this delightful pattern twist.
-
Color Play: Experiment with colors for the leaf and background, reflecting seasonal themes like bright spring greens or warm autumn hues. Each combination brings a fresh vibe!
-
Fiber Alternatives: Try using bamboo or alpaca yarn for a unique texture and lightweight drape, elevating your project with luxurious fibers that feel lovely in hand.
-
Size Adjustments: Resize your square by changing the number of rounds. A larger square makes a cozy blanket, while a smaller one works beautifully as coasters.
-
Textured Borders: Add a fun border with scallops or picots at the edge for a playful finish. These little details can transform your square into an eye-catching piece.
-
Embellishments: Consider adding beads or embroidery to enhance visual interest and texture, allowing your creativity to truly shine in each unique square.
-
Multi-Square Projects: Connect several granny squares into a stunning throw blanket or bag. Each square can reflect a different color scheme, creating a cohesive yet diverse look.
-
Fringe Fun: Incorporate fringe along the edges for added flair. This simple addition can turn your leaf granny square into a stylish accent piece.
-
Layering Textures: Combine yarn weights to create a contrasting texture within the same square. Experimenting with a mix can add depth and intrigue to your designs.
Care Instructions for Leaf Granny Square
Machine Washing: Use cold water on a gentle cycle to avoid agitation, which can cause felting or pilling on your leaf granny square.
Hand Washing: If preferred, gently hand wash in cold water with a mild detergent, ensuring you do not wring or twist the square to maintain its shape.
Drying/Blocking: Lay your finished leaf granny square flat to dry on a clean towel, reshaping it to enhance the leaf motif while it dries.
Storage: When not in use, store your granny square in a cool, dry place, avoiding direct sunlight to preserve its vibrant colors and delicate stitches.
Expert Tips for Leaf Granny Square
-
Check Your Gauge: Always watch your gauge while crocheting. If your square appears larger than expected, switch to a smaller hook size for a snug fit.
-
Count Your Stitches: Regularly count your stitches at the end of each round. This ensures your leaf granny square aligns properly and avoids mistakes that could alter its shape.
-
Block for Success: After completing your square, consider blocking it. This simple step enhances the leaf design and achieves a polished final look, making your work shine.
-
Use Stitch Markers: Incorporate stitch markers to mark the beginning of each round. This prevents losing track of your rounds and helps maintain even stitch counts.
-
Weave in Ends Thoroughly: Don’t skip weaving in ends; this keeps your leaf granny square looking neat. Securely weave in ends to avoid unraveling during use.
What to Pair with Leaf Granny Square
Embrace the joy of crafting a harmonious ensemble as you explore delightful companion projects to elevate your crochet journey.
-
Charming Leaf Coasters: Add a touch of whimsy to your coffee table while protecting surfaces with matching leafy designs. These quick projects can enhance any little gathering with nature's essence.
-
Serene Leaf Blanket: Combine multiple leaf granny squares to create a cozy throw blanket that wraps you in warmth and charm. Perfect for draping over a couch or bed, this project will showcase your creativity.
-
Delightful Leaf Purse: Create a stylish bag using granny squares that highlights the intricate leaf design while being functional for everyday use. Perfect for crafting your favorite outdoor adventures.
-
Adorable Leaf Headband: Fashion a lovely headband featuring smaller leaf squares that makes for a cute accessory while keeping your ears warm. This lovely project is a great way to use up leftover yarn.
-
Cozy Leaf Pillows: Transform your couch or favorite chair with decorative pillows showcasing the leafy motifs. These soft additions will elevate your space, inviting a touch of nature indoors.
-
Whimsical Leaf Bunting: Craft a playful bunting using your leaf squares to adorn parties or seasonal celebrations. This joyful decoration adds vibrant color and charm to any occasion.
Leaf Granny Square FAQs
Can I substitute yarn for my Leaf Granny Square?
Absolutely! You can swap acrylic for cotton or vice versa. Just remember that different fibers can affect the final drape and warmth of your square, so it’s wise to check your gauge when making any substitutions.
How can I adjust the size of my Leaf Granny Square?
Don't panic! To make your square larger or smaller, simply add or reduce the number of rounds you crochet. Just be mindful to maintain the stitch counts specified for each round to keep the shape consistent.
Why is my Leaf Granny Square curling at the edges?
Curling can happen, and it's often due to tight stitches or an improper hook size. Make sure you're using the recommended hook size and consider loosening your tension slightly. Blocking your square can also help flatten it.
What hook size should I use for the Leaf Granny Square?
For the Leaf Granny Square, a 5.0mm (H-8) or a 4.5mm (7) hook is recommended based on your yarn weight. If you're not getting the right size, experiment with different sizes to find the best fit for your tension!
How do I fix dropped stitches in my Leaf Granny Square?
It's an easy fix! You can simply pull the working yarn back up to the last completed stitch or use a crochet hook to re-insert the dropped stitch back into the row. Just take your time to ensure it looks neat!
What can I do to keep track of my rounds while working on the Leaf Granny Square?
Using stitch markers is a great idea! Place them at the beginning of each new round to easily identify where you start and keep your stitch count accurate. This will make your crocheting flow much smoother!

Leave a Reply