
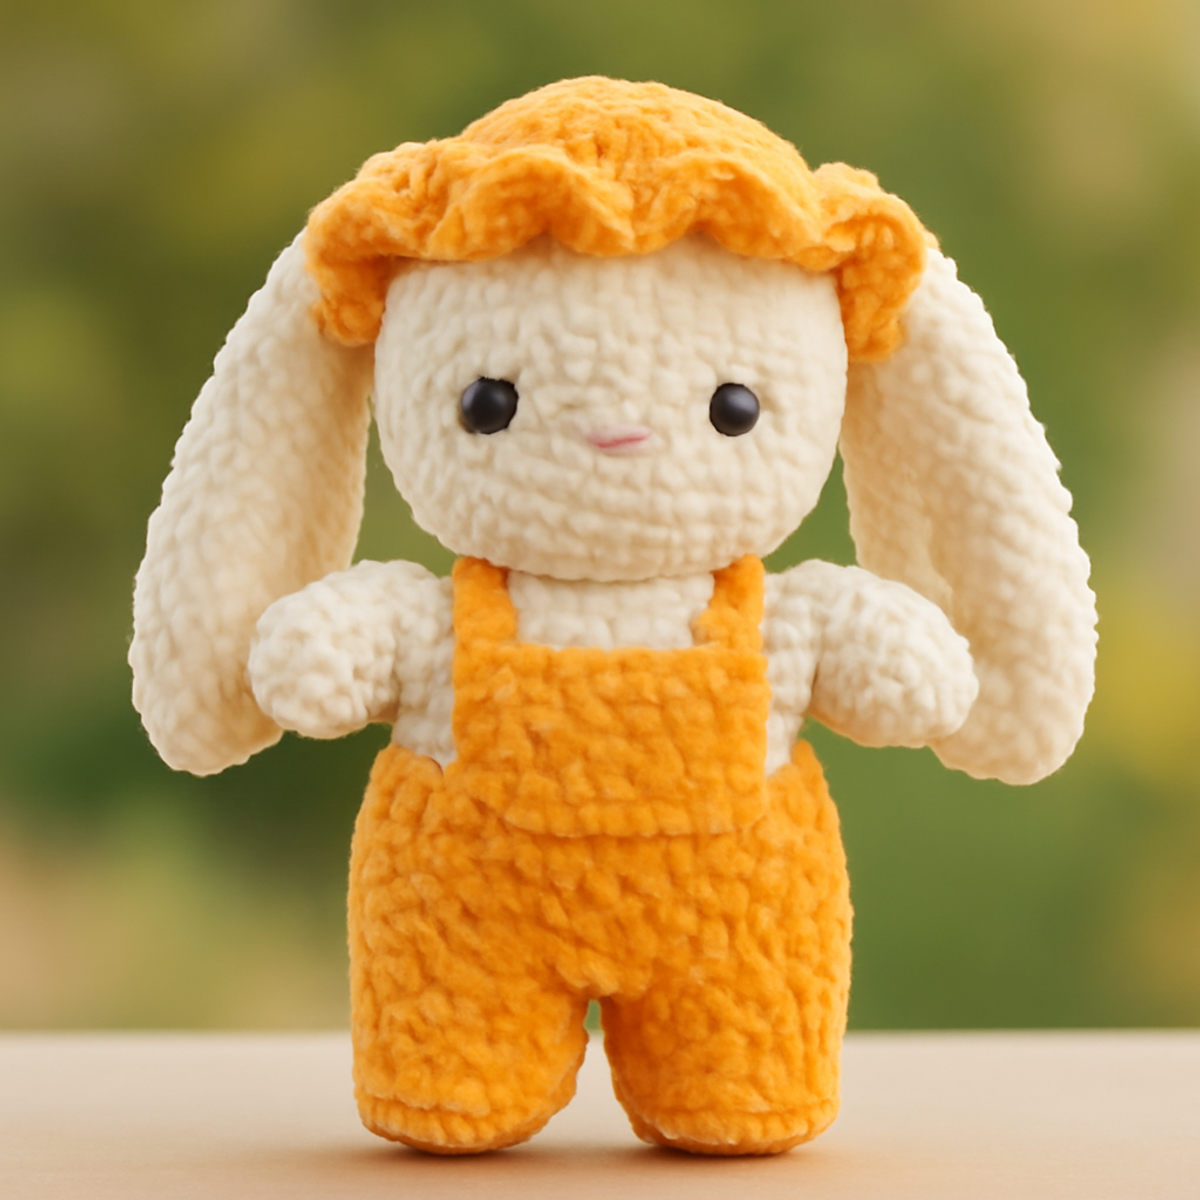
There's something so magical about creating a whimsical character with your own hands, and that's exactly what the Charming Amigurumi Bunny offers! This plush bunny crochet project is perfect for both beginners and seasoned crafters alike, inviting you to craft a delightfully soft toy that fills any child's space with charm. With its incredibly huggable bobble stitch texture, this bunny not only makes for a cozy companion but also serves as an eye-catching decorative piece in nurseries. One of the best parts? You can personalize it with a rainbow of colors and imaginative accessories, ensuring each bunny is as unique as the love poured into it. So, whether you’re gifting it to a loved one or adding a touch of warmth to your own home, this project promises endless joy and comfort. Let’s dive into the stitches and bring this adorable bunny to life!
Plush Bunny Crochet Materials & Tools
- Worsted Weight Yarn – You'll need approximately 200-300 yards of a main color (soft cream or off-white) and 50-100 yards for accents like vibrant purple or orange overalls.
- 4.0mm (G-6) Hook – This hook size is ideal for creating the plush texture with the bobble stitch.
- Safety Eyes (10mm) – Use these for the bunny's adorable facial features to bring it to life.
- Stitch Markers – Handy for easily tracking your rounds, especially when working with increase stitches.
Why Choose This Plush Bunny Crochet?
Whimsical Charm: This plush bunny crochet pattern is a delightful way to create a soft, imaginative toy that captures the hearts of children and adults alike.
Easy Precision: Perfect for both beginners and seasoned pros, the straightforward instructions and simple stitches make crafting this bunny a breeze.
Customizable Colors: You can mix and match yarn colors to personalize your bunny, allowing you to reflect your unique creativity with every creation.
Snuggly Texture: Crafted with the plush bobble stitch, this bunny boasts a huggable texture that’s just right for little hands.
Perfect Gift Idea: Ideal for gifts or adorable nursery decor, this charming design adds a splash of joy and whimsy to any space.
Fun Accessories: With options for cute additions like overalls, bows, or even butterfly wings, you can truly make each bunny a one-of-a-kind treasure.
Gauge & Sizing Notes
Don't skip the gauge swatch! Ensuring the correct tension is vital for your plush bunny crochet project, as it directly affects the final size and overall softness of your creation. Aim for a gauge where a 4×4 inch (10×10 cm) square equals approximately 16 single crochets by 20 rows; this will help achieve the desired plush texture. If your tension is tighter or looser, adjust your hook size accordingly or change to a thicker yarn for a fluffier outcome. To make your adorable bunny larger or smaller, simply adjust your starting chain in multiples of 6 for each body section. Happy crocheting!
Step-by-Step Pattern for plush bunny crochet
Row 1: Head Start
Begin your plush bunny crochet by making a magic circle, then ch 1 and work 6 sc into the circle (6 sts). Pull the circle tight. For the next round, inc in each stitch around (12 sts). Your work should begin to cup slightly as you form the base of the head.
Row 2: Building the Head Shape
Continue with the bunny's head by sc in the first stitch, then inc in the next repeat around (18 sts). This will give your plush bunny a rounded shape. As you progress, you should notice the head rounding out more prominently.
Row 3: More Head Rounding
For round three, sc in the first two stitches, then inc in the next and repeat (24 sts). Your work should be expanding smoothly, and you should be developing a nice base for the bunny's head.
Row 4: Shaping the Head
Next, work a round of sc in each stitch around (24 sts). This solidifies the head shape, creating a dense and soft texture. Ensure your tension remains consistent to keep a plush feel throughout your project.
Row 5: Forming the Top of the Head
For the next round, sc in the first three stitches, then inc in the next (30 sts). Continue this pattern, feeling your work build height as you create a lovely dome shape for the top of the head.
Row 6: Finalizing the Head Shape
Now, work a round of sc in each stitch around (30 sts) to smooth out the top. At this point, your plush bunny crochet head should feel good in your hands and start resembling the cute character you’re creating.
Step 2: Ears Creation
Moving on to the ears, start with a magic circle, ch 1, then work 6 sc into the circle (6 sts). This will be the base for each ear. Pull tight, and start to form the floppy ear shape.
Step 3: Shaping the Ears
Continue by working inc in each stitch all around (12 sts). Your work will start to take the shape of a rounded ear. Make two identical pieces for a matching pair.
Step 4: Lengthening the Ears
For the next rounds, work sc in each stitch for 5 additional rounds (12 sts). Each ear should now feel long and floppy, perfect for your adorable plush bunny.
Step 5: Completing the Body
For the body, create a magic circle, ch 1, and work 6 sc into the circle (6 sts). Pull it tight and prepare to enlarge the body of your plush bunny.
Step 6: Expanding the Body
Make the body round by inc in each stitch around (12 sts), and follow this with a round of sc in each stitch (12 sts). The body should begin to take shape, widening as you add more stitches.
Step 7: Continuing the Body
Work a round of sc in the next two stitches, then inc in the following stitch (16 sts). It's nice to see how your plush bunny crochet is fleshing out with each round you complete.
Step 8: Final Body Rounds
Repeat the last row by working a round of sc in each stitch (16 sts). Your bunny's body should feel soft and round by now, setting the stage for its welcoming charm.
Step 9: Overalls Assembly
To make the overalls, start with a chain of 16, then turn and hdc in the second chain from the hook across (15 sts). This small project piece adds a lovely touch to your plush bunny.
Step 10: Completing the Overalls
Now, work hdc in each stitch for a total of 6 rows. This creates the main body of your bunny's overalls. Once done, you can connect it around the bunny’s body fittingly.
Step 11: Finishing Touches
Attach your safety eyes securely, and create a small mouth with yarn or embroidery, adding personality to your plush bunny. Finally, sewing the ears and subtle accessories like bows will give it charm and character.
What to Pair with Charming Amigurumi Bunny
Create a delightful collection with matching pieces that enhance the charm of your plush bunny crochet project!
-
Soft Blankie: A cozy baby blanket complements the bunny, adding a snuggly touch for little ones. In calming, pastel colors, it creates a comforting environment.
-
Mini Bunny Basket: Crochet a charming basket for storing small toys. This playful accessory enhances the bunny's space while being practical and adorable.
-
Matching Ruffled Cap: Craft a mini ruffled cap to adorn your bunny for an extra touch of whimsy. A matching cap can be made with leftover yarn and adds character.
-
Cute Bunny Booties: Create matching booties for tiny feet, designed to mimic the bunny’s adorable features. They’ll be the perfect companion for cuddling and keepsakes.
-
Whimsical Wall Hanging: Design a colorful wall hanging with a bunny motif that complements your plush friend. This adds a delightful artistic touch to any child's room.
How to Wash and Care for Your Plush Bunny Crochet
Machine Washing: Use cold water on a gentle cycle to preserve the integrity of your plush bunny crochet. Avoid agitation to prevent felting or pilling.
Hand Washing: For more delicate care, gently wash in cold water with mild detergent, using your hands to squeeze out dirt without stretching the fabric.
Drying/Blocking: Always lay your bunny flat to dry, reshaping its features if necessary. Avoid tumble drying, as this can distort its lovely character.
Storage: Store your plush bunny crochet in a cool, dry place, ideally in a breathable container or bag, to maintain its soft texture and whimsical charm.
Plush Bunny Crochet Variations
Feel free to let your creativity shine as you explore delightful twists on this crochet pattern!
-
Yarn Alternatives: Switch to a cotton blend for a smoother finish and a more distinct sheen. Cotton also offers different color options, adding a fresh look to your bunny!
-
Color Play: Experiment with pastel palettes like mint green or lavender for the body. Mixing colors can create a whimsical, eye-catching design!
-
Size Adjustments: To make a larger bunny, use a bulkier yarn and a bigger hook. This makes it an even more huggable cuddly friend!
-
Texture Bonuses: Consider adding a cute pom-pom tail to enhance the bunny's charm. This little detail can bring an extra layer of cuteness!
-
Accessory Options: Create stylish overalls with pockets or unique sleeve lengths. Imagine adding fun elements like tiny knitted flowers or bows for added flair!
-
Character Variety: Give your bunny personality by swapping the ears for long floppy dog-style ones or adding butterfly wings to jazz things up!
-
Fun Borders: Incorporate a fun textured border around the bunny's body or overalls using a different stitch pattern. It adds character while making the bunny look extra cozy!
-
Seasonal Themes: Tailor your bunny for holidays by using seasonal colors or accessories like a tiny knit scarf or festive hat for winter cheer.
Expert Tips for Plush Bunny Crochet
-
Mind Your Tension: Keeping a consistent tension is key! A tighter stitch yields a denser bunny, preventing gaps and ensuring a snug, plush feel.
-
Use Stitch Markers: Avoid losing track of your rounds—especially with increases—by placing a stitch marker at the end of each round for accuracy.
-
Block Before Assembly: Consider blocking your pieces before sewing them together. This helps them lie flat, especially the floppy ears and overalls, for a polished finish.
-
Count Carefully: Always verify your stitch counts at the end of each round. This helps you avoid mistakes that can create an uneven shape in your plush bunny crochet.
-
Secure Facial Features: Make sure your safety eyes are securely attached to avoid any accidents during playtime. Double-check their placement for a cute, expressive look.
Plush Bunny Crochet FAQs
Can I substitute yarn for my plush bunny crochet project?
Absolutely! While the pattern calls for worsted weight yarn, you can use a cotton blend for a smoother finish. Just ensure that the substituted yarn maintains a similar weight and texture—that way, your bunny retains its cuddly form!
How can I adjust the size of my plush bunny crochet?
If you'd like a larger bunny, simply add more increase rounds in the head and body sections before finishing them. Conversely, to make your bunny smaller, reduce the number of increase rounds but keep an eye on the overall proportions to maintain the whimsical look.
Why is my plush bunny crochet work curling?
Don't panic! Curling can happen if your tension is too loose or if the stitches are uneven. Make sure to keep a consistent gauge throughout your work. If the issue persists, blocking the pieces before assembly can help straighten them out!
What crochet hook size should I use for my plush bunny crochet?
For this project, a 4.0 mm (G-6) hook is recommended. This size works perfectly for creating the plush texture with the bobble stitch. If you find your stitches are too tight or loose, feel free to adjust to a hook size that feels comfortable for you.
How do I fix dropped stitches in my plush bunny crochet?
It's an easy fix! Just use a crochet hook to carefully pick up the dropped stitch and pull the yarn through it. You can use the same color yarn to weave in the loose ends. Remember to double-check your stitch counts after every row to catch any potential drops early!
What do I do if my bunny's ears aren’t floppy enough?
If your bunny's ears are looking a bit stiff, you might want to try decreasing your tension when crocheting them. A softer tension will encourage that delightful flop! If you need, you can also adjust the number of rows for added length and a softer feel.

Leave a Reply