
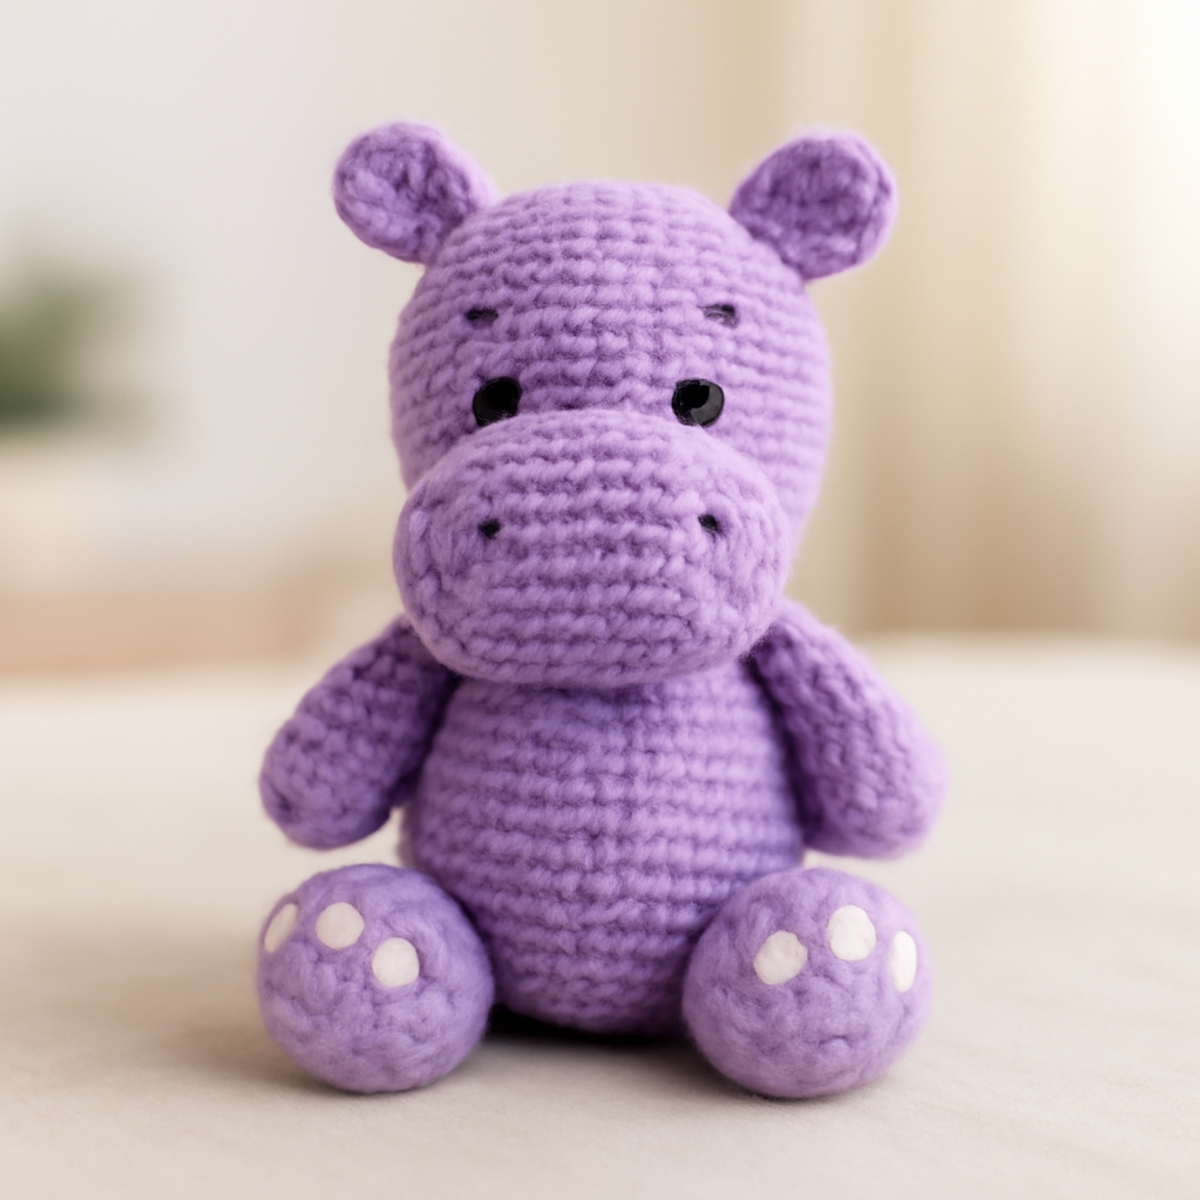
There’s something truly magical about creating a cuddly companion, and this purple hippo amigurumi will have you hooked from the very first stitch! The "Cuddly Purple Hippo Amigurumi Pattern" offers an inviting project that welcomes crafters of all skill levels, making it an ideal choice for both beginners and seasoned crocheters. With its approachable design, you'll find joy in the simple process of crafting this adorable piece, which effortlessly merges whimsical charm with heartwarming nostalgia. Not only is this amigurumi a delight to create, but it also serves as a perfect gift or playful decor, bringing smiles wherever it goes. Ready to dive into this fun-filled adventure and create your own cute little hippo? Let's get started!
Purple Hippo Amigurumi Materials & Tools
- Worsted Weight Yarn – Approximately 100-150 yards in a vibrant purple, preferably an acrylic blend for durability and softness.
- Small Amount of White Yarn – For adding charming details to your hippo's features.
- 3.0 mm (US size D) Hook – Ideal for achieving tight stitches and maintaining the structure of your amigurumi.
- 10 mm Safety Eyes – Essential for giving your hippo its adorable, expressive gaze.
- Yarn Needle – Use this for weaving in ends and assembling your hippo.
- Fiberfill Stuffing – Needed to give your hippo its plush and huggable finish.
Gather these materials and get ready to embark on the delightful journey of creating your very own purple hippo amigurumi!
Why Choose the Purple Hippo Amigurumi?
Adorable Appeal: The unique design brings a smile to anyone's face, making it a heartfelt gift for children and adults alike.
Perfect for All Levels: This pattern is incredibly beginner-friendly, allowing new crafters to jump into the world of amigurumi with confidence.
Quick Completion: With a manageable yardage requirement, you can whip up this delightful hippo in no time, perfect for last-minute gifts!
Whimsical Style: The charming details and vibrant color add a playful touch to any space, seamlessly fitting into your decor or toy collection.
Customizable Fun: Let your creativity shine by experimenting with colors or accessories, making each hippo truly one-of-a-kind!
Dive into this joyous crafting experience and enjoy every stitch as you create your own purple hippo amigurumi!
How to Check Your Gauge for Purple Hippo Amigurumi
Don't skip the gauge swatch! Ensuring the correct tension with your hook is vital for crafting your purple hippo amigurumi, as it directly affects the finished size and overall appearance of your adorable project. A standard recommendation for amigurumi is to aim for a 4×4 inch (10×10 cm) tension swatch using approximately 6 single crochets and 7 rows. If you're looking to adjust sizing, try increasing your starting chain in multiples of 6 to make your hippo larger or decreasing it for a smaller version. If your tension doesn't quite match, don't fret—if your swatch is too small, simply go up a hook size for a looser stitch. Happy crocheting!
Step-by-Step Pattern for purple hippo amigurumi
Row 1: Start the Head
Begin by making a magic ring. Work 6 sc into the ring, pulling it tight to close. This forms the base of your purple hippo amigurumi's head, creating a small circle. You should see a cozy little base beginning to form (6 sts).
Row 2: Increase for Shape
In this round, crochet 2 sc in each stitch around to increase the size. Your work should start to bowl out slightly, giving it a more rounded head shape. You will have a total of 12 stitches at the end of this round (12 sts).
Row 3: Continue Increasing
For this round, work (1 sc, inc) in each stitch around. This means you'll do one single crochet followed by an increase in the next stitch, repeating until the end. Your project should be taking a lovely dome shape now (18 sts).
Row 4: Shaping the Head
Now, sc in the next 3 stitches, followed by (1 sc, inc) 5 times, then sc in the last 3 stitches. This will slightly widen the head while keeping the top rounded. You should see a gentle transition happening (24 sts).
Row 5-7: Build the Body
Work in continuous rounds. For Rows 5 and 6, sc in each stitch around (24 sts). In Row 7, change it up by sc in the next 5 stitches, followed by (1 sc, dec) 6 times, and finish with sc in the last 4 stitches. Your amigurumi should start to look fuller and more hippo-like (18 sts).
Row 8: Shaping the Body
Sc in the next 4 stitches, followed by (1 sc, dec) 6 times. End the round with sc in the last 2 stitches. The body portion of your purple hippo amigurumi is starting to take form, so admire the progress as it bulges out (12 sts).
Row 9: Attach Limbs
For the legs, work 6 sc, then leave a long tail for sewing later. Change to yarn color for the feet. Create 2 more legs, each with 6 sc, and repeat for arms with 5 sc. Make sure to keep the shape of your hippo body distinct (6-6-5 sts).
Step 10: Snout Construction
To make the snout, start with a magic ring and work 8 sc into the ring. This forms a small circle for the adorable face. Round it off with a cup-like shape. You should end up with a defined snout form (8 sts).
Step 11: Assembly of Features
Carefully attach the snout to the head using the long yarn tail. Position the safety eyes just above the snout; this will give your purple hippo amigurumi its lively expression. Pin everything in place before securing (snout: 1, eyes: 2).
Step 12: Stuff and Finish
Stuff the body firmly but not overly so, allowing for the delightful plushness of the purple hippo amigurumi. Finish closing up the bottom with a slip stitch and weave in your ends. Your project is almost there!
Step 13: Final Touches
For any final design elements, you may want to add a tail or personalize it with a cute scarf or bow. This is your chance to let creativity shine! You should see a complete, charming little hippo now, ready for cuddling or display.
What to Make after Cuddly Purple Hippo Amigurumi?
Crafting a charming set can extend the joy of your crochet journey, bringing matching whimsy to your space.
-
Snuggly Blanket: Create a cozy blanket using the same vibrant purple yarn to wrap your hippo in warmth. This will offer a perfect cuddle buddy experience!
-
Cute Companion Chick: Pair your hippo with a delightful amigurumi chick in cheerful yellow. This duo brings a sunny vibe, perfect for decor or as a playful gift.
-
Playful Pillow: Design a matching pillow in a soft purple hue to complement your hippo. It adds comfort and continues the whimsical aesthetic in your living space.
-
Accessory Bows: Craft tiny bows in coordinating colors to outfit your hippo in style. This simple addition enhances its charm and allows for personalized flair!
-
Miniature Friends: Make a series of amigurumi miniature animals that can accompany your hippo. It’s a fun way to explore different designs while expanding your adorable collection!
Expert Tips for Crafting Your Hippo
-
Maintain Tension: Consistently grip your hook to keep an even tension throughout your work. This is especially crucial for small stitches in the purple hippo amigurumi.
-
Count Carefully: Use a stitch marker to track your rounds. This will help prevent losing count and ensure each part of your hippo aligns correctly.
-
Avoid Overstuffing: Use a moderate amount of fiberfill to avoid altering the shape and weight of your hippo. Overstuffing can lead to an awkwardly shaped amigurumi.
-
Secure Features Well: When attaching the snout and eyes, make sure to pin them in place before sewing. This helps you visualize and adjust their placement for the best look.
-
Weave in Ends Neatly: Take your time to weave in all loose ends securely. This adds to the finished appearance and durability of your purple hippo amigurumi.
Variations & Substitutions for Purple Hippo Amigurumi
Feel inspired to put your personal touch on this delightful hippo pattern with these fun and creative options!
-
Yarn Weight Swaps: Experiment with lighter or heavier yarn to create varying sizes, from mini hippos to larger, huggable companions.
-
Color Block: Mix vibrant purple with pastels like mint green or soft pink. This technique adds a lively visual twist and makes your hippo truly unique.
-
Fiber Alternatives: Substitute cotton yarn for a summer-friendly option. Its texture will change the look and feel, creating a sleek and modern amigurumi.
-
Custom Accessories: Craft a little bow or scarf from contrasting yarn to add personality and flair. Tiny embellishments can make your hippo stand out!
-
Texture Modifications: Consider adding a playful pom-pom at the hippo's tail or fluffy fringe around the snout for an eye-catching detail that adds more character.
-
Sizing Adjustments: Want a chunkier hippo? Simply use a larger hook size with your worsted weight yarn. Enjoy the creative freedom while keeping the pattern's essence intact.
-
Face Enhancements: Use embroidery thread to create a smile or whimsical eyebrows, infusing even more charm into your hippo. Each stitch transforms it into a personalized masterpiece.
-
Surface Embellishments: Add safety patches or stitch little stars or hearts onto the body to give your hippo even more cuddly charisma.
Let your creativity run wild as you select variations that speak to your heart, making each purple hippo amigurumi a special reflection of you!
How to Wash and Care for Your Purple Hippo Amigurumi
Hand Washing: Gently hand wash your purple hippo amigurumi in cold water with mild soap to preserve its soft texture and vibrant color.
Drying: Lay the amigurumi flat on a clean towel to air dry, avoiding direct sunlight to prevent any color fading and maintaining its lovely shape.
Storage: When storing, keep your hippo in a cool, dry place away from direct sunlight to prevent colors from fading and avoid compression.
Avoid Agitation: Refrain from machine washing or agitating, as this can lead to unwanted felting or pilling on your adorable creation.
Cuddly Purple Hippo Amigurumi FAQs
Can I use a different type of yarn for my purple hippo amigurumi?
Absolutely! While a worsted weight acrylic blend is recommended for its softness and durability, you can experiment with other yarn types. Just keep in mind that the texture and drape may change. If you decide to use a different fiber, ensure the weight is similar for the best results.
How can I make my hippo bigger or smaller?
To adjust the size of your purple hippo amigurumi, you can change the yarn weight. Using a bulkier yarn will yield a larger hippo, while thinner yarn will result in a smaller creation. Additionally, you can modify the number of increase rounds, but be cautious as this may affect shape and balance.
Why is my work curling up?
Don't panic! Curling can happen if your tension is too tight; make sure you're holding your yarn and hook comfortably. You might also try checking your stitch count as a small miscount can cause stitches to pull incorrectly. If all else fails, a light blocking can help flatten it out.
What size hook should I use for this project?
Using a 3.0 mm (US size D) hook is recommended for the purple hippo amigurumi to achieve tight stitches. This helps maintain the shape of your piece and prevents stuffing from showing through. If you find your stitches are too tight or loose, don't hesitate to switch to a hook size that feels more comfortable for you!
I’ve dropped a stitch; how do I fix it?
It’s an easy fix! Just carefully pull back to the dropped stitch, and use your hook to pull the working yarn back through. If it's a significant drop, you may need to unravel a few rows. It's always a good idea to count your stitches regularly to catch these issues early on!
What’s the best way to sew on the safety eyes?
For securely attaching the safety eyes on your purple hippo amigurumi, position them just above the snout and use the provided washers to secure them from behind. Ensure they're tight enough so they don't fall off during play, but be gentle to avoid damaging the yarn. Pin them in place first to visualize the perfect placement!

Leave a Reply