
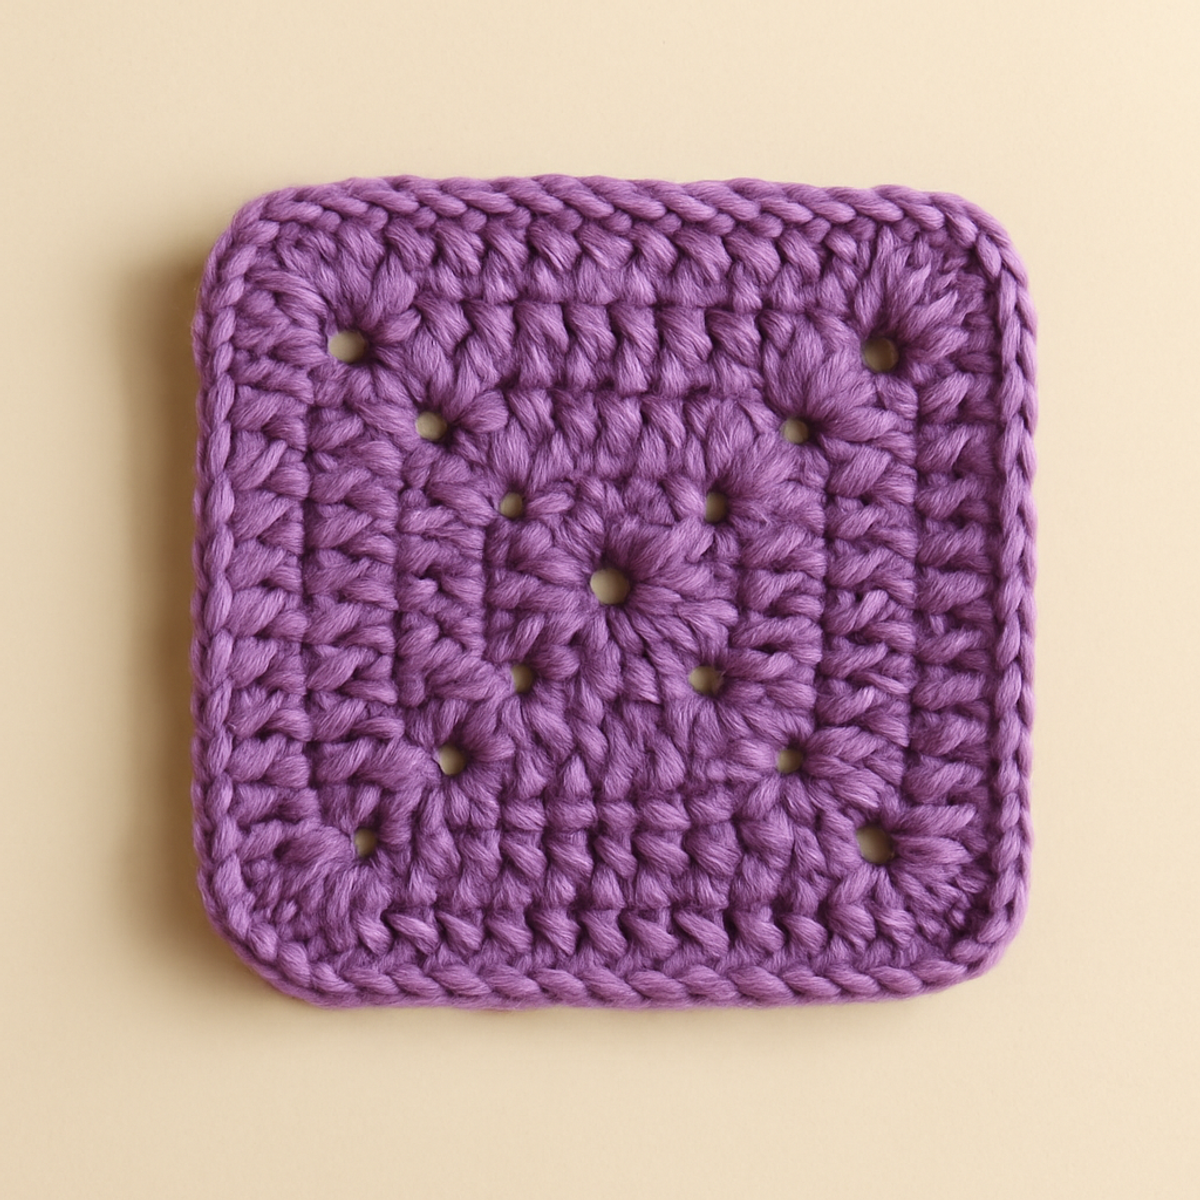
As I wrapped my fingers around the soft, lavender yarn, I couldn’t help but recall the warmth and comfort of handmade treasures. The Solid Granny Square is a delightful staple in any crocheter’s toolkit, perfect for beginners eager to dive into the craft or seasoned crafters looking to whip up cozy creations. This versatile piece not only showcases a beautiful texture but also works up quickly—a true stash-buster for your yarn collection! With its solid construction, the granny square is perfect for creating everything from stylish blankets to charming home decor items. Whether you're crafting for yourself or a loved one, you’ll find joy in each stitch. Let’s unravel this classic pattern together and bring a touch of homemade warmth into our lives!
Solid Granny Square Materials & Tools
- Worsted Weight Yarn – Choose 100% acrylic or a cotton blend for a soft, durable finish; approximately 50-75 yards will be needed for each square.
- 5.5mm (I-9) Hook – This size is perfect for working with medium yarn, ensuring crisp stitch definition.
- Notions – No additional notions are required for this project, making it a straightforward choice for crafters.
Why Is the Solid Granny Square Irresistible?
Versatile Use: This solid granny square isn't just for blankets! Its sturdy structure makes it a fantastic choice for home decor, accessories, and more, encouraging your creativity to bloom.
Effortless Construction: Thanks to its simple yet effective stitch pattern, you'll swiftly grasp the basics and be making squares in no time, making it ideal for beginners or those brushing up on their skills.
Textured Aesthetic: Enjoy the delightful texture that the double crochet stitches provide, resulting in a cozy and tactile fabric that you'll love to incorporate into your projects.
Customization Galore: Mix up your yarn colors or experiment with different fibers to create a unique twist on this classic design, making it truly your own.
Quick to Make: This project is a fantastic stash-buster! With only 50-75 yards needed, you'll be able to use up leftover yarn in a jiffy, all while enjoying the satisfaction of finishing a project.
Gauge & Sizing Notes
Don't skip the gauge swatch! Checking your tension is essential for the solid granny square to ensure your squares end up the perfect size for your project. A common guideline for the granny square is that a 4×4 inch (10×10 cm) square should have approximately 12 double crochets and 8 rows. If you're looking to adjust the size, you can increase your starting chain in multiples of 3 + 2 to make it wider or add more rounds as needed. If your tension swatch is too small, simply go up a hook size for looser stitches—tension matters! Happy crocheting with your solid granny square!
Step-by-Step Pattern for Solid Granny Square
Row 1 (or Round 1): Begin with the Magic Ring
Start by making a magic ring. Chain 3 (this counts as your first double crochet), then work 2 double crochets (dc) into the ring. Create your first corner by chaining 2. Next, work 3 dc into the ring, chain 2 and repeat from * to finish your round. Close the round by pulling the magic ring tight, and you should see a lovely center forming with a total of 12 double crochets (12 sts).
Row 2: Expanding the Corner Spaces
Slip stitch to close the round and then chain 3 to start this row, again counting as a double crochet. In each of the chain-2 spaces from the previous round, work 3 dc, chain 2, and again 3 dc for each corner. As you work around, your solid granny square will start to take shape, becoming more structured and ready with 24 double crochets and 4 corner chains from this round (24 sts).
Row 3: Continuing the Build
Slip stitch to join once more and chain 3 to begin this round. In each chain-2 space from the last round, repeat the pattern of 3 dc, chaining 2, and following with 3 more dc for each corner. This round will further emphasize the square structure and should showcase an increasing stability, resulting in a total stitch count of 36 double crochets (36 sts).
Row 4: Finalizing Your Square
Close this round with a slip stitch and chain 3 to initiate the next. Again in each corner’s chain-2 space, work 3 dc, chain 2, and 3 dc. For the remaining edges, place 3 double crochets evenly spaced, which will maintain the solid feel of your granny square. After completing this round, you should see a beautiful square emerging with 48 double crochets (48 sts).
Step 5: Optional Edging
If you wish to finish off your solid granny square neatly, consider adding a simple border. Work a round of single crochet (sc) evenly around the edges. To do so, insert your hook in each stitch, placing 1 sc consistently, creating a crisp finish. This step will enhance the texture and frame your work, enticingly finishing off your solid granny square with a lovely polished look.
Step 6: Assembly (Optional)
Although no specific assembly is required for the solid granny square itself, should you wish to join multiple squares together, align them and use a slip stitch or whip stitch through the edges. This allows for a unified project like a cozy blanket or chic throw, showcasing the beauty of your handmade creations together. Enjoy the process as each square connects to form something wonderful!
What to Pair with Solid Granny Square?
Creating a matching set adds a delightful touch to your crochet journey, enhancing the cozy atmosphere they bring.
-
Charming Pillow Covers: These can feature the same granny square design, adding an inviting flair to your living space.
-
Stylish Coasters: Use smaller squares to make coasters that echo the solid granny square aesthetic, perfect for your coffee table.
-
Matching Bag: Create a lovely tote using the granny square pattern that complements your cozy squares, perfect for crafting on the go.
-
Warm Blanket: Join multiple squares together for a cozy throw that wraps you in the warmth of your handiwork.
-
Snug Beanie: A simple beanie uses the same solid granny square design to keep you warm while looking effortlessly chic.
How to Wash and Care for Your Solid Granny Square
-
Machine Washing: Use cold water on a gentle cycle to prevent felting or pilling, keeping your solid granny square looking fresh and vibrant.
-
Hand Washing: For a more delicate approach, gently hand wash in cool water, allowing your square to soak for a few minutes before rinsing thoroughly.
-
Drying/Blocking: Lay your solid granny square flat on a clean, dry surface to reshape it; avoid hanging as this may distort the fabric.
-
Storage: Store your square in a cool, dry place, preferably in a breathable cotton bag to protect it from dust and moisture, maintaining its charming look.
Solid Granny Square Variations & Substitutions
Customize your crochet experience and add a personal touch to your creations with these delightful variations!
-
Color Play: Incorporate multiple colors into your square for a vibrant patchwork effect. Alternating colors in each round adds a playful twist.
-
Hook Size Swap: Use a smaller or larger hook to create different sizes of the granny square. Experimenting can yield unique proportions for every project!
-
Fiber Versatility: Experiment with different fibers like cotton or bamboo for varied textures. Each fiber offers its own drape, making your granny square stand out.
-
Embellished Edges: Add a round of single crochet or a decorative border to enhance the edges of your square. This finishing touch can give it a polished look.
-
Add Texture: Incorporate fun elements like fringe or pom-poms for a whimsical touch. These small additions can elevate your granny square's personality.
-
Larger Projects: Join multiple squares together to create a blanket or other larger pieces. This combines your ingenuity and patience into something wonderfully cozy.
-
Size Adjustments: Change the number of rounds to create smaller or larger squares. This flexibility allows you to tailor your piece for any application.
-
Personal Touch: Add embroidery or fabric patches for a personalized flair. This customization highlights your unique style and creates one-of-a-kind treasures.
Expert Tips for Solid Granny Square
-
Maintain Even Tension: Consistent tension is key! This will ensure your solid granny square doesn’t warp and keeps its perfect shape.
-
Count Stitches Carefully: For beginners, accurate stitch counting is vital. This helps maintain alignment and avoids any potential misshapes.
-
Don’t Rush the Slip Stitch: When closing your rounds, take your time with the slip stitch to ensure a neat join, helping the overall appearance.
-
Consider Blocking: After completing your square, blocking is recommended. This technique enhances the square shape and sharpens the edges beautifully.
-
Practice Connecting Squares: If making multiple squares, practice joining them with slip stitches for a seamless finish and a lovely final product.
Solid Granny Square FAQs
Can I use a different yarn than worsted weight?
Absolutely! While worsted weight yarn is recommended for the solid granny square, you can experiment with other yarn weights. Just remember that altering the yarn weight may require you to adjust your hook size and keep an eye on your gauge to maintain the overall dimensions.
How do I make my solid granny square larger or smaller?
To size up your solid granny square, you can increase the number of rounds you crochet or use a larger hook. For a smaller square, reduce the number of rounds or switch to a finer yarn and smaller hook. Just ensure your tension remains consistent for a nifty finish!
Why is my work curling up at the edges?
Don't panic! Curling is often a result of inconsistent tension or working too tightly. Check your stitch counts and try to relax your grip while crocheting. Adding a border of single crochet can also help straighten out the edges for that crisp finish you’re looking for.
What if I accidentally drop a stitch while crocheting?
It’s an easy fix! Simply pull the yarn back to the dropped stitch, then use your hook to weave the yarn back through the stitch. If you’re unsure of how many stitches you should have, count your stitches on the rows you've completed to see if adjustments are needed.
What hook size should I use for the solid granny square?
For this project, a 5.5 mm (I-9) hook is recommended. This size works beautifully with worsted weight yarn, providing a nice balance between stitch definition and ease of use. If you're using a different yarn weight, make sure to adjust your hook size accordingly to achieve the desired look and feel.

Leave a Reply