
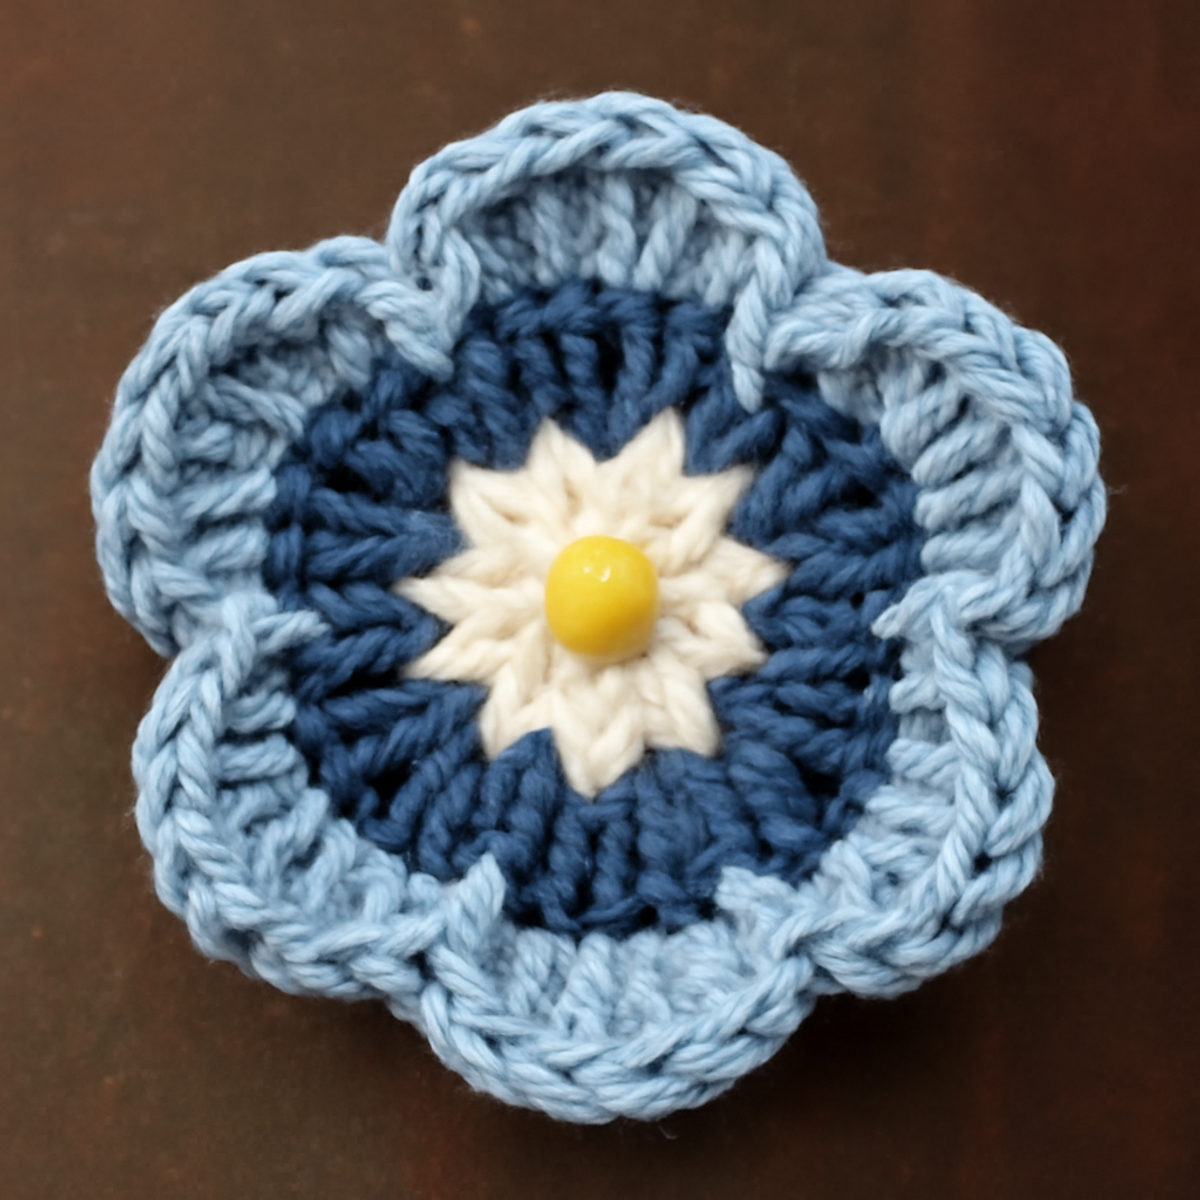
As I sat in my favorite nook, yarn spilling from my hands like a bouquet of possibilities, I found myself enchanted by the idea of a crochet flower brooch. This accessory isn’t just a beautiful ornament; it’s a joyful statement piece that effortlessly enhances jackets, bags, or hats. The crochet flower brooch is perfect for adventurous beginners and seasoned crocheters alike, offering a serene escape into the world of creativity. One of the best parts? It works up quickly, making it an ideal project for last-minute gifts or to brighten up your own wardrobe. Plus, you'll have the delightful opportunity to master essential stitches while bringing your floral vision to life. Let’s dive into this lovely little project and unleash our imaginations as we stitch together something truly special!
Crochet Flower Brooch Materials & Tools
- Medium Weight Yarn (DK) – Approximately 70-100 yards in cotton is ideal for durability and sheen in your crochet flower brooch.
- 4.0-5.0 mm (G-H) Hook – This size ensures a perfect stitch density to achieve those lovely petals.
- Yellow Button – A decorative accent for the center of your flower, adding charm and character.
- Stitch Marker – Handy for helping you keep track of your rounds when working on those beautiful layers.
Why Crochet Flower Brooch Shines?
Versatility: This charming accessory can adorn jackets, bags, or hats, seamlessly fitting any season or occasion.
Swift Crafting: With a quick turnaround time, you'll find yourself finishing this project in just about an hour—perfect for those unexpected gifting needs!
Engaging Techniques: Ideal for intermediate crocheters, the pattern encourages creativity while allowing you to practice essential stitches, enhancing your skills.
Textural Appeal: Experience the delightful plush texture created through specialized crochet techniques, making it a feast for the eyes as well as a joy to wear.
Customization Galore: Change color schemes, mix yarn textures, or add embellishments for a personalized touch that reflects your unique style.
Gauge & Sizing Notes
Don't skip the gauge swatch! Checking your tension is crucial for your crochet flower brooch to ensure each petal looks consistent and beautiful. A general gauge guideline to follow is to work a 4×4 inch (10×10 cm) square using appropriate techniques; for instance, it might help to aim for 14 double crochets by 8 rows. If you find that your tension doesn't match, adjusting your hook size can help—if your swatch is a bit small, try going up a hook size. To make your flower brooch larger, you can increase your starting chain in multiples of 2 for the petals. Happy crocheting!
Step-by-Step Pattern for crochet flower brooch
Row 1: Start with the Center
Begin by creating a magic ring. Within this ring, work 10 dc to form the center of your crochet flower brooch. Pull the tail to tighten the ring, then sl st to the top of the first dc to join. Your work should form a small circle, providing a solid base for the rest of the flower (10 sts).
Row 2: Create the Petal Base
Ch 2 (counts as first dc), then work 1 dc in the same stitch. For this round, make 2 dc in each of the next 9 stitches around, creating a lovely ruffled effect for your petals. Join with a sl st to the top of the initial ch-2. The flower's base should now be full and slightly rounded, with a total of 20 sts.
Row 3: Forming the Petals
To create petals, ch 5, then sl st into the next stitch. Repeat this sequence in each stitch around until you've worked a total of 10 petals. The flower's structure should start to show clear petal shapes, contributing beautifully to the decorative aspect of the crochet flower brooch. You should have 10 petals, evenly spaced.
Row 4: Enhancing the Petals
In this round, work 1 sc in the base of each petal. This creates a sturdy look for your crochet flower brooch. After completing the round, sc between each petal for evenness. Your work will begin to take on a more defined shape, with a total of 10 sc throughout this round.
Row 5: Add Texture
Now, to add depth, for every sc from the previous round, work 2 hdc and 1 sc for each petal. This will give your petals a more textured and fuller appearance. Join with a sl st to close this round, resulting in a beautiful, fluffy look for your flower (30 sts).
Step 6: Finishing Touches
To finalize your crochet flower brooch, work a round of sc all around the flower's edge, ensuring you crochet around the base of the petals. This will create a neat finish and help to maintain the flower's shape. After that, join with a sl st and fasten off, ready for embellishments, including the yellow button in the center. Your flower brooch should now stand proudly, showcasing its beauty!
What to Pair with the Brooklyn Flower Brooch?
Embrace the playful spirit of creativity with complementary projects that enhance the beauty of your crochet flower brooch.
-
Matching Hair Clips: Create adorable hair clips using the same yarn, perfect for a whimsy-filled look.
-
Charming Floral Bracelet: Charms crafted in a similar design can easily adorn your wrist, elevating your accessory game.
-
Cozy Flower Headband: A headband featuring additional flowers offers a delightful way to bring harmony to your outfit.
-
Vibrant Tote Bag: Pair your brooch with a matching tote bag to create a cohesive accessory set, ideal for outings.
-
Textured Scarf: A scarf in similar shades not only complements the brooch but also adds warmth and style to your ensemble.
Expert Tips for Crochet Flower Brooch
-
Tension Matters: Maintain consistent tension throughout your project to ensure uniform petal sizes. A tension ring can help achieve this lovely consistency.
-
Count Stitches: Keep track of your stitch counts after each round. It's easy to lose count, especially when working in rounds. Use a stitch marker for added assistance!
-
Steadily Join Rounds: When joining rounds, ensure that the slip stitch is placed neatly. It can be done in the back loop for a less visible finish to your crochet flower brooch.
-
Finish with Flair: Consider steam blocking your finished flower to enhance its shape, allowing the petals to lie flat beautifully and adding an inviting touch to your accessory.
-
Customize Wisely: If adding embellishments like beads or sequins, keep them minimal to maintain the flower's charm. Too many distractions can take away from its beauty!
How to Wash and Care for Your Crochet Flower Brooch
Machine Washing: Use a gentle cycle with cold water to keep your crochet flower brooch looking fresh while avoiding agitation that can cause felting or pilling.
Hand Washing: For the best results, gently hand wash your flower brooch in cool water with a mild detergent. Swirl it lightly to prevent any stress on the stitches.
Drying/Blocking: Lay your crochet flower brooch flat on a clean towel to dry. Shaping it during this process helps maintain its lovely design and texture.
Storage: Store your brooch in a cool, dry place away from direct sunlight. Keeping it in a breathable pouch can help maintain its shape and vibrancy.
Crochet Flower Brooch Variations
Customize your crochet flower brooch, and let your creativity bloom in delightful ways!
-
Color Play: Switch to pastel shades for spring or deep jewel tones for an autumn-inspired palette. Each color choice will tell its own story, transforming your flower into a seasonal celebration.
-
Textured Yarns: Experiment with yarns like boucle or chenille for added texture. The unique feel will elevate your brooch’s tactile appeal, making it not just a visual accessory but a sensory delight.
-
Size Adjustments: Use a larger hook or add extra rounds for a bolder flower. This simple adjustment can create a statement piece that draws attention and sparks conversation.
-
Embellishments: Add beads or sequins for a touch of sparkle. These little details can turn your flower brooch into a dazzling piece of art that catches the light just right.
-
Fringed Edges: Incorporate fringe along the edges of your petals for a playful twist. The added movement brings a lively energy to your brooch, making it stand out even more.
-
Color Blocking: Create a dynamic look by working petal sections in varying colors. This modern approach enhances the floral design and offers a fun visual contrast to traditional single-color blooms.
-
Layered Flowers: Make a bouquet of smaller flowers nestled together. This multicolored arrangement opens the door for a burst of creativity, perfect for pinning on jackets or decorating bags.
-
New Fibers: Consider using alternative fibers, such as bamboo or hemp, for eco-friendly options that can change the look and feel of your crochet flower brooch. Each fiber has its unique shine and drape, inviting fresh inspiration.
Brooklyn Flower Brooch FAQs
Can I substitute yarn for the crochet flower brooch?
Absolutely! While I recommend using medium weight cotton yarn for durability, feel free to experiment with other yarn types like acrylic or bamboo. Just be mindful that the texture and drape may vary depending on your choice.
How can I adjust the size of my crochet flower brooch?
If you want to create a larger flower, simply use a bigger hook or add extra rounds to the petals. Conversely, for a smaller flower, switch to a smaller hook or reduce the number of initial stitches. It can be a fun way to customize your piece!
Why is my crochet flower brooch curling at the edges?
Don't panic! Curling edges may happen if your tension is too tight or if you’re using a yarn that doesn’t hold its shape well. I recommend checking your tension throughout the project and gently blocking your finished piece to help it lay flat.
What hook size should I use for the crochet flower brooch?
I suggest using a 4.0-5.0 mm (G-H US letter) hook size to achieve the ideal stitch density for your crochet flower brooch. This size will help you maintain the plush and textured look of the petals while keeping everything neat.
How do I fix dropped stitches in my crochet flower brooch?
It's an easy fix! Simply grab a crochet hook of the same size, insert it into the stitch below the dropped one, and gently pull the working yarn through to re-establish the stitch. Just take your time, and soon those pesky dropped stitches will be a thing of the past!
What if my petals aren't evenly spaced?
If you're noticing uneven spacing, take a moment to count your stitches, ensuring you have the correct number per round. You can gently adjust your petals by pulling them apart or crocheting in the spaces to create more definition. Remember, every flower is unique, and that's part of the charm!

Leave a Reply